Sometimes, the simplest treats carry the loudest nostalgia. This no bake peanut clusters recipe is my go-to when I want something sweet and satisfying without the fuss of turning on the oven. It’s a nostalgic nod to childhood afternoons, where a handful of these sticky, crunchy bites felt like a little victory against the chaos of the day.
What I love most is how quick this comes together—just melting, mixing, and scooping. It’s perfect for those moments when you crave a sweet fix but don’t want to mess with complicated ingredients or long waits. Plus, the aroma of roasted peanuts and melted chocolate curling through the kitchen? It’s pure comfort, no matter your age.
Focusing on the nostalgic simplicity and the joy of creating something indulgent with minimal effort, especially for those who want a sweet treat without turning on the oven. This recipe celebrates the beauty of quick, no-fuss snacks that evoke childhood memories and satisfy cravings instantly.
Nostalgia in Every Bite
- This recipe takes me back to lazy Sunday afternoons, where I’d sneak bites before dinner was ready.
- I love how the sticky, crunchy texture is oddly satisfying—like a tiny, sweet rebellion against healthy eating.
- There’s a quiet pride in assembling these clusters quickly, knowing I’m creating a treat that’s both simple and deeply comforting.
- Sometimes, I make these just for myself, a small indulgence that feels like a warm hug after a long day.
- Every time I make them, I remember how easy it is to turn basic pantry staples into something special.
Nostalgic Crunch in a Snap
- This recipe was born out of a busy holiday season when I needed something quick, satisfying, and cut from the usual fuss. I remember rummaging through my pantry and realizing I had everything I needed for these peanut clusters—no oven, no fuss, just pure, sticky goodness. It became my go-to for small gatherings and quick gifts, especially when time was tight and cravings were high.
- What keeps me coming back is how these clusters capture that perfect balance of salty and sweet, with a crunch that’s just right. It’s the kind of treat that’s almost too simple—melting chocolate, roasted peanuts, a touch of honey—and somehow, it turns into a little moment of joy in my day. Plus, the aroma of melting chocolate mingling with toasted peanuts? That’s pure comfort, straight from the bowl.
- heading: ‘The story behind this recipe’
Trivia and Historical Tidbits
- These peanut clusters likely originated as a homemade candy treat in early American kitchens, where resourcefulness and simplicity reigned supreme.
- During the Great Depression, no-bake recipes like this gained popularity because they used minimal ingredients and no oven needed, making them accessible to many families.
- The combination of chocolate and peanuts has roots in Southern confectionery traditions, evolving into countless variations over decades.
- In the 1950s, with the rise of convenience foods, recipes like these became a staple for quick holiday gifts and church bake sale treasures.
- Modern twists, such as adding sea salt or swapping dark chocolate, keep this nostalgic recipe relevant and endlessly adaptable.
Ingredient breakdown: key components
- Peanut butter: I prefer a creamy variety for smoothness, but crunchy works if you like extra texture—just watch for peanut chunks that can be a bit distracting when biting into these clusters.
- Chocolate chips: Semi-sweet melts nicely and leaves a rich, mellow flavor. If you want a deeper chocolate hit, swap in dark chocolate—just keep an eye on the melting process so it doesn’t seize.
- Honey: I use honey for a touch of chewiness and sweetness that sticks everything together, but maple syrup is a decent swap—just keep in mind it’s a bit thinner and might make the mixture more runny.
- Roasted peanuts: The aroma of toasted nuts is what really elevates these clusters. If you’re out, chopped cashews or almonds work well, but skip raw nuts unless you toast them first for that smoky crunch.
- Vanilla extract: It’s subtle but essential—adds warmth and depth. If you’re out, a pinch of almond extract can add a different but lovely flavor dimension.
- Salt: Just a pinch enhances the chocolate and peanut flavor. Fine sea salt flakes sprinkled on top after setting can add a nice salty crunch—don’t skip it!
- Optional add-ins: Dried cranberries or coconut flakes can make these more festive. Add just before shaping to keep their texture intact and avoid sogginess.
Spotlight on key ingredients
Peanut butter:
- I prefer creamy for smoothness; crunchy adds texture but watch for peanut chunks that can distract when biting into clusters.
- Chocolate chips: Semi-sweet melts evenly, leaving a mellow flavor. For a richer taste, switch to dark chocolate—mind the melting process so it doesn’t seize.
- Roasted peanuts: The toasted aroma is crucial; if you skip toasting, the flavor dulls. Chopped almonds or cashews work as substitutes, but toast them first for the best crunch.
Chocolate:
- Melts into a glossy, smooth coating that’s both rich and slightly bitter. White chocolate can be used for sweetness, but it melts differently and is less forgiving.
- Honey: Adds stickiness and a gentle sweetness that helps everything bond. Maple syrup or agave can replace it, but expect a slightly different texture and flavor profile.
Notes for ingredient swaps
- Dairy-Free: Swap milk chocolate for coconut or cashew-based chocolates. Expect a slightly different melt and flavor, but still rich and smooth.
- Nut Variations: Use chopped almonds or cashews instead of peanuts. They bring a different crunch and flavor profile, especially if toasted first.
- Sweetener: Replace honey with maple syrup or agave nectar. These will alter the stickiness slightly, and the flavor will shift accordingly.
- Chocolate Type: Dark chocolate can deepen the flavor, while white chocolate adds sweetness and a milky note. Adjust melting time slightly.
- Salt: A pinch of sea salt or flaky salt on top enhances everything. Skip if you prefer a sweeter, less savory bite.
- Add-ins: Cranberries, shredded coconut, or mini marshmallows can be mixed in for variety. Add just before shaping to prevent sogginess.
- Oil for Melting: Use coconut oil or vegetable oil if melting chocolate in a double boiler instead of microwave. Keeps the chocolate smooth and shiny.
Equipment & Tools
- Large mixing bowl: Mix ingredients thoroughly
- Microwave-safe bowl: Melt chocolate and honey safely
- Baking sheet with parchment paper: Set clusters without sticking
- Spoon or cookie scoop: Portion and shape clusters
- Spatula or stirring spoon: Stir melted chocolate and ingredients
Step-by-step guide to no bake peanut clusters
- Gather your equipment: a large mixing bowl, a microwave-safe bowl, a baking sheet, and parchment paper. The bowl is for mixing, the microwave bowl for melting chocolate, the sheet for setting clusters.
- Line your baking sheet with parchment paper. This prevents sticking and makes cleanup easier.
- In the microwave-safe bowl, combine chocolate chips and honey. Microwave in 30-second bursts, stirring each time, until smooth and glossy. About 1-2 minutes total.
- While the chocolate melts, toast the peanuts lightly in a dry pan over medium heat for 3-4 minutes, until fragrant and slightly golden. Let them cool for a few minutes.
- Pour the toasted peanuts into the melted chocolate mixture. Add vanilla extract and a pinch of salt. Stir well until evenly coated.
- Using a tablespoon or small cookie scoop, drop spoonfuls of the mixture onto the prepared baking sheet. Gently press down to flatten slightly if desired.
- Let the clusters set at room temperature for about 30 minutes, or refrigerate for 15 minutes for faster setting. They should be firm and shiny when ready.
- Once set, gently peel the clusters from the parchment paper. Store in an airtight container at room temperature for up to a week, or freeze for longer storage.
Let the clusters rest at room temperature or in the fridge until firm. Then, peel gently and store in an airtight container. Serve directly from the fridge for a firmer bite or at room temp for a softer chew.
How to Know It’s Done
- Chocolate is fully melted and smooth without lumps.
- Peanuts are toasted and fragrant, not raw or soggy.
- Clusters are firm and shiny, not sticky or greasy.
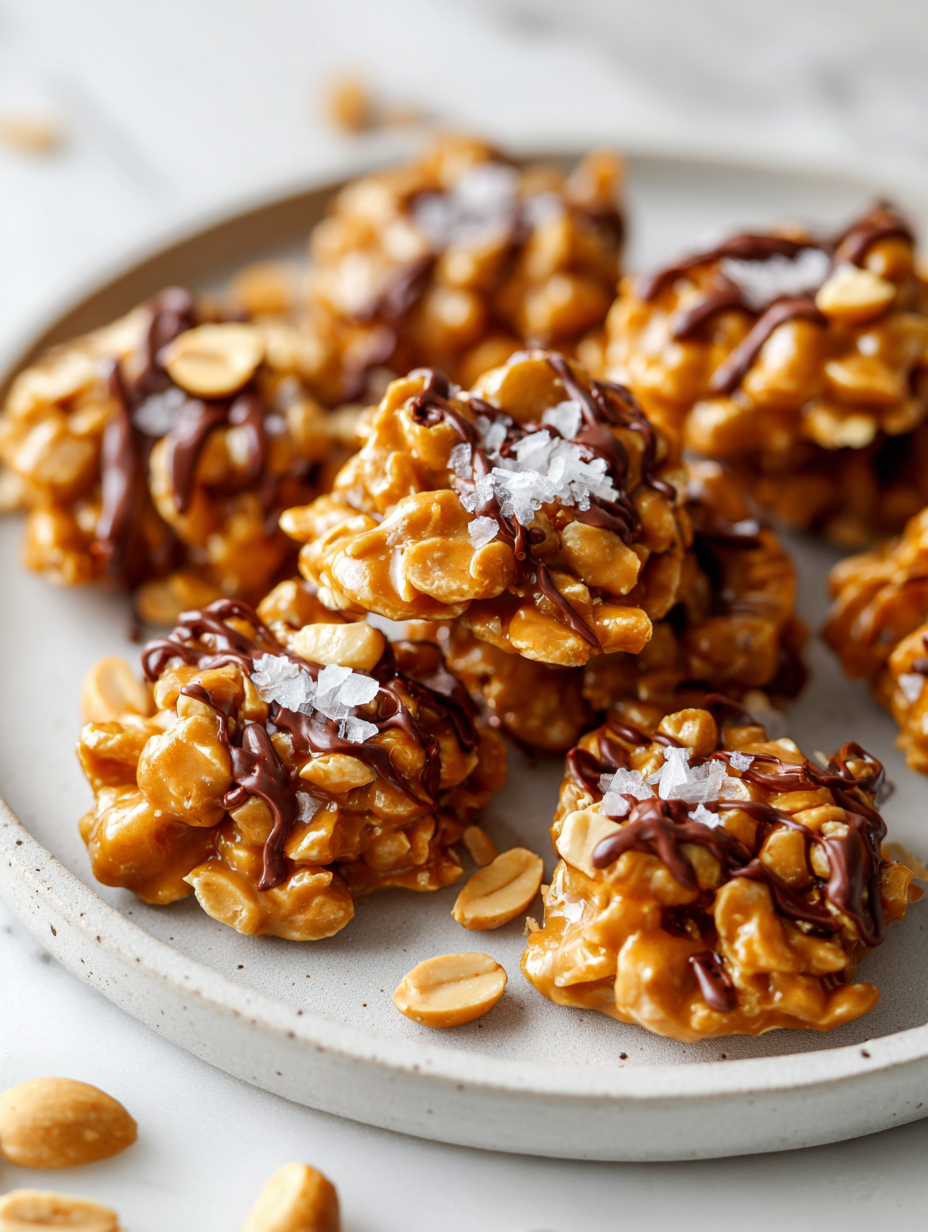
No-Bake Peanut Clusters
Ingredients
Equipment
Method
- Line a baking sheet with parchment paper and set aside.
- Place the chocolate chips and honey in a microwave-safe bowl and microwave in 30-second intervals, stirring each time, until the mixture is smooth and glossy.
- While the chocolate melts, lightly toast the peanuts in a dry skillet over medium heat for about 3-4 minutes until fragrant and golden, then let them cool slightly.
- Pour the toasted peanuts into the melted chocolate mixture, add vanilla extract and a pinch of salt, then stir until the peanuts are evenly coated with the chocolate.
- Using a spoon or cookie scoop, drop spoonfuls of the mixture onto the prepared parchment-lined sheet, pressing down gently to flatten if desired.
- Let the clusters set at room temperature for about 30 minutes, or refrigerate for 15 minutes until firm and shiny.
- Once set, peel the clusters from the parchment paper and store in an airtight container at room temperature or in the fridge for up to a week. Enjoy these crunchy, sticky bites whenever cravings hit!
Notes
Pro Tips for Perfect Clusters
- Bolded Mini-Head: Use low heat when melting chocolate, stirring constantly to prevent seizing and ensure glossy smoothness.
- Bolded Mini-Head: Toast peanuts lightly in a dry pan until fragrant; this enhances aroma and adds a smoky crunch to your clusters.
- Bolded Mini-Head: Mix ingredients quickly once melted to keep the texture sticky but manageable, avoiding tough or dry clusters.
- Bolded Mini-Head: Chill the clusters in the fridge until firm—about 15 minutes—to make handling and storing easier.
- Bolded Mini-Head: Add a pinch of flaky sea salt on top after setting for a burst of flavor contrast that elevates the sweet-salty balance.
Common mistakes and how to fix them
- FORGOT to stir chocolate thoroughly → Stir consistently for smooth melting.
- DUMPED in all ingredients at once → Add ingredients gradually for even coating.
- OVER-TORCHED the chocolate → Melt on low power, watch for gloss, not scorched lumps.
- MISSED the chill step → Chill clusters until firm, avoids melting when handling.
Quick fixes and pantry swaps
- If chocolate seizes, splash in a teaspoon of vegetable oil and stir until glossy.
- When nuts stick to the bowl, rinse with warm water and dry thoroughly before reusing.
- Splash cold water on your hands if mixture is too sticky to handle easily.
- Patch over cracks by pressing extra mixture into the gaps before chilling again.
- Shield from humidity and serve at room temperature for best flavor and texture.
Prep, store, and reheat tips
- You can prepare the mixture a day in advance; keep it covered in the fridge to prevent moisture absorption and maintain freshness.
- Store the clusters in an airtight container at room temperature for up to a week; for longer, freeze for 1-2 months, ensuring they’re well wrapped to prevent freezer burn.
- Refrigerating briefly before serving helps firm up the clusters, making them easier to handle and preventing melting if your kitchen is warm.
- If reheating is needed, gently warm in short bursts in the microwave—10 seconds at a time—until just soft enough to bite, watching for melting or burning aromas.
Top questions about peanut clusters
1. Can I use a different nut butter?
Yes, you can swap peanut butter with almond or cashew butter; it changes the flavor but still works well.
2. Is microwave melting necessary or can I use a double boiler?
Microwave melting is quickest, but double boiler works if you prefer gentle heat; just watch for burning.
3. How long do these last and what’s the best storage method?
Storing in an airtight container at room temp keeps them fresh for about a week; for longer, freeze for up to 2 months.
4. Should I add salt on top or mix it in?
Adding a pinch of sea salt on top after setting enhances the flavor with a salty crunch; sprinkle lightly for best effect.
5. My mixture is too sticky, what can I do?
If the mixture is too sticky, chill it in the fridge for 10-15 minutes before forming clusters.
6. Can I add other ingredients like dried fruit?
You can add dried fruits or coconut flakes for variety; add before shaping the clusters so they stick well.
7. How can I speed up setting time?
Refrigerate for 15 minutes to help set the clusters faster and keep them firm.
8. My melted chocolate is seized, how do I fix it?
If the chocolate seizes, stir in a teaspoon of oil and heat gently until smooth again.
9. What type of chocolate works best?
Use semi-sweet or dark chocolate for a richer flavor, or white chocolate for a sweeter, creamier taste.
10. Nuts are sticking to my bowl, what should I do?
To prevent nuts from sticking to the bowl, rinse with warm water and dry thoroughly before reuse.
Making these no bake peanut clusters is a small act of kindness I keep coming back to. The smell of melting chocolate mingling with toasted peanuts still pulls me in every time. It’s a simple pleasure that reminds me how satisfying quick, honest treats can be, especially when life feels a bit chaotic.
In the end, it’s about those little moments—cracking open the fridge and grabbing a cluster, feeling that perfect crunch and sweet, salty bite. No matter how busy the day, these clusters bring a quiet joy and a sense of comfort that’s hard to find elsewhere.