This recipe is born out of those moments when I need a sweet fix in a flash, without the fuss of baking. It’s about turning humble pantry staples—oats, cocoa, a bit of butter—into something that feels like a treat but is practically instant. There’s a certain satisfaction in no-bake recipes, especially when they come together with a few simple ingredients and a dash of patience.
I love how these chocolate oat bites remind me of childhood snacks, yet they’re perfectly suited for grown-up cravings too. They’re a little messy to make, but that’s part of the charm—getting your hands sticky, feeling the chocolate melt, and shaping each bite. It’s honest cooking, no pretenses, just good ingredients mingling into something comforting and easy to grab on a busy day.
This recipe is inspired by the need for a quick, satisfying treat that’s both nostalgic and adaptable, perfect for when you want something sweet without turning on the oven. It’s about turning simple pantry staples into a comforting snack, especially during busy days or when craving a little indulgence that’s easy to share.
Nostalgic Comfort in Every Bite
- These bites remind me of lazy Sunday afternoons, when my grandma’s kitchen smelled of cocoa and warmth.
- I get a little thrill every time I squeeze the last drop of honey into the mixture—sweet, sticky, and so satisfying.
- There’s a rush of pride in turning simple ingredients into something that disappears faster than I can make it.
- Cracking the chocolate and watching it melt into the oats feels like a tiny, delicious victory each time.
- I love how these little bites are both a quick fix and a nostalgic comfort—perfect for busy mornings or late-night cravings.
Nostalgic Comfort in Every Bite
This recipe came together on a night when I was craving something sweet but had no energy to turn on the oven. I remembered how my grandmother used to toss oats and cocoa together in a rush, creating quick snacks that felt like a hug. It’s become my go-to for those busy mornings or when I need a small, honest treat that doesn’t demand much fuss. There’s a certain charm in mixing up ingredients by hand, feeling the sticky oats and melting chocolate come together into something I can shape with my own two hands.
Historical & Cultural Tidbits
- These no-bake chocolate oat bites have roots in resourceful pantry cooking, dating back to when baking supplies were scarce.
- They echo the mid-20th century trend of simple, no-heat treats that could be whipped up quickly during post-war rationing.
- Originally, recipes like this used leftover oats and bits of chocolate, turning everyday ingredients into a satisfying snack.
- Today, they’re a modern twist on nostalgic homemade snacks, perfect for busy mornings or spontaneous cravings.
Ingredient breakdown: key components
- Rolled oats: I love the hearty chew they bring, but if you prefer a softer bite, try quick oats instead.
- Cocoa powder: Unsweetened gives a deep, rich flavor; sweetened cocoa can make the bites overly sugary if you’re not careful.
- Honey or maple syrup: I use honey for its sticky sweetness that holds everything together, but maple adds a subtle smoky note—swap based on your flavor mood.
- Butter: It adds richness and helps the mixture set; for a dairy-free version, coconut oil works but results in a slightly different texture.
- Chocolate chips: I prefer dark because they melt into the bites, creating little pockets of gooey chocolate—use milk or white for a sweeter, creamier bite.
- Vanilla extract: Just a splash lifts the cocoa flavor with a warm, fragrant note—skip if you want a more intense chocolate punch.
- Optional add-ins: Nuts, dried fruit, or seeds—go wild, but toast them first for extra crunch and flavor pop.
Spotlight on key ingredients
Oats:
- Rolled oats: I love the hearty chew they bring, but if you prefer a softer bite, try quick oats instead.
- Cocoa powder: Unsweetened gives a deep, rich flavor; sweetened cocoa can make the bites overly sugary if you’re not careful.
- Honey or maple syrup: I use honey for its sticky sweetness that holds everything together, but maple adds a subtle smoky note—swap based on your flavor mood.
Chocolate:
- Chocolate chips: I prefer dark because they melt into the bites, creating little pockets of gooey chocolate—use milk or white for a sweeter, creamier bite.
- Butter: It adds richness and helps the mixture set; for a dairy-free version, coconut oil works but results in a slightly different texture.
Notes for ingredient swaps
- Dairy-Free: Swap butter for coconut oil. It melts into the mixture smoothly but adds a subtle coconut aroma.
- Sweetener Choice: Use agave syrup or brown rice syrup instead of honey. They bring a different sweetness profile but keep things sticky.
- Oats: Quick oats can be used for a softer, more tender bite, whereas old-fashioned oats give a chewier texture.
- Chocolate: Swap dark chocolate chips for white or milk chocolate for a sweeter, creamier experience. Expect a different melt and flavor.
- Add-ins: Nuts or dried fruits — toast them first to boost flavor and crunch, or skip for a cleaner bite.
- Cocoa Powder: Use Dutch-processed for a smoother, less acidic chocolate flavor, or natural cocoa for a brighter, tangier note.
- Binders: For extra chewy bites, add a spoonful of nut butter or a splash of maple syrup—adjust for stickiness.
Equipment & Tools
- Mixing bowl: Combine and fold ingredients
- Spatula: Mix and fold ingredients smoothly
- Saucepan: Melt butter and sweetener gently
- Parchment paper: Prevent sticking and for easy cleanup
- Teaspoon or small scoop: Portion out and shape bites
- Refrigerator: Set and firm up the bites
Step-by-step guide to no-bake bites
- Gather your equipment: a mixing bowl, a spatula, a baking sheet, and parchment paper. The bowl is for mixing, the sheet for chilling, and parchment keeps things tidy.
- In the mixing bowl, combine 1 1/2 cups rolled oats, 1/2 cup unsweetened cocoa powder, and a pinch of salt. Stir well to distribute evenly.
- Melt 1/2 cup butter (or coconut oil for dairy-free) with 1/3 cup honey or maple syrup. Do this in a small saucepan over low heat, just until smooth and fragrant (about 2 minutes).
- Pour the warm melted mixture into the dry ingredients. Use the spatula to fold everything together until the oats are evenly coated and sticky. It should look thick and glossy.
- Add 1/2 cup chocolate chips or chunks, folding gently to distribute. The mixture should be tacky but manageable; if too dry, add a splash more honey.
- Line your baking sheet with parchment paper. Using a teaspoon or small scoop, portion out the mixture and roll into compact balls or press into a rough rectangle, then cut into squares.
- Place the formed bites onto the prepared sheet, spacing them about 2 inches apart. Flatten slightly if you prefer a more cookie-like shape.
- Refrigerate the tray for at least 30 minutes, or until the bites are firm and set. If in a hurry, you can freeze them for 15 minutes, but they taste best after a proper chill.
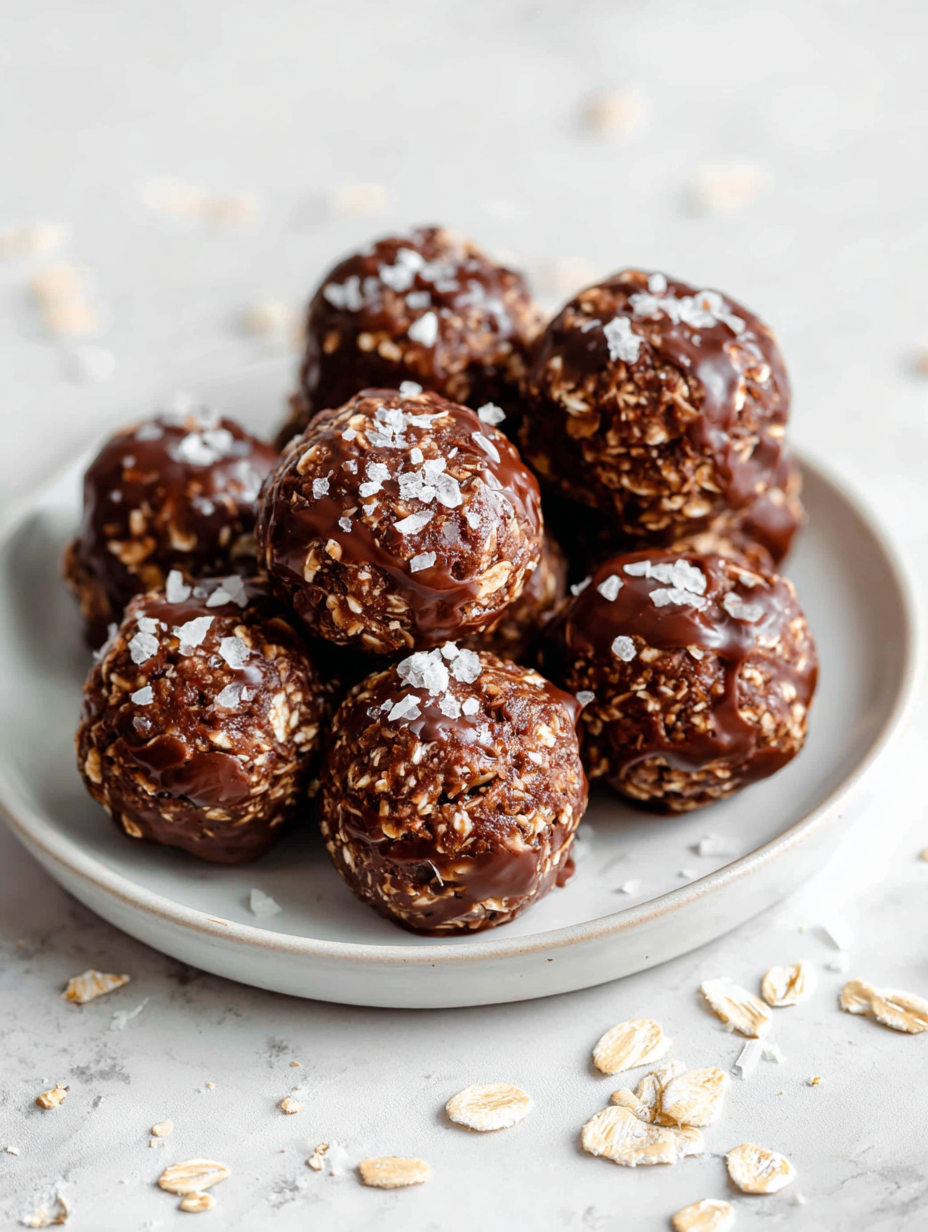
- Once firm, remove from the fridge. The bites should be chewy, with a shiny, chocolatey exterior. They are ready to enjoy or store.
- Store in an airtight container in the fridge for up to a week, or freeze for longer storage. Let come to room temp or warm slightly before serving for maximum gooeyness.
Refrigerate until completely firm, about 30 minutes. Serve directly from fridge for chewy texture, or let sit at room temp for a few minutes to soften slightly. Plate on a small dish or store in an airtight container.
How to Know It’s Done
- Mixture is thick, glossy, and holds shape when pressed.
- Chocolate chips are partially melted and evenly dispersed.
- Bites are firm and set after refrigeration, not sticky or greasy.
No-Bake Chocolate Oat Bites
Ingredients
Equipment
Method
- In a mixing bowl, combine the rolled oats, cocoa powder, and vanilla extract, stirring until evenly mixed.
- In a small saucepan, melt the butter over low heat, then stir in honey until the mixture is smooth and fragrant.
- Pour the warm butter and honey mixture into the dry ingredients, folding everything together with a spatula until the oats are thoroughly coated and the mixture is sticky and glossy.
- Add the chocolate chips to the mixture and gently fold to distribute evenly, ensuring pockets of melted chocolate form.
- Line a baking sheet with parchment paper and use a teaspoon or small scoop to portion out the mixture, shaping each into compact balls or pressing into a rough rectangle.
- Place the tray in the refrigerator and chill for at least 30 minutes until the bites are firm and set.
- Once firm, remove the bites from the fridge and enjoy their chewy, chocolatey exterior with a hearty interior.
Pro tips for perfect bites
- Chill the mixture briefly before shaping — it firms up, making rolling easier and less sticky.
- Use slightly softened butter for smoother melting and even distribution into the dry ingredients.
- When melting chocolate, do it slowly over low heat or in short bursts in the microwave to prevent scorching.
- For extra shine, add a tiny pinch of salt to the chocolate mixture — it enhances the cocoa depth.
- Press the mixture firmly into your tray to eliminate air pockets and ensure compact bites.
- Store bites in an airtight container in the fridge to keep them chewy and prevent melting at room temp.
- For a richer chocolate flavor, toast the oats lightly in a dry pan before mixing — adds depth and aroma.
Common mistakes and how to fix them
- FORGOT to adjust sweetness → taste and add more or less honey accordingly.
- DUMPED mixture too early → let it chill longer for better binding and texture.
- OVER-TORCHED chocolate → lower heat and stir constantly to prevent burning.
- MISSED the setting point → refrigerate until bites are firm and shiny, not sticky.
Quick fixes and pantry swaps
- If mixture is too dry → splash in a bit more honey or melted butter.
- When bites are sticky → refrigerate for 15 minutes to firm up quickly.
- Splash melted chocolate over bites → add shimmer and extra flavor.
- Patch over cracks with a tiny bit of melted chocolate for a polished look.
- Shield delicate bites from moisture by storing in an airtight container.
Make-Ahead and Storage Tips
- You can prepare the mixture a day in advance; keep it covered in the fridge to prevent drying out, and it will taste even better after the flavors meld.
- Store the assembled bites in an airtight container in the fridge for up to a week; the cool temperature helps maintain their chewy texture.
- For longer storage, freeze the bites for up to three months; wrap tightly to prevent freezer burn and preserve the chocolate flavor.
- Refrigerated bites become chewy and firm, with a rich chocolate aroma. Let them sit at room temperature for 5 minutes to soften slightly before eating.
Top questions about no bake chocolate oat bites
1. Can I use quick oats instead of rolled oats?
Use rolled oats for chewiness; quick oats make them softer and less chewy.
2. How do I know when the bites are set?
Refrigerate for at least 30 minutes until firm and shiny, not sticky or greasy.
3. Can I substitute honey with another sweetener?
Yes, swap honey for maple syrup or agave; they are equally sticky and sweet.
4. How long do these bites last in the fridge?
Store in an airtight container in the fridge for up to a week, or freeze for longer.
5. How do I melt chocolate without burning it?
Melt chocolate slowly over low heat or in short bursts to prevent burning.
6. Any tips for boosting flavor in these bites?
Add a pinch of salt to enhance cocoa flavor or toast oats for extra aroma.
7. What if my mixture is too dry or too sticky?
If mixture is too dry, add a little more honey or melted butter; if too sticky, chill briefly.
8. Can I make these bites ahead of time?
You can prepare the mixture the night before; just keep it covered in the fridge.
9. What’s a good dairy-free substitute for butter?
Yes, for a dairy-free version, use coconut oil instead of butter, which adds a subtle coconut scent.
10. How do I fix bites that are too soft?
If bites are too soft, freeze them for 10-15 minutes before serving.
These no-bake chocolate oat bites are a reminder that simple ingredients can create something both nostalgic and satisfying. They come together quickly, making them perfect for unexpected cravings or busy days when you need a little sweetness without the fuss.
Once chilled, they offer a chewy, chocolatey bite that’s hard to resist. Sharing them feels like passing along a small, honest joy—no matter the season or occasion, they’re a little treat that always fits.

Hello, I’m Oliver James, the person behind Melting Into Flavors. Cooking is my greatest passion, and it’s been the driving force in my life for as long as I can remember.
It’s not just about food for me; it’s about creating experiences, connecting with others, and sharing the love I have for what’s on the plate. Through this blog and my café, I’m able to share my journey with all of you and hopefully inspire some of your own culinary adventures along the way.


