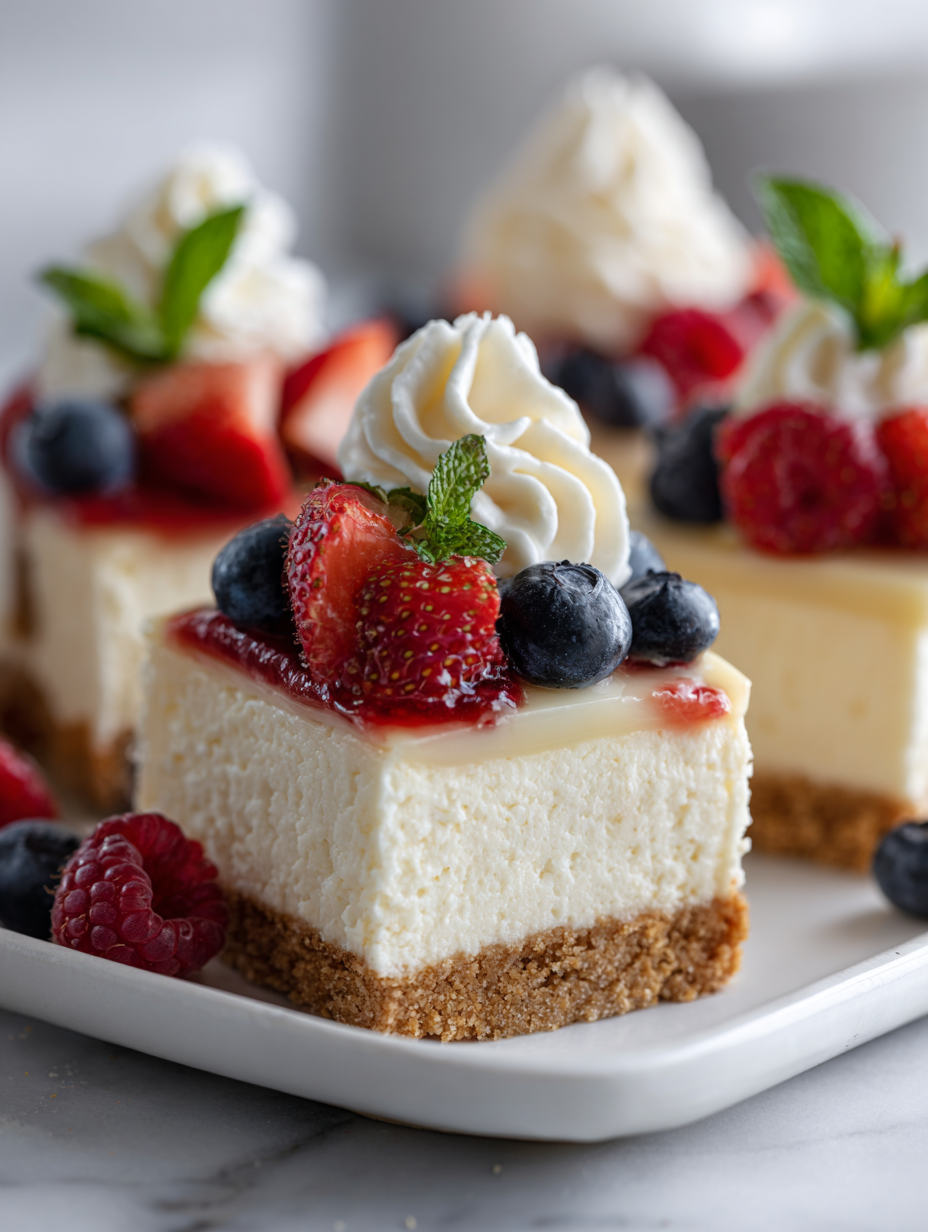
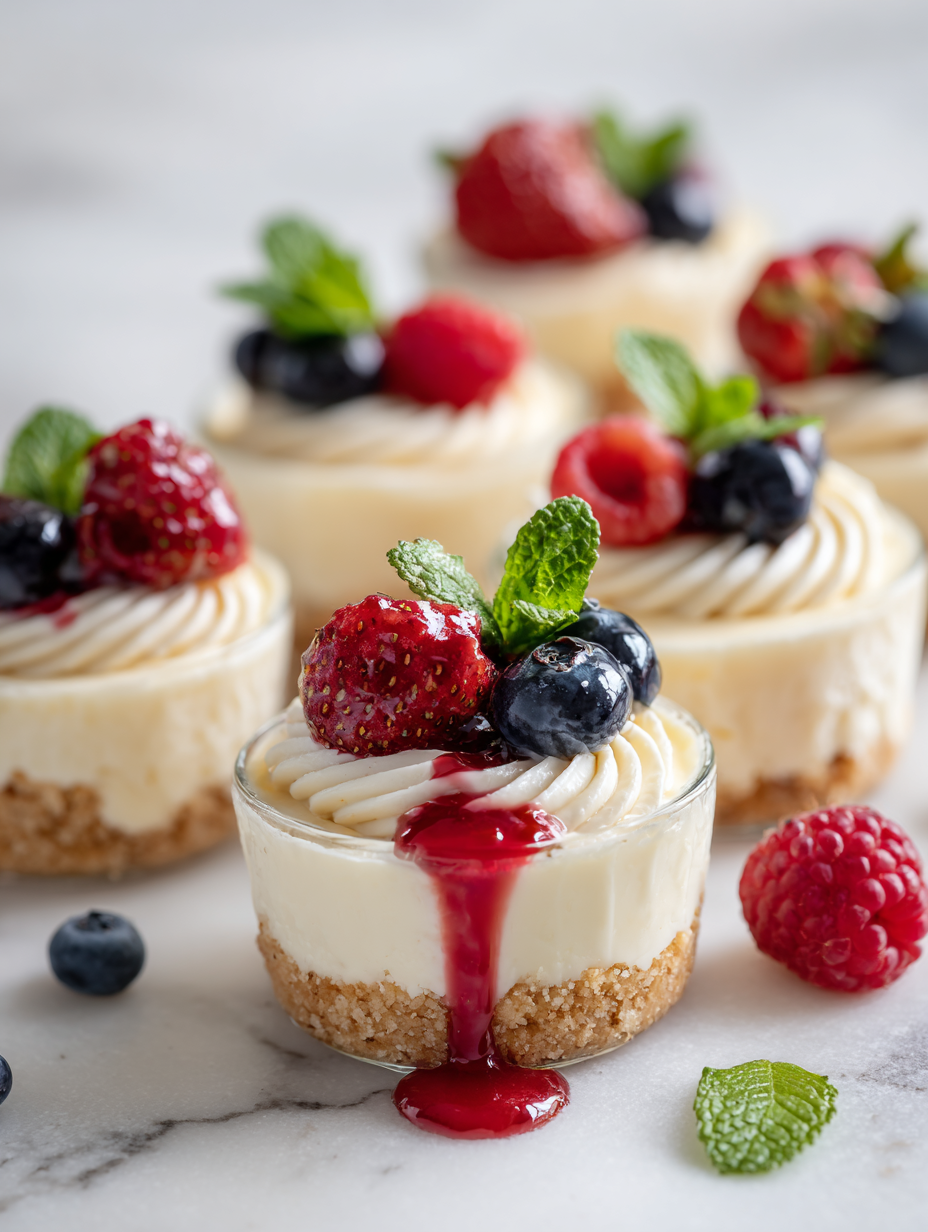
Sometimes, the best desserts are the ones you can whip up in minutes, without turning on the oven or making a mess. These no-bake mini cheesecakes are exactly that—small, creamy bites of decadence that feel fancy but are dead simple to pull together after a long day or last-minute guest plans. I love how they combine rich, tangy cream cheese with a buttery graham cracker crust, all chilled to perfection in the fridge.
What makes this recipe special isn’t just the ease, but the little moments it brings. It’s the kind of dessert that feels indulgent without the heavy feeling afterward, perfect for weekdays or when you want something sweet without the fuss. Plus, they’re versatile—top them with fresh berries, a drizzle of caramel, or a sprinkle of crushed cookies, whatever strikes your mood.
This recipe is inspired by my late-night craving for a fancy dessert that’s quick, no fuss, and doesn’t dirty a single dish. It’s my secret weapon for impromptu gatherings or when I need a sweet fix after a long day. I love how these mini cheesecakes feel indulgent but come together in a flash, making dessert feel less like a production and more like a cozy treat.
A Sweet Escape in Minutes
- I love how these mini cheesecakes feel like a little luxury, even on the busiest days.
- There’s a quiet joy in assembling these in my pajamas, listening to old jazz records.
- Whenever I make these, I remember my first dinner party—everyone was surprised how effortless dessert could be.
- These tiny treats have saved me more times than I can count during last-minute gatherings or when cravings hit hard.
- There’s a nostalgic comfort in their creamy tang, reminding me of summer picnics and family laughs.
The story behind this recipe
This recipe came about on a night when I was overwhelmed and needed a sweet escape that wouldn’t require turning on the oven or making a mess. I’d been craving something creamy, tangy, and satisfying, but didn’t want to spend hours in the kitchen. The idea of a no-bake cheesecake that could be assembled quickly and still feel indulgent stuck with me. It’s become my go-to for last-minute cravings and casual get-togethers, and honestly, it’s the kind of treat that feels like a small victory in simplicity.
Historical Tidbits of No-Bake Cheesecakes
- These no-bake cheesecakes have roots in 20th-century American dessert innovation, where convenience became key.
- The concept of a chilled, set cheesecake dates back to European recipes from the 1800s, adapted over time for quick American versions.
- Mini desserts like these gained popularity in the 1950s as party-friendly, individual servings that required no slicing or fuss.
Key Ingredients and Tips
- Cream cheese: I prefer full-fat for that rich, silky texture that feels indulgent. If you want lighter, try Neufchâtel—just watch for a slightly less creamy result.
- Graham cracker crumbs: I crush these until they’re fine but still a bit coarse, for a satisfying crunch. Swap with digestive biscuits if you’re outside the US, but expect a slightly denser crust.
- Butter: I melt unsalted butter until it’s just shimmering, which helps the crumbs stick together. Use salted if that’s what you’ve got, just cut back on salt in the crust.
- Sugar: I use granulated for a clean sweetness, but brown sugar can add a caramel note if you like a deeper flavor—just reduce the overall sugar slightly.
- Lemon juice: I love the bright zing it adds, cutting through the creaminess. Skip if you prefer a more neutral cheesecake, but it really lifts the flavor.
- Toppings: Fresh berries or a drizzle of honey work wonders. I like to use whatever’s ripe and in season—makes the dessert feel fresh and vibrant.
- Optional flavorings: A splash of vanilla or a pinch of cinnamon can add a cozy touch. Just keep it light so it doesn’t overpower the cheesecake’s tang.
Spotlight on Cream Cheese and Graham Crackers
Cream cheese:
- I love how it turns silky and smooth when whipped, trapping air for a light texture. If it gets lumpy, just beat it longer or soften it first.
- It’s the backbone of this dessert—rich, tangy, and irresistibly creamy. When warmed slightly, it becomes easier to blend into a fluffy filling.
Graham crackers:
- When crushed fine, they create a crumbly, buttery base that holds together beautifully. Larger chunks add crunch and texture.
- The aroma of toasted graham layers adds a nostalgic, warm scent to the crust. If you prefer a richer flavor, try mixing in a pinch of cinnamon or cocoa powder.
Notes for ingredient swaps
- Dairy-Free: Swap cream cheese for coconut cream or tofu-based cream cheese. Expect a slightly different texture, more coconut-rich and less tangy.
- Gluten-Free: Use gluten-free graham crackers or crushed rice cereals. Keeps the crust crumbly but may alter the flavor slightly.
- Sweetener: Replace sugar with honey or maple syrup. Adds a different depth of sweetness and a touch of natural flavor.
- Lemon Juice: Use lime juice or omit entirely for a milder, less zesty flavor. Lemon brightens, but you can skip for a subtler tartness.
- Crust: Substitute Oreo crumbs (without the cream) for a chocolate twist or nuts for extra crunch. Be mindful of added fats and flavors.
- Toppings: Top with chopped nuts, toasted coconut, or fruit preserves instead of fresh berries for variety. Adds different textures and sweetness.
- Butter: Use vegan margarine or coconut oil for dairy-free options. Changes the richness but still holds the crust together well.
Equipment & Tools
- Mini muffin tin or small ramekins: Holds the crust and filling for individual portions.
- Mixing bowl: Combines ingredients smoothly.
- Spatula or small spoon: Fills and smooths the crust and filling.
- Piping bag or spoon: Distributes the cream evenly into the crusts.
Step-by-step guide to no bake cheesecakes
- Gather your equipment: a mini muffin tin or small ramekins, a mixing bowl, a spatula, and a piping bag or spoon for filling.
- Prepare the crust: In a bowl, combine 1 1/2 cups graham cracker crumbs, 1/4 cup sugar, and 1/2 cup melted butter. Mix until crumbs are evenly coated and resemble wet sand.
- Press the crust: Divide the mixture into the mini muffin tin or ramekins. Use the back of a spoon or a small glass to press firmly into the bottom, creating an even layer. Chill in the fridge for 15 minutes to set.
- Make the filling: In a large bowl, beat 16 oz (450 g) cream cheese until smooth and creamy. Add 1/2 cup powdered sugar, 1 teaspoon vanilla extract, and 2 tablespoons lemon juice. Mix until well combined and fluffy.
- Fill the cups: Using a spoon or piping bag, evenly distribute the cream cheese mixture over the chilled crusts. Smooth the tops with a spatula or the back of a spoon.
- Chill again: Cover loosely with plastic wrap or a lid. Refrigerate for at least 2 hours, or overnight for best set and flavor melding.
- Finish and serve: Just before serving, top with fresh berries, fruit compote, or a drizzle of honey if desired. Keep refrigerated until ready to enjoy.
Let the cheesecakes chill in the fridge for at least 2 hours, preferably overnight. Just before serving, add toppings to enhance flavor and presentation. Serve cold for the best texture—creamy and firm with a slight jiggle.
How to Know It’s Done
- Crust looks golden and holds together when pressed.
- Filling is smooth, with no lumps, and slightly firm on top after chilling.
- Cheesecake jiggles slightly when gently shaken but is not liquid.
No-Bake Mini Cheesecakes
Ingredients
Equipment
Method
- Combine the graham cracker crumbs and sugar in a mixing bowl until evenly mixed, then pour in the melted butter. Stir until the mixture resembles wet sand and holds together when pressed.
- Divide the crumb mixture evenly among the mini muffin cups or ramekins. Use the back of a small spoon or a glass to press the crumbs firmly into the bottom, creating a compact crust. Chill in the fridge for 15 minutes to set.
- While the crust chills, beat the softened cream cheese in a large bowl until smooth and fluffy. This helps incorporate air for a silky texture.
- Add the powdered sugar, lemon juice, and vanilla extract to the cream cheese. Mix until fully combined and the mixture is creamy and slightly thickened.
- Use a small spoon or piping bag to evenly distribute the cream cheese filling over the chilled crusts. Smooth the tops gently with the spatula for a neat appearance.
- Cover the mini cheesecakes loosely with plastic wrap or a lid and refrigerate for at least 2 hours or overnight. This allows the flavors to meld and the filling to firm up.
- Just before serving, top each mini cheesecake with fresh berries or your preferred toppings. Serve chilled and enjoy the creamy, tangy bites.
Pro tips for perfect no-bake cheesecakes
- Bolded mini-head: Chill crust thoroughly → Keeps it firm and easy to handle when filling.
- Bolded mini-head: Use room-temperature cream cheese → Whips up smoother, avoiding lumps and ensuring a silky texture.
- Bolded mini-head: Press crumbs firmly → Creates a sturdy base that won’t crumble when served.
- Bolded mini-head: Fold ingredients gently → Keeps the filling light and airy, avoid overmixing for a fluffy result.
- Bolded mini-head: Chill cheesecakes overnight → Develops flavor and firms up for perfect slicing and serving.
- Bolded mini-head: Top with chilled toppings → Keeps berries or other toppings fresh and vibrant, prevents sogginess.
- Bolded mini-head: Use a spatula for smoothing → Achieves an even surface, easier to decorate or add toppings.
Common mistakes and how to fix them
- FORGOT to chill crust? Repress and refrigerate for 15 minutes before filling.
- DUMPED filling too thick? Warm briefly and beat again for smoothness.
- OVER-TORCHED crust? Cover with foil and lower oven temp for a softer bake.
- MISSED jiggle test? Chill longer or gently shake to check consistency.
Quick fixes and pantry swaps
- When filling looks runny, chill it for 15 minutes to firm up.
- Splash a little lemon juice on the crust if it’s getting soggy quickly.
- Patch a cracked crust with a tiny bit of melted butter and press again.
- Shield delicate toppings with a thin layer of whipped cream to prevent sogginess.
- If the cheesecake is too soft, freeze for 20 minutes before serving to set it quickly.
Prep, store, and reheat tips
- Prepare the crust and filling components ahead of time; keep the crust refrigerated and the filling covered in the fridge for up to 24 hours. The flavors meld better after sitting overnight.
- Assemble the cheesecakes a few hours before serving; they taste best after at least 2 hours of chilling, allowing the texture to set properly and the flavors to deepen.
- Store leftovers tightly covered in the fridge for 2-3 days. The creamy texture remains stable, but toppings may become less vibrant over time.
- Reheat if desired by letting them sit at room temperature for 10-15 minutes, or add fresh toppings just before serving to enhance the sensory experience. The chill will mellow the tang and firm up the texture.
Top questions about no bake cheesecakes
1. Should I soften the cream cheese first?
Use room temperature cream cheese for a smooth, velvety texture without lumps. Cold cheese tends to be harder to blend.
2. How long should I chill before serving?
Chill the assembled cheesecakes for at least 2 hours, preferably overnight, to let flavors meld and texture set properly.
3. Why is my crust falling apart?
If the crust feels too soft, press it firmly into the pan and chill for 15 minutes before adding filling. Using melted butter helps it hold better.
4. Can I substitute the graham cracker crust?
Swapping graham crackers for digestive biscuits or crushed cookies works well. Expect slight changes in flavor and texture, but it still holds together.
5. Is lemon juice necessary?
Adding fresh lemon juice brightens the flavor and balances the richness. You can skip if you prefer a milder, less tangy cheesecake.
6. What toppings work best?
Top with fresh berries, fruit compote, or a drizzle of honey. Keep toppings chilled until serving to prevent sogginess.
7. How long can I keep leftovers?
Store leftovers in an airtight container in the fridge for up to 3 days. The texture stays creamy but toppings may soften.
8. My filling is too liquid; what now?
If filling is too runny, chill it for 15 minutes and then beat again. For cracks, smooth with a spatula during assembly.
9. How do I fill the cups evenly?
Use a piping bag or a small spoon for even filling. Press crust firmly to ensure it stays sturdy and crumbly.
10. How do I prevent cracks?
If cheesecake cracks, avoid overmixing the filling and ensure it’s well chilled before serving. Gently smooth the surface for a neat finish.
These no-bake mini cheesecakes come together fast and feel like a little reward after a busy day. Their creamy texture and bright flavor make them a perfect, no-fuss dessert that’s hard to resist. Sharing them feels like a quiet celebration, even on ordinary nights.
In a world that often moves too quickly, these tiny treats remind me that simple pleasures—like a chilled spoonful of tangy, silky cheesecake—are worth savoring. They’re a small, sweet pause that makes any moment feel just a bit more special.