This no-bake hazelnut bites recipe is all about flexibility. I love how you can easily tweak it for allergies or taste preferences without breaking a sweat. It’s perfect for when you want something sweet but don’t want to mess with melting chocolate or complicated steps.
What really drew me in is how adaptable these bites are. Whether you’re gluten-free, vegan, or just out of certain ingredients, you can probably swap in what’s in your pantry. Plus, they come together fast — a real lifesaver when cravings hit or guests drop by unexpectedly.
There’s something satisfying about creating a treat that’s both simple and personalized. I’ve made these with darker roasted hazelnuts, added a splash of espresso, or even rolled them in cocoa powder for a different finish. It’s honestly a recipe that makes me feel like a kitchen wizard, even on my busiest days.
Focusing on how this no-bake recipe can be customized easily for dietary needs and flavor preferences, making it a versatile treat that adapts to every home cook’s pantry and taste buds.
A Treat for All Diets
- I love how these bites remind me of childhood afternoons spent snacking on hazelnuts and chocolate, but with a grown-up twist.
- There’s a chaotic joy in watching the mixture come together; it’s sticky, fragrant, and instantly comforting.
- I feel proud every time I make these — they’re deceptively simple but always impress, whether for a quick treat or a last-minute gift.
- The aroma of toasted hazelnuts filling the kitchen makes me pause and appreciate how such humble ingredients can create something so satisfying.
- Cracking into one of these bites feels like a small victory—crunchy outside, gooey inside, with that smoky nutty flavor that lingers.
The story behind this recipe
- This recipe started from a cluttered afternoon in my kitchen, where I was craving something sweet but didn’t want to turn on the stove or mess with melting chocolate. I remembered those old-fashioned hazelnut candies my grandma used to keep in the jar—crunchy, sweet, and just a little smoky. I decided to see if I could recreate that crunch without any baking, just good ingredients and a little patience.
- What really made me stick with this idea was how forgiving it is—substitutions, additions, or omissions don’t ruin the core. It’s a recipe born from necessity and a love for simple, honest snacks that don’t demand much fuss. Plus, I find the process oddly calming—pressing the mixture into a pan and watching it set feels like a tiny act of self-care.
- heading: ‘The story behind this recipe’
Trivia and historical tidbits
- These bites have roots in humble European snack traditions, where nuts and sweet spreads were combined without fuss.
- The no-bake aspect probably gained popularity during wartime or periods of rationing, when oven access was limited.
- Hazelnuts have long been valued for their rich, smoky flavor—used historically in everything from spreads to liqueurs.
- Modern variations often include vegan or allergy-friendly swaps, making this recipe a versatile homage to vintage treats.
- The idea of combining nuts and sweet binders in small, portable bites has been a kitchen staple across many cultures for centuries.
Key Ingredients and Tips
- Hazelnuts: I prefer toasted hazelnuts for that deep, smoky aroma—crush them to release more flavor, but don’t over-process into butter unless you want a smoother texture.
- Medjool Dates: They’re naturally sticky and sweet, making the mixture come together easily. If yours are dry, soak them in warm water for 10 minutes—your hands will thank you.
- Honey or Maple Syrup: I use honey for a richer, floral note, but maple syrup keeps it vegan. Adjust sweetness to taste, especially if your dates are very ripe.
- Cocoa Powder: Adds depth and a slight bitterness—sift it well to avoid lumps. For a hint of smokiness, try a pinch of smoked paprika, if that’s your vibe.
- Sea Salt: Just a pinch heightens all the flavors; don’t skip it. If you’re into salted caramel, sprinkle a little flaky salt on top before chilling.
- Coconut Oil: Helps bind everything and adds a subtle richness. If you want a firmer bite, use a touch more; for softer, cut back slightly.
- Optional Extras: Chopped dark chocolate, a sprinkle of flaky sea salt, or a dash of espresso powder can elevate these bites—play around with what’s in your pantry.
Spotlight on Key Ingredients
Hazelnuts:
- I prefer toasted hazelnuts for that deep, smoky aroma—crush them to release more flavor, but don’t over-process into butter unless you want a smoother texture.
- Medjool Dates: They’re naturally sticky and sweet, making the mixture come together easily. If yours are dry, soak them in warm water for 10 minutes—your hands will thank you.
- Honey or Maple Syrup: I use honey for a richer, floral note, but maple syrup keeps it vegan. Adjust sweetness to taste, especially if your dates are very ripe.
Dates and Cocoa Powder:
- Medjool Dates: Their chewy, sticky texture is essential for binding—choose ripe, plump dates for maximum sweetness and ease of blending.
- Coconut Oil: It melts quickly and helps everything stick together—use a little more if you want a softer bite, less for a firmer one.
- Cocoa Powder: Adds a rich, bitter depth—sift it well to avoid lumps, and consider smoked paprika for a smoky twist.
Notes for ingredient swaps
- Nuts: Swap hazelnuts with almonds or cashews for a milder, nuttier flavor. Toast them first for best aroma.
- Sweeteners: Use agave syrup or brown rice syrup if honey or maple aren’t your thing—just expect a slightly different sweetness profile.
- Vegan binder: Replace honey with coconut nectar or rice malt syrup to keep these bites vegan without losing stickiness.
- Cocoa: Swap regular cocoa powder for raw cacao powder for a more intense, slightly bitter chocolate hit.
- Oil: If you want a firmer bite, add a bit more coconut oil; for softer, cut back slightly or skip entirely if you prefer less richness.
- Add-ins: Chopped dark chocolate, dried fruit, or a sprinkle of sea salt can customize these bites—play around based on what’s in your pantry.
- Allergens: If nuts are an issue, try sunflower seed or pumpkin seed butter as a binder—still rich, still tasty.
Equipment & Tools
- Skillet: Toast hazelnuts evenly and develop flavor.
- Mixing bowl: Combine ingredients thoroughly.
- Spatula: Mix and press mixture into pan.
- Small baking pan or silicone mold: Shape and hold the bites while setting.
- Parchment paper: Prevent sticking and make removal easier.
- Knife: Cut bites cleanly once set.
Step-by-step guide to no bake hazelnut bites
- Gather your equipment: a mixing bowl, a spatula, a small baking pan or silicone mold, and parchment paper for lining. No oven needed, so keep your fridge nearby.
- Toast the hazelnuts in a dry skillet over medium heat, about 5-7 minutes. Stir frequently until fragrant and lightly browned. Let cool slightly.
- Roughly chop the toasted hazelnuts, or pulse a few times in a food processor if you prefer a finer texture, but don’t turn them into butter.
- Remove pits from dates, then chop and soak in warm water for 10 minutes if they’re dry or stiff. Drain well before using.
- In your mixing bowl, combine the chopped hazelnuts, soaked dates, honey or maple syrup, cocoa powder, a pinch of sea salt, and coconut oil. Mix thoroughly until the mixture is sticky and holds together when pressed.
- Taste the mixture and adjust sweetness or salt as needed. If it’s too crumbly, add a tiny splash more coconut oil or honey and mix again.
- Press the mixture firmly into your lined pan or mold. Use the back of a spatula or your fingers to flatten evenly, about 1-inch thick.
- Chill in the fridge for at least 2 hours, or until firm and set. For a quicker set, pop it in the freezer for about an hour—watch for cracking if frozen too long.
- Once set, cut into small bites or bars. For clean edges, wipe your knife with a damp cloth between cuts.
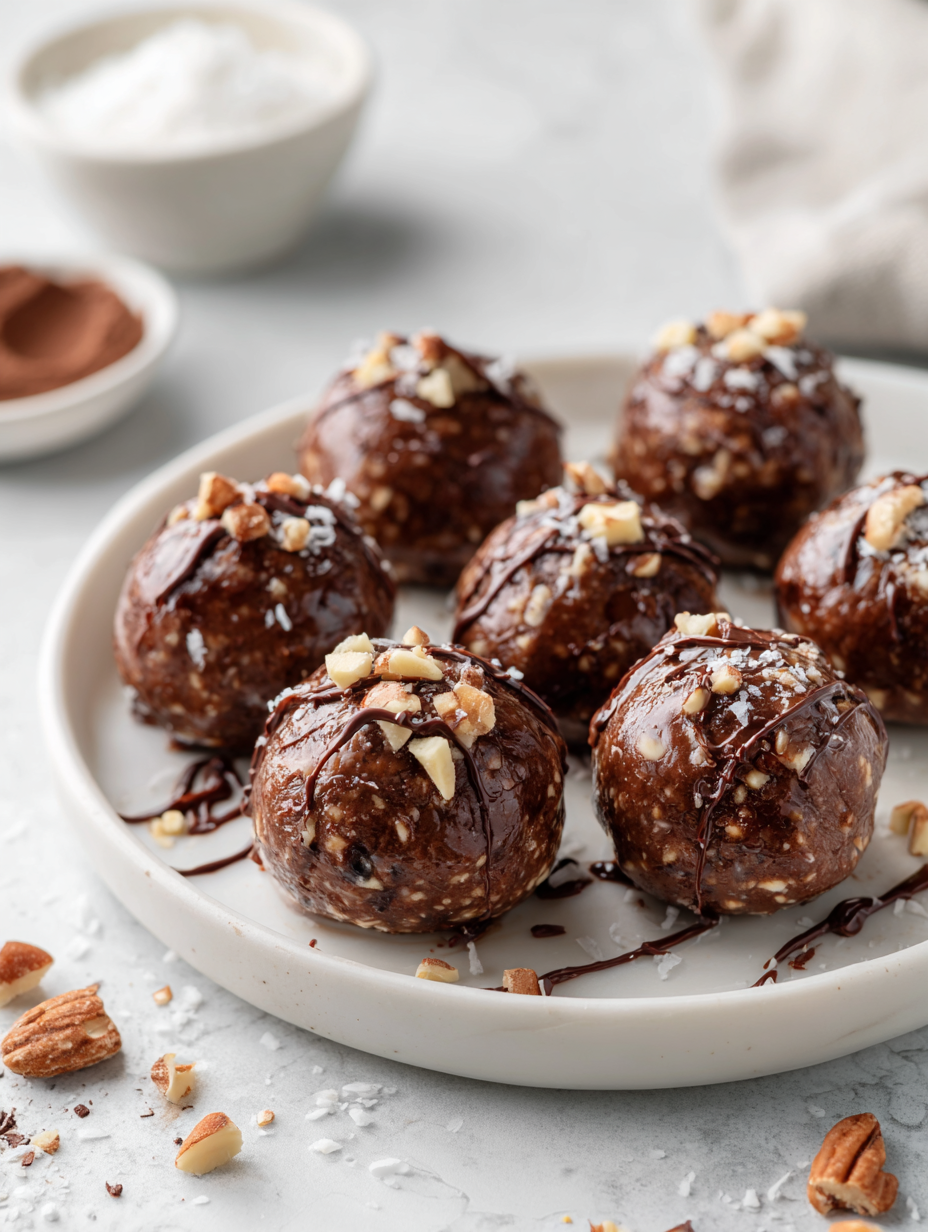
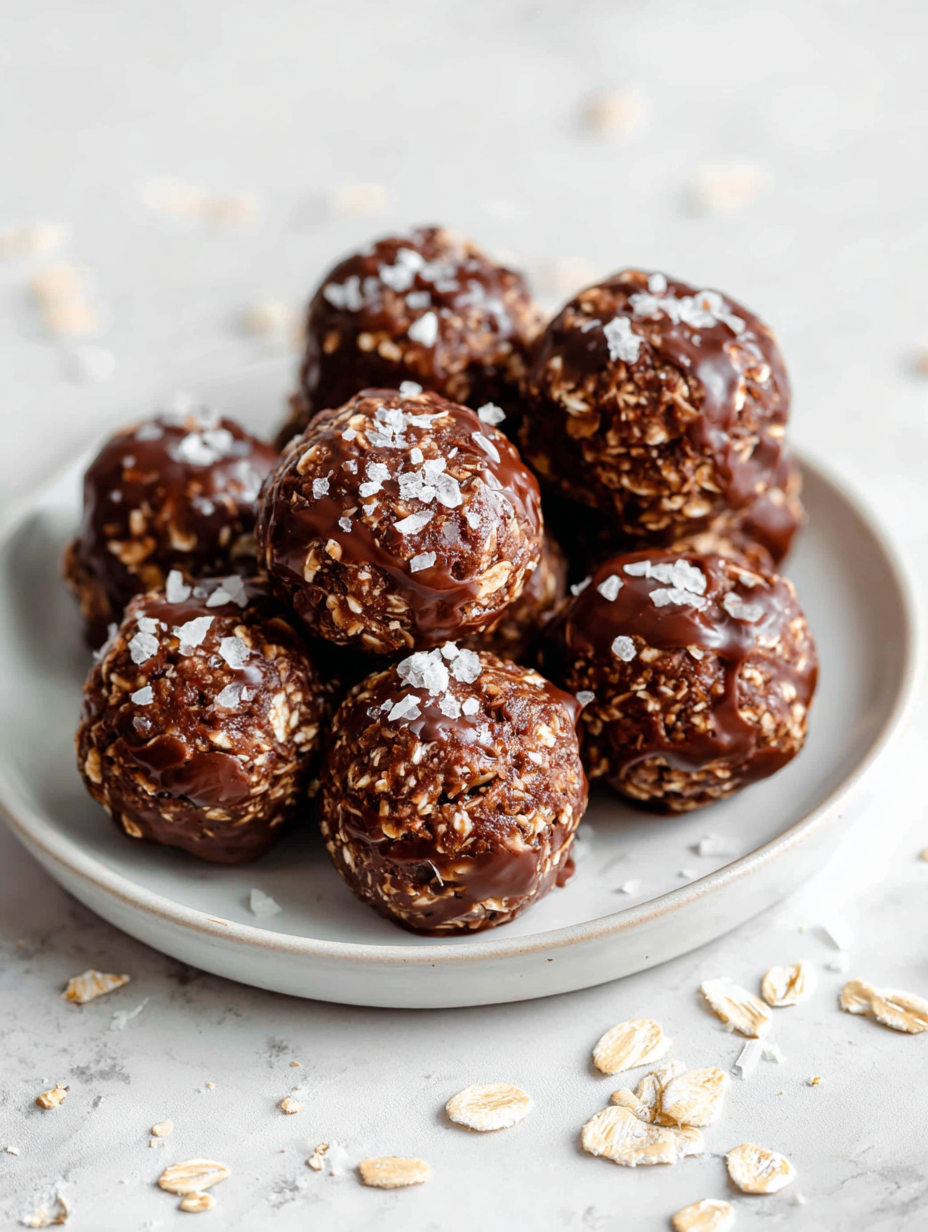
- Optional: roll the bites in extra chopped hazelnuts, cocoa powder, or a drizzle of dark chocolate for extra flair. Return to fridge to set for 15 minutes before serving.
Chill the bites in the fridge for at least 2 hours until firm. Slice into squares or bars, then serve or store in an airtight container in the fridge for up to a week. For a softer bite, leave at room temperature for 10 minutes before eating.
How to Know It’s Done
- Mixture holds together when pressed, not crumbly or dry.
- Bites are firm and set after chilling, with a slight give when pressed.
- Surface of bites is matte and slightly crackled, not greasy or shiny.

No-Bake Hazelnut Bites
Ingredients
Equipment
Method
- Toast the hazelnuts in a dry skillet over medium heat, stirring frequently until fragrant and lightly browned, about 5-7 minutes. Let cool slightly.
- Roughly chop or pulse the toasted hazelnuts a few times in a food processor to break them down without turning into nut butter.
- Remove pits from the dates, chop them up, and soak in warm water for about 10 minutes if they’re dry or stiff. Drain well before adding.
- In your mixing bowl, combine the chopped hazelnuts, soaked dates, honey or maple syrup, sifted cocoa powder, sea salt, and coconut oil. Mix thoroughly with a spatula until the mixture is sticky and holds together when pressed.
- Taste the mixture and adjust sweetness or salt if needed. If it’s too crumbly, add a small splash more coconut oil or honey and mix again.
- Line your small baking pan or silicone mold with parchment paper. Press the mixture firmly into the pan, smoothing the top with the back of a spatula or your fingers.
- Place the pan in the fridge and chill for at least 2 hours, or until the mixture is firm and set. For quicker setting, freeze for about an hour.
- Once firm, lift the mixture out of the pan using the parchment paper and place on a cutting board. Use a sharp knife wiped with a damp cloth to cut into small bites or bars.
- Optional: Roll the bites in extra chopped hazelnuts, cocoa powder, or drizzle with melted dark chocolate for added flavor and presentation. Return to the fridge for 15 minutes to set if adding toppings.
- Enjoy your homemade hazelnut bites immediately or store them in an airtight container in the fridge for up to a week. For longer storage, freeze them wrapped individually for up to a month.
Pro tips for perfect bites
- Use toasted hazelnuts for a deep, smoky aroma—crush them just enough to release flavor without turning into paste.
- Soak dried dates in warm water for 10 minutes before blending—makes them easier to process and boosts sweetness.
- Sift cocoa powder to avoid lumps—adding smoked paprika can add a surprising smoky dimension if desired.
- Press mixture firmly into your pan—using the back of a spoon or spatula ensures an even, compact layer for clean cuts.
- Chill for at least 2 hours—this helps bites set properly, making them easier to slice without crumbling.
- Wipe your knife between cuts—damp cloth keeps edges clean and prevents sticking for neat squares.
- Add chopped hazelnuts or a drizzle of melted dark chocolate after setting—extra flavor and texture boost.
Common mistakes and how to fix them
- FORGOT to toast hazelnuts: toast longer or at higher heat; watch for burning and smell of roasting nuts.
- DUMPED too much oil: reduce coconut oil next time; mixture may be too greasy and hard to shape.
- OVER-TORCHED the mixture: lower heat and stir constantly; burnt nuts will give bitter flavor and dark color.
- SKIPPED chilling step: chill at least 2 hours; bites won’t set properly and will be too sticky to cut.
Quick Fixes and Pantry Swaps
- When mixture is too dry, splash in a tiny bit of warm water to loosen it.
- If bites are too sticky, dust with cocoa powder or chopped nuts before setting.
- Splash a few drops of water on over-dried mixture to restore tackiness.
- Patch a crack in the set bites with a quick swipe of melted chocolate or nut butter.
- Shield from moisture by storing in an airtight container, especially in humid weather.
Prep, store, and reheat tips
- You can prepare the mixture a day in advance; keep it covered in the fridge for easy assembly later. The flavors meld nicely overnight, and the mixture remains sticky and fragrant.
- Store the assembled bites in an airtight container in the fridge for up to a week. They stay firm and retain their nutty aroma, but the texture becomes slightly softer over time.
- For longer storage, freeze the bites for up to a month. Wrap them individually in parchment or plastic wrap to prevent freezer burn. Thaw in the fridge or at room temperature until soft enough to enjoy.
- Reheat by letting them sit at room temperature for 10 minutes or giving them a quick 10-second zap in the microwave. The bites will soften slightly, and the hazelnut aroma will reignite, especially if they’ve been chilled overnight.
Top questions about hazelnut bites
1. Can I use raw hazelnuts instead of roasted?
Yes, you can use roasted and chopped hazelnuts, which add a richer flavor and crunch.
2. Can I substitute hazelnuts with other nut butters?
Absolutely, almond or cashew butter works well and gives a different nuttiness.
3. Are these bites vegan?
Yes, you can skip the honey and use maple syrup for a vegan version, but the texture might be slightly different.
4. What if my dates are too dry to blend?
If your dates are dry, soak them in warm water for 10 minutes before blending for better stickiness.
5. How do I know when the bites are set?
Chill the mixture for at least 2 hours until firm. It should feel slightly sticky and hold its shape.
6. How should I store the hazelnut bites?
Store in an airtight container in the fridge for up to a week or freeze for longer storage.
7. Can I customize the coating or finish?
Yes, you can roll them in cocoa powder, chopped nuts, or drizzle melted chocolate for extra flavor.
8. My mixture is too dry, what can I do?
If your mixture is too crumbly, add a tiny splash of coconut oil or honey and mix again.
9. How do I get clean slices?
Use a sharp knife wiped with a damp cloth for clean cuts and prevent sticking.
10. Why do my bites crack when I cut them?
If the bites crack or crumble, let them sit at room temperature for 10 minutes before serving.
These no-bake hazelnut bites are a small reminder that simple ingredients can create something special. They’re perfect for when you want a quick, satisfying treat without much fuss, especially now when easy comforts are welcomed. The rich aroma of toasted hazelnuts and the chewy, nutty bites make for a satisfying finish to any day.
In a world that often feels hurried, these bites let you slow down and enjoy a moment of honest, homemade goodness. They’re not just snacks—they’re a small act of care, a way to bring a little warmth and sweetness into your routine, no matter the season.