This recipe is my go-to for when I need a quick, nourishing treat that feels indulgent but is made from everyday pantry staples. It’s a reminder that simple ingredients can come together to create something both satisfying and unexpectedly elegant, especially when I’m short on time but craving something sweet and wholesome.
There’s a certain charm in how these no-bake date balls come together without any fuss. It’s a messy, sticky process—hands coated in caramel-like date paste, but that’s part of the fun. They’re perfect for afternoons when I want something quick, filling, and just a little bit special.
Plus, they’re a good way to use up those last few dates hiding in the back of the fridge, waiting for their moment. These balls aren’t just a snack; they’re a little bit of comfort on busy days, and honestly, they taste better knowing I didn’t turn on the oven.
This recipe is my go-to for when I need a quick, nourishing treat that feels indulgent but is made from everyday pantry staples. It’s a reminder that simple ingredients can come together to create something both satisfying and unexpectedly elegant, especially when I’m short on time but craving something sweet and wholesome.
Unexpected Elegance in Pantry Staples
- Making these no-bake date balls always feels like a small victory, especially when I need a quick sweet fix.
- I love how these remind me of childhood snacks, but with a richer, nuttier twist that feels more grown-up.
- There’s a calming rhythm to rolling the sticky mixture into balls—almost meditative after a hectic day.
- Sharing these with friends sparks conversations about simple pleasures and nostalgic treats that don’t require fuss.
- Every time I make them, I’m reminded that sometimes, the best recipes are the ones that come together with just a handful of pantry staples.
The story behind this recipe
- This recipe started as a way to use up a mountain of dates after a particularly fruitful harvest. I wanted something sweet but no-fuss, something that didn’t require turning on the oven on hot summer days. The first batch was a bit rough—more crumbly than I liked—but it sparked an idea for a no-bake treat that’s both chewy and satisfying.
- Over time, I tweaked the ratios, added a splash of vanilla, and rolled them into neat little balls. Now, they’re a staple in my snack drawer, especially when I need a quick energy boost or a little something sweet without the guilt. It’s funny how such simple ingredients—dates, nuts, maybe a dash of cocoa—can turn into something so comforting and familiar.
- heading: ‘The story behind this recipe’
Historical & Cultural Roots
- Dates have been a staple sweetener in Middle Eastern diets for thousands of years, prized for their natural caramel-like flavor.
- This no-bake method likely originated in resourceful kitchens where turning on the oven wasn’t always feasible, especially in hot climates.
- They gained popularity in the health food movement of the 1970s, emphasizing simple, unprocessed ingredients and minimal fuss.
Ingredient breakdown: key components
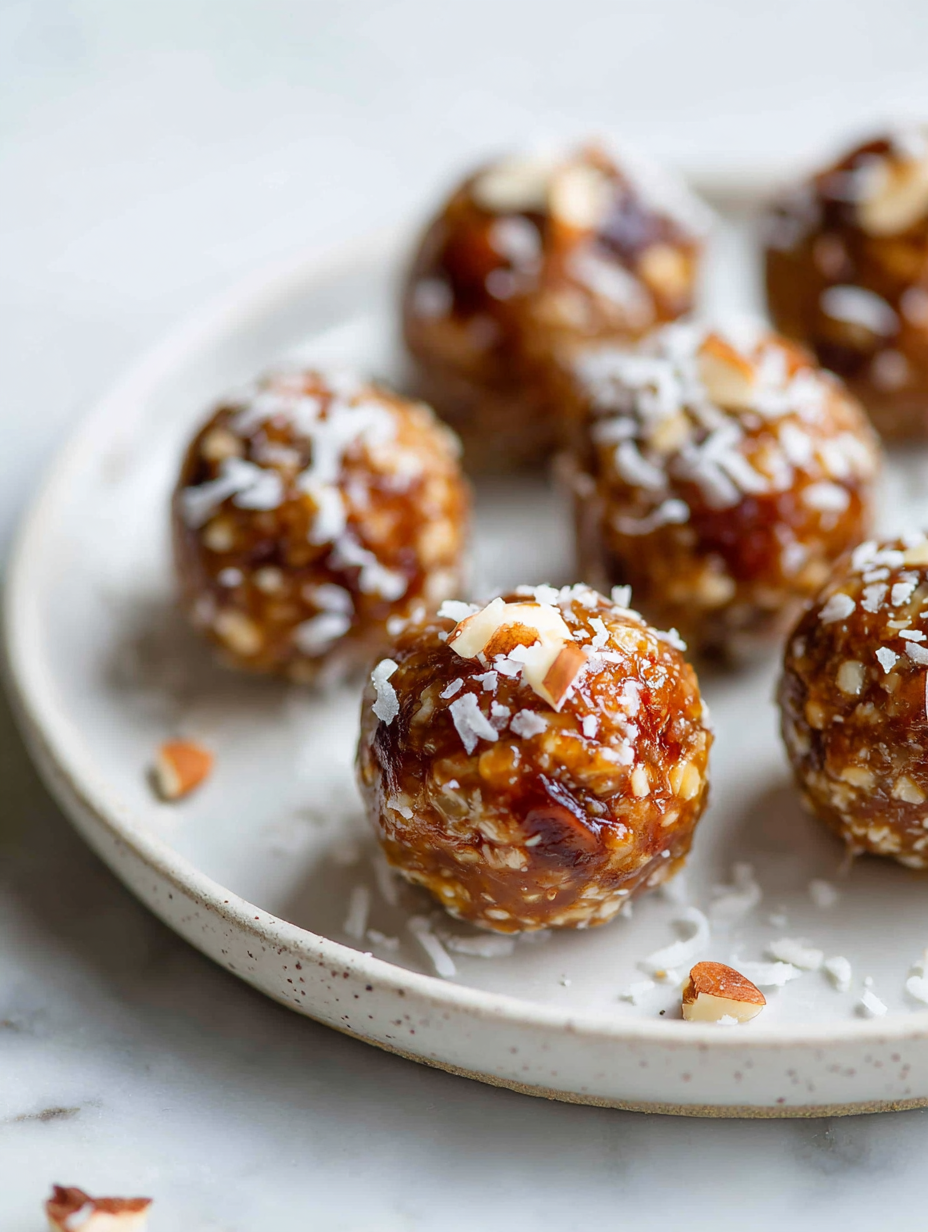
- Dates: Their natural sweetness is like caramel, gooey and rich. If they’re too dry, soak them in warm water for 10 minutes to soften.
- Nuts: I prefer almonds for crunch, but walnuts add a bit of earthiness. Toast them lightly to boost flavor, or skip if nut allergies are an issue.
- Oats: Old-fashioned oats give a chewy texture that holds together well. For a finer bite, pulse them in a food processor first.
- Cocoa Powder: Unsweetened dark cocoa adds depth and a slight bitterness that balances the sweetness. Use Dutch-processed for a smoother taste.
- Flavor Enhancers: A splash of vanilla or a pinch of sea salt can really make the flavors pop. Don’t skip these if you want a more rounded taste.
- Binders: Honey or maple syrup can be swapped depending on your preference. Honey gives a richer, floral note, while maple adds warmth and complexity.
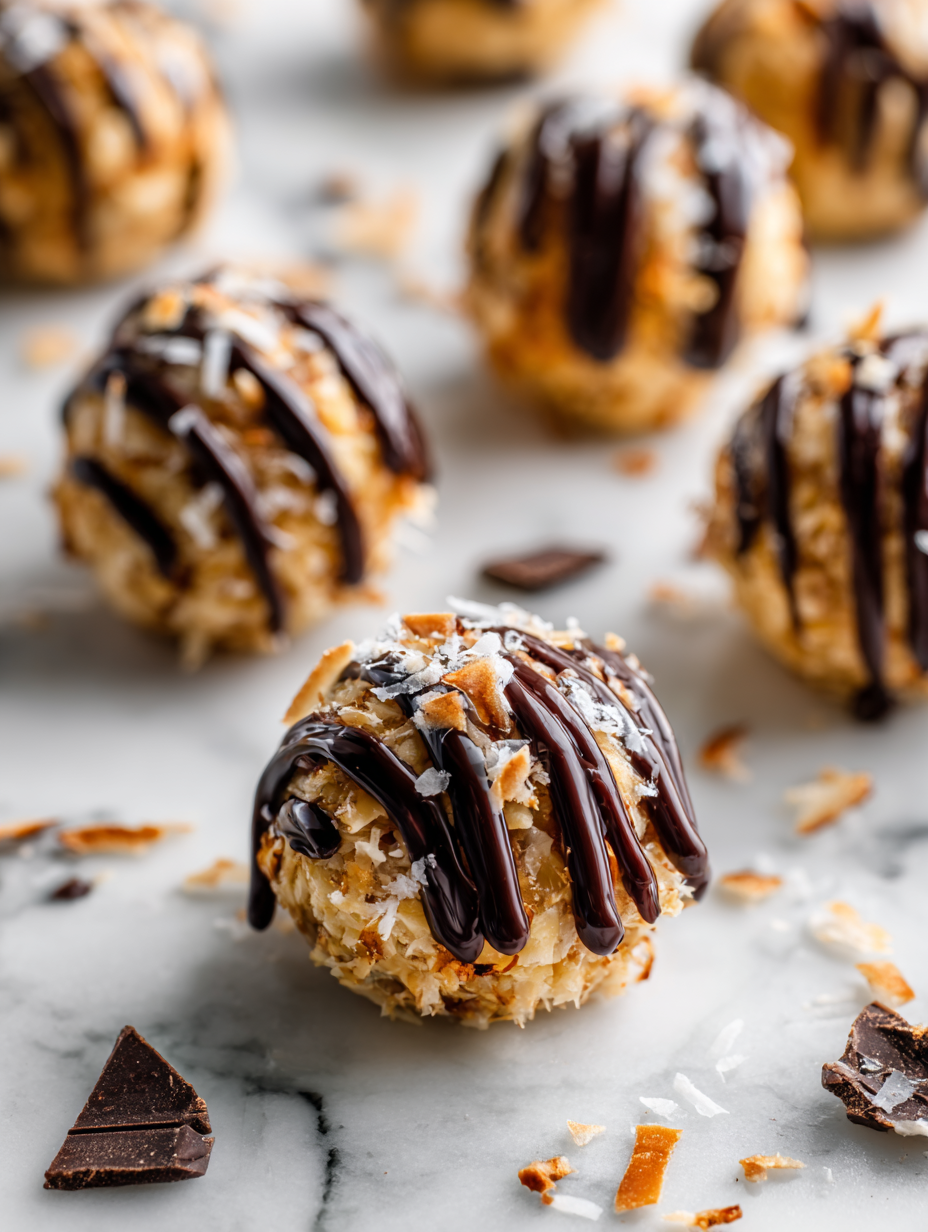
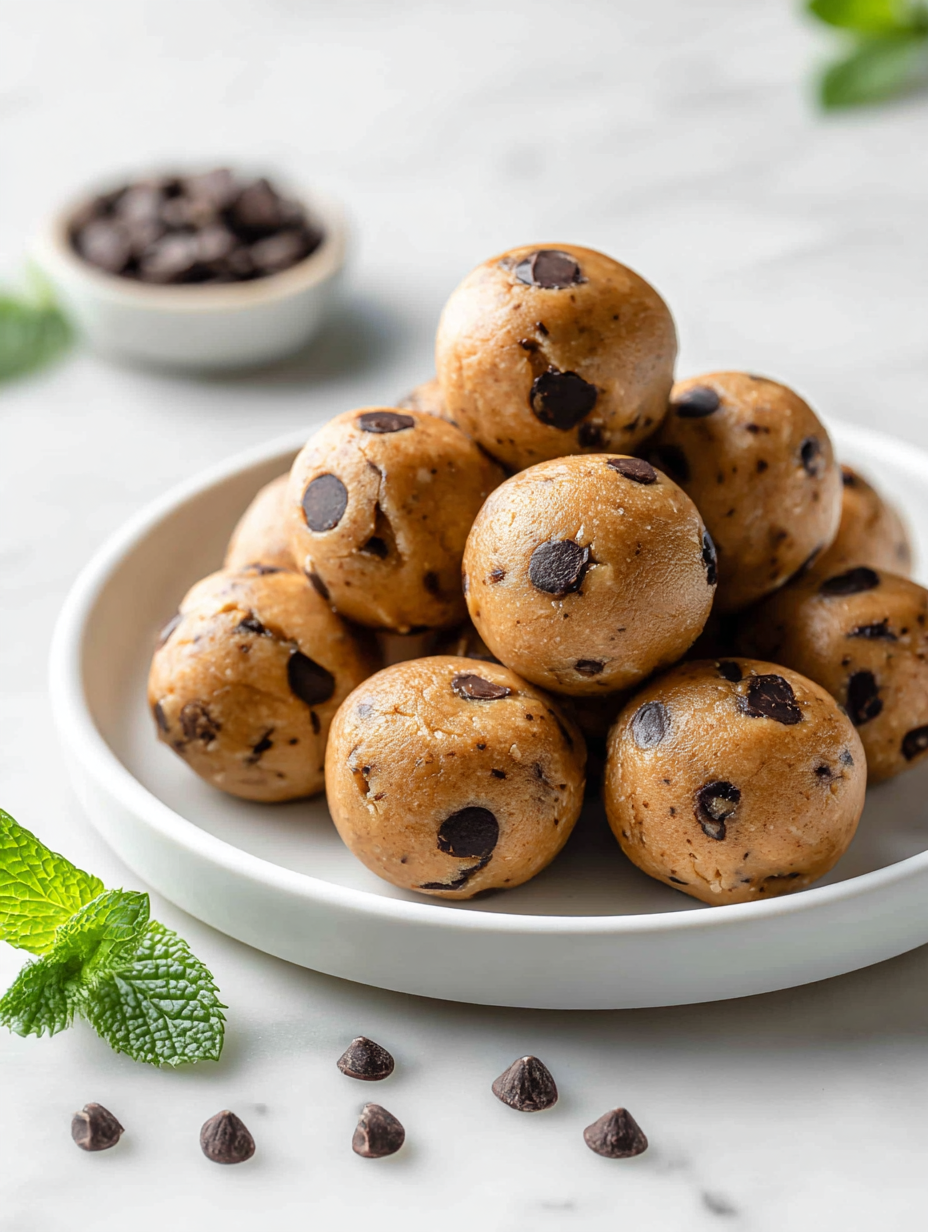
- Add-ins: Shredded coconut, chia seeds, or mini chocolate chips can elevate your balls. Use sparingly to keep the mixture manageable and not too sticky.
Spotlight on key ingredients
Dates:
- Their gooey, caramel-like texture makes the balls naturally sweet and sticky, perfect for binding.
- They soften beautifully when processed, turning into a rich paste that coats your hands with a sweet aroma.
Nuts:
- Toasted almonds add a satisfying crunch and a nutty aroma that balances the sweetness of dates.
- They become slightly oily when toasted, releasing a warm, roasted scent that makes the mixture more flavorful.
Notes for ingredient swaps
- Dairy-Free: Use coconut oil or coconut butter instead of butter for a richer, tropical flavor.
- Nut Variations: Swap almonds for walnuts or cashews—each brings a slightly different crunch and flavor profile.
- Sweetener Switch: Maple syrup can replace honey for a more caramel-like, earthy sweetness, but may alter the texture slightly.
- Oats: Use rolled oats or gluten-free oats depending on your dietary needs; both work well, but rolled oats give a chewier bite.
- Add-ins: Shredded coconut, chia seeds, or mini chocolate chips can be mixed in for extra texture and flavor, just keep proportions in check.
- Dates: Medjool dates are softer and sweeter, but dried deglet noor dates work if soaked beforehand to soften.
- Cocoa Powder: Dutch-processed cocoa for a smoother, less acidic flavor—unsweetened cocoa gives a more intense chocolate punch.
Equipment & Tools
- food processor: To efficiently break down dates into a sticky paste
- skillet: For lightly toasting nuts to enhance flavor
- mixing bowl: To combine all ingredients evenly
- spatula: For mixing and scraping ingredients
- cookie scoop or tablespoon: To portion out and shape the balls uniformly
- baking sheet with parchment: To hold the formed balls while chilling
Step-by-step guide to no-bake date balls
- Gather your equipment: a mixing bowl, a silicone spatula, a cookie scoop or tablespoon, and a baking sheet lined with parchment. These keep the process smooth and clean.
- Pit the dates if needed, then pulse them in a food processor until they form a sticky, almost caramel-like paste, about 30 seconds. They should be clump-free but still sticky.
- Chop your nuts coarsely. Toast them lightly in a dry skillet over medium heat (about 5 minutes, until golden and fragrant). Cool slightly.
- In a large bowl, combine the date paste, chopped nuts, oats, cocoa powder, and a pinch of salt. Mix thoroughly with the spatula until everything is evenly distributed.
- If the mixture feels too sticky to roll, add a tablespoon of oats or nuts. If it’s too crumbly, a teaspoon of honey or maple syrup will help it come together.
- Using a cookie scoop or tablespoon, portion out the mixture and roll into balls about 2 cm (¾ inch) in diameter. Keep your hands damp if the mixture sticks too much.
- Place the balls on the prepared baking sheet, spaced about 2 cm apart. Chill in the fridge for at least 30 minutes to set. They’ll firm up and become more cohesive.
- Check the texture: they should be firm but chewable. The flavor will deepen slightly after chilling, with a rich, nutty aroma and a hint of chocolate.
- Once set, store in an airtight container in the fridge for up to a week, or freeze for longer storage. Let them soften slightly at room temp before serving.
Chill the balls in the fridge for at least 30 minutes until firm. Serve directly from the fridge or at room temperature for a softer bite. Store leftovers in an airtight container in the fridge or freezer, depending on your preference.
How to Know It’s Done
- Date mixture sticks together when pressed; if crumbly, add a touch more honey.
- Balls hold shape without cracking or falling apart; if too soft, refrigerate longer.
- Smell: a warm, caramel aroma indicates good binding and flavor development.
No-Bake Date Balls
Ingredients
Equipment
Method
- Place the pitted dates into a food processor and pulse until they form a sticky, caramel-like paste, about 30 seconds. The mixture should be smooth and clump together easily.
- Chop the nuts coarsely and toast them in a dry skillet over medium heat for about 5 minutes, until fragrant and golden. Let them cool slightly.
- In a large mixing bowl, combine the date paste, toasted nuts, oats, cocoa powder, vanilla extract, and sea salt. Mix thoroughly with a spatula until everything is evenly incorporated and sticky.
- If the mixture feels too dry and crumbly, add a tablespoon of honey or maple syrup and stir until it comes together. If it’s too sticky to handle, sprinkle in a little more oats and mix again.
- Using a cookie scoop or tablespoon, portion out the mixture and roll it between your palms to form balls about 2 centimeters in diameter. Keep your hands damp if the mixture sticks too much.
- Place each ball on the prepared parchment-lined baking sheet, spacing them about 2 centimeters apart. Chill in the fridge for at least 30 minutes until firm and set.
- Once chilled, the date balls will be chewy, sticky, and rich in flavor. Store leftovers in an airtight container in the fridge for up to a week or freeze for longer storage.
Pro tips for perfect date balls
- Use slightly damp hands to roll sticky mixture without sticking.
- Toast nuts until fragrant but avoid burning for a warm, smoky flavor.
- Process dates until smooth—any small chunks can make balls crumbly.
- Chill the mixture for at least 30 minutes to help it firm up and hold shape.
- Add a splash of water or extra honey if the mixture is too dry and crumbly.
- Incorporate add-ins like shredded coconut or chocolate chips for extra texture and flavor.
- Store in an airtight container in the fridge for up to a week, or freeze for longer storage.
Common mistakes and how to fix them
- FORGOT to soften dates → Soak them in warm water before processing.
- DUMPED in too many nuts → Use a coarse chop to prevent mixture from becoming crumbly.
- OVER-TORCHED nuts → Toast nuts lightly, about 5 minutes, until fragrant but not dark.
- FAILED to chill properly → Chill for at least 30 minutes until balls are firm and hold shape.
Quick fixes and pantry swaps
- If mixture feels too sticky → Splash with a little water and knead until manageable.
- When balls crack while rolling → Chill mixture for 10 minutes before shaping again.
- Splash with coconut oil if nuts turn bitter during toasting.
- Patch cracks by pressing mixture back together with damp fingers.
- Shield from moisture by storing in an airtight container, especially in humid weather.
Prep, store, and reheat tips
- Prepare the mixture: processed dates, nuts, oats, and cocoa can be combined a day ahead; keep covered in the fridge for fresh, sticky texture.
- Form the balls: shaping the mixture can be done in advance, then stored on a plate lined with parchment; cover tightly with plastic wrap.
- Shelf life: these date balls stay good for up to a week in the fridge, developing a richer, slightly stickier flavor over time.
- Refrigeration: keep chilled to maintain firmness; let sit at room temperature for 5-10 minutes before serving for softer bites.
- Reheating: no need to reheat—just enjoy straight from the fridge or briefly warm for a gooey, indulgent treat.
Top questions about no bake date balls
1. Can I use dried dates instead of fresh?
Yes, soaking dried dates in warm water for 10 minutes makes them easier to process and enhances their sweetness.
2. Can I change the nuts in the recipe?
Absolutely! You can swap in walnuts, cashews, or even pecans for a different crunch and flavor profile.
3. My mixture is too sticky or too dry, what do I do?
If your mixture feels too sticky, add a bit more oats or nuts. If it’s crumbly, a tiny drizzle of honey helps bind.
4. How long should I chill the date balls?
Chill the balls in the fridge for at least 30 minutes until they hold their shape better and taste more developed.
5. How should I store the date balls?
Store them in an airtight container in the fridge for up to a week, or freeze for longer storage. Let them soften slightly before eating.
6. Can I make these vegan?
You can substitute maple syrup or agave syrup for honey to make it vegan, but expect a slightly different texture.
7. Can I add other ingredients?
Using coconut flakes or mini chocolate chips can add texture and flavor—just keep the quantities manageable so the mixture stays sticky.
8. Why do my balls fall apart?
Processing the dates until smooth ensures the balls stick together well. Small chunks can make shaping tricky.
9. Can I use different cocoa powders?
For a more intense chocolate flavor, use Dutch-processed cocoa powder instead of regular unsweetened cocoa.
10. My mixture feels greasy, what now?
If your mixture is too oily after toasting nuts, let them cool completely before mixing to prevent excess oil from breaking the mixture.
These no-bake date balls are a no-fuss treat that sneaks in a lot of flavor with minimal effort, especially when I need a quick sweet fix. They’re a reminder that simple pantry staples can turn into a satisfying snack when you roll up your sleeves and get a little sticky.
Whenever I make them, I appreciate how honest and forgiving the process is—no oven required, just good ingredients and a little patience. They’re perfect for busy days, or when I want something that feels like a small indulgence without the fuss.