This recipe flips the usual approach by focusing on the tactile satisfaction of pressing and shaping the bars with your hands, making it a meditative act that connects you directly to the food, turning a simple treat into a mindful kitchen ritual.
There’s something deeply grounding about feeling the cool, sticky mixture under your fingertips, shaping each bar with care. It’s more than just making dessert; it’s a chance to slow down and find a little peace in the chaos of daily life.
Plus, no bake means almost zero fuss—just melt, mix, and press. It’s a recipe that’s as practical as it is calming, perfect for those moments when you want a sweet fix without the oven heat or complicated steps.
This recipe flips the usual approach by focusing on the tactile satisfaction of pressing and shaping the bars with your hands, making it a meditative act that connects you directly to the food, turning a simple treat into a mindful kitchen ritual.
The story behind this recipe
- This recipe came together on a rainy afternoon when I needed something quick but satisfying. I was craving that perfect crunch and gooey chocolate that hits just right. I remembered a childhood snack my grandma used to make, and I wanted to recreate that simple joy with a grown-up twist.
- Making these bars feels like a small act of rebellion against the overly complicated desserts we often chase. It’s just melting, mixing, pressing—no oven, no fuss. Every time I make them, I think about those lazy weekends when comfort means a handful of ingredients and a little bit of patience.
- They’re a reminder that sometimes, the best treats are the simplest. No fancy equipment, no waiting for things to bake—just good, honest flavors pressed into a shape I can break apart with my hands. It’s a little ritual that reconnects me to childhood and makes the day feel a bit more manageable.
Ingredient breakdown
- Peanut butter: I use creamy, slightly salty peanut butter for a rich, nutty flavor that melts smoothly. Swap with almond butter for a different nutty twist, but expect a slightly different texture.
- Dark chocolate: I prefer a 70% cocoa bar for a bittersweet punch that balances the sweetness. You can try milk chocolate for a milder, creamier taste, but it will be less intense.
- Honey or syrup: I opt for honey to add a floral sweetness that complements the peanut butter. Maple syrup works well too, lending a deeper, caramel note—just watch the consistency.
- Oats: I like old-fashioned rolled oats for a chewy texture, but quick oats will make the mixture smoother. Toast them lightly for a nuttier aroma before mixing.
- Butter: I melt unsalted butter until it’s just barely bubbling, giving a glossy sheen. For dairy-free, coconut oil is a good substitute that adds a hint of coconut aroma and keeps things firm.
- Vanilla extract: I add a splash for warmth and depth. If you don’t have vanilla, a pinch of cinnamon or a dash of salt can enhance the overall flavor.
- Salt: Just a pinch enhances all the flavors and balances the sweetness. Adjust to taste, especially if using salted peanut butter or butter.
Spotlight on key ingredients
Peanut butter:
- I prefer creamy, slightly salty peanut butter for a smooth, rich flavor that melts into the mixture. Swap with almond butter for a nuttier, slightly drier result, but keep in mind the texture may change.
- Dark chocolate: I choose a 70% cocoa bar for a bittersweet punch that balances sweetness. You can use milk chocolate if you want a milder, creamier melt, but it will be less intense and slightly softer when set.
Dark chocolate:
- I prefer a 70% cocoa bar for a deep, slightly smoky flavor that melts smoothly. When melted, it becomes glossy and velvety, coating the other ingredients with a rich sheen.
- Honey or syrup: I use honey for a floral sweetness that blends seamlessly. Maple syrup can be an alternative, adding a deeper caramel note, but it may make the mixture slightly stickier and more viscous.
Notes for ingredient swaps
- Dairy-Free: Swap regular butter for coconut oil—adds a subtle coconut aroma and keeps the bars firm.
- Nut Butters: Almond or cashew butter can replace peanut butter for a different nutty flavor, but expect a slightly thinner texture.
- Sweeteners: Maple syrup instead of honey gives a deeper caramel note; adjust quantity to taste to avoid overly sweet bars.
- Chocolate: Use milk chocolate for a creamier, sweeter finish, but expect a softer set and less intense cocoa flavor.
- Oats: Quinoa flakes or crushed rice cereal can be used if you want a lighter, crunchier texture—just beware of moisture absorption.
- Add-ins: Dried fruits or chopped nuts can be mixed in for extra texture; keep in mind they may alter the binding slightly.
- Flavor Boost: A dash of espresso powder or sea salt can elevate the chocolate and peanut flavors—use sparingly.
Equipment & Tools
- Baking dish: Holds and shapes the bars
- Spatula: Mixing and pressing the mixture
- Microwave-safe bowl: Melting ingredients evenly
- Parchment paper: Prevent sticking and easy removal
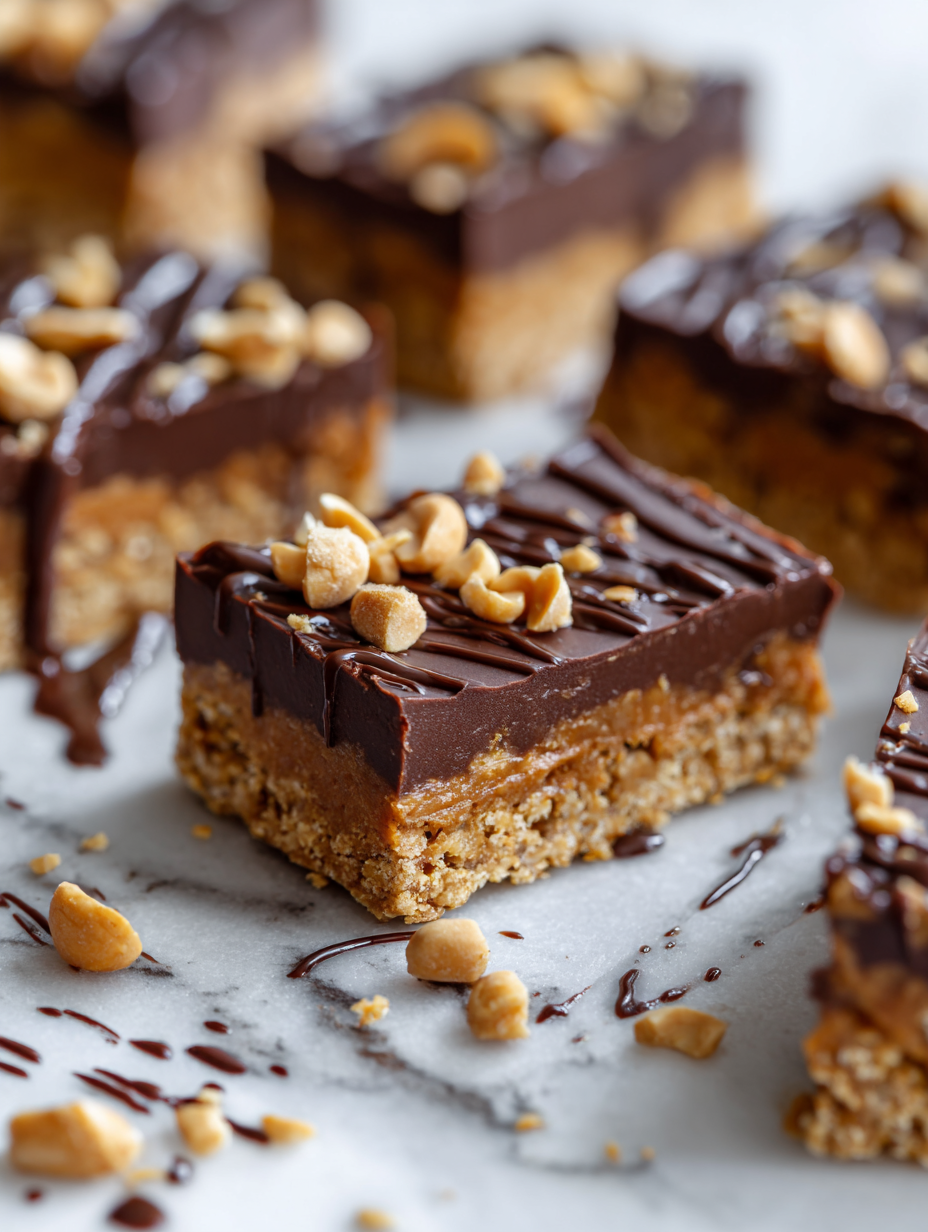
Step-by-step guide to no bake chocolate peanut bars
- Gather your equipment: a 20cm (8-inch) square baking dish, a spatula, a microwave-safe bowl, and parchment paper lined inside the dish.
- Line the baking dish with parchment paper, leaving some overhang for easy removal later.
- In the microwave-safe bowl, combine 1 cup (250g) peanut butter and 1/2 cup (120ml) honey or maple syrup. Microwave in 30-second bursts, stirring in between, until smooth and warm (about 1-2 minutes total).
- Add 1 teaspoon vanilla extract and a pinch of salt to the mixture, stirring well to incorporate.
- In a separate bowl, lightly toast 1 1/2 cups (125g) rolled oats for 2-3 minutes over medium heat, until fragrant and slightly golden. Let cool slightly.
- Pour the toasted oats into the peanut butter mixture, stirring until evenly coated. If the mixture feels too thick, stir in a tablespoon of warm water or more honey.
- Melt 1 cup (170g) dark chocolate (70% cocoa) in 20-second bursts in the microwave, stirring after each, until smooth. Let cool slightly.
- Pour the melted chocolate into the peanut butter and oats mixture, folding gently until fully combined and glossy.
- Transfer the mixture into your prepared dish. Use a spatula to press it evenly into the corners, smoothing the top with the back of the spatula or a piece of parchment.
- Press down firmly, ensuring the mixture is compact and even. For best results, press for about 2 minutes to eliminate air pockets.
- Place the dish in the fridge for at least 2 hours, or until firm and set. The mixture should feel firm and hold a clean crack when gently pressed.
- Once set, lift the bars out of the dish using the parchment overhang. Cut into squares or rectangles, about 2-inch pieces.
- Serve immediately or store in an airtight container in the fridge for up to a week. For longer storage, freeze for up to 1 month, thawing at room temperature for 10 minutes before serving.
Let the bars chill in the fridge for at least 2 hours until firm. Use parchment to lift them out, then cut into squares. Serve straight from the fridge for a firm bite or at room temp for softer texture.
How to Know It’s Done
- Chocolate layer is glossy and firm, not sticky.
- Bars hold shape when cut, not crumbly.
- Mixture is evenly pressed and compacted for clean slicing.
No-Bake Chocolate Peanut Bars
Ingredients
Equipment
Method
- Line your baking dish with parchment paper, leaving overhang on the sides for easy lifting.
- In a microwave-safe bowl, combine the peanut butter and honey. Microwave in 30-second bursts, stirring in between, until the mixture is smooth, warm, and glossy.
- Add a teaspoon of vanilla extract and a pinch of salt to the warm mixture, stirring well to incorporate all the flavors.
- Lightly toast the oats in a dry skillet over medium heat for 2-3 minutes until fragrant and slightly golden, then let them cool slightly.
- Pour the toasted oats into the peanut butter mixture and fold gently until everything is evenly coated and sticky enough to hold together.
- Chop the dark chocolate into small chunks and melt in short 20-second bursts in the microwave, stirring after each until smooth and glossy.
- Pour the melted chocolate into the oat and peanut butter mixture and fold gently to combine, creating a shiny, chocolate-coated mixture.
- Transfer the mixture into your prepared dish, then press down firmly with the back of a spatula or your hands to create an even, compact layer. This helps the bars hold their shape.
- Place the dish in the fridge and chill for at least 2 hours, or until the mixture is firm and set.
- Lift the set mixture out of the dish using the parchment overhang, then cut into squares or rectangles with a sharp knife.
- Serve the bars immediately or store them in an airtight container in the fridge for up to a week. For longer storage, freeze and thaw slightly before enjoying.
Tips for perfect bars
- Chill the mixture: Ensure the mixture is cool enough before pressing into the pan—this helps it set firmly and cleanly.
- Use parchment overhang: Line your dish with parchment, leaving extra to lift out the whole block easily for neater cuts.
- Press firmly: Apply even pressure with the back of a spatula or your hands to avoid air pockets and crumbly edges.
- Melt chocolate gently: Use short bursts in the microwave, stirring frequently to prevent burning and develop a glossy finish.
- Add texture wisely: Incorporate chopped nuts or dried fruit after mixing—stir gently to distribute without breaking the mixture apart.
- Test before chilling: Slightly jiggle the pan; if the mixture wobbles like jelly but doesn’t feel sticky, it’s ready for fridge.
- Store properly: Keep in an airtight container in the fridge; for best texture, serve slightly chilled but not frozen.
Common mistakes and how to fix them
- FORGOT to chill the mixture → Ensure the bars are refrigerated until fully set.
- DUMPED in too much chocolate → Use a moderate amount, avoiding overly thick layers that crack.
- OVER-TORCHED the chocolate → Melt gently in short bursts, stirring to prevent burning and bitterness.
- MISSED pressing firmly → Press mixture tightly into the dish to prevent crumbling when cut.
Quick Fixes and Pantry Swaps
- When mixture is too sticky → Chill it for 10 minutes to firm up.
- If chocolate won’t melt smoothly → Use short bursts in microwave, stirring often.
- Splash a little warm water if mixture is dry → Helps it come together without cracking.
- Patch cracked bars with a drizzle of melted chocolate → Seals imperfections and adds shine.
- Shield edges with extra pressing if mixture is uneven → Ensures clean, uniform bars.
Prep, store, and reheat tips
- You can prepare the entire mixture up to 24 hours in advance; keep it covered in the fridge for a fresh, cool texture when ready to press.
- Store the assembled bars, wrapped tightly in plastic wrap or in an airtight container, in the fridge for up to a week. The flavors deepen slightly over time, becoming more cohesive.
- For longer storage, freeze the bars for up to a month. Wrap them individually in parchment or foil to prevent freezer burn; thaw at room temperature for about 10 minutes before slicing.
- Refrigerated bars are best served chilled—feel the firmness and hear a slight crack when you cut. Reheat briefly in the microwave if you prefer a softer bite, but note the chocolate may melt slightly and become glossy.
Top questions about no bake bars
1. Can I use crunchy peanut butter?
Use natural peanut butter for a richer flavor and smoother texture. Skippy or Jif work well, but try to avoid overly oily types.
2. Is microwave melting safe for chocolate?
Yes, you can melt the chocolate in a double boiler if you prefer a more controlled heat, but microwaving is quicker and just as effective.
3. How long do I need to chill the bars?
Chill the bars for at least 2 hours until they’re firm and set. If you’re in a rush, 30 minutes in the freezer speeds things up.
4. Can I customize the ingredients?
You can add chopped nuts, dried fruit, or coconut flakes into the mixture before pressing it into the pan for extra texture and flavor.
5. How should I store these bars?
Store the bars in an airtight container in the fridge for up to a week. For longer storage, freeze them wrapped tightly for up to a month.
6. The mixture is too thick, what can I do?
If the mixture feels too thick to spread, stir in a teaspoon of warm water or more honey to loosen it up. Don’t add too much at once.
7. How do I get clean cuts?
Use a sharp knife warmed slightly with hot water to cut clean lines. Wipe it clean between cuts to keep edges neat.
8. Can I substitute the chocolate?
You can swap dark chocolate for milk chocolate if you prefer a sweeter, creamier coating. Just note it may melt faster and be softer when set.
9. My bars are crumbly, what went wrong?
If the bars crack or crumble when cutting, press the mixture more firmly into the pan and chill longer before slicing.
10. Can I enhance the flavor with extra ingredients?
Adding a pinch of sea salt or espresso powder can intensify the chocolate flavor and balance the sweetness beautifully.
These bars are a reminder that sometimes, the simplest ingredients create the most satisfying treats. A quick, tactile process makes the act of baking feel more connected, more mindful. When they finally set and you slice through that glossy chocolate, it’s hard not to smile at how effortless and indulgent they are.
Right now, when comfort food feels especially important, these bars offer a little moment of calm and sweetness. Sharing them, or keeping a stash in the fridge, means you’ve always got something ready to satisfy that craving—no fuss, no oven, just pure, honest flavor.