This no-bake chocolate biscuit bars recipe is my secret weapon for when the afternoon slump hits and I need something sweet, fast. It’s a treat that comes together without turning on the oven, which is a relief on hot days or busy evenings. Plus, the ingredients are always in my pantry, so I can whip one up anytime without planning ahead.
What I love most is how adaptable it is—whether I’ve got leftover biscuits or want to tweak the chocolate ratio, it’s forgiving. The smell of melting chocolate, mingling with crushed biscuits, instantly brings back childhood memories of school lunchboxes and late-night snacking. It’s honest comfort, made in minutes and enjoyed even faster.
This recipe is my secret weapon for busy afternoons when I crave something sweet but have no energy for baking. It’s the kind of treat that comes together in minutes, using ingredients I always keep in the pantry. No oven, no fuss, just pure chocolate comfort that’s perfect for a quick fix or last-minute guest. It’s my go-to when I want to impress without the mess.
The story behind this recipe
- This recipe harks back to lazy weekend afternoons at my grandma’s house, where she’d toss together these bars with whatever biscuits and chocolate she had on hand. There’s something so honest about the way it uses simple pantry staples to create a rich, satisfying treat. It’s a reminder that good things often come together without fuss, in moments of chaos or calm alike.
- I’ve kept that same spirit alive—no fancy ingredients, just a pinch of nostalgia and a dash of practicality. The first time I made these, I realized how much I craved that unpretentious, melt-in-your-mouth texture. Now, whenever I need a quick chocolate fix, I turn to this recipe, and it always brings a little warmth, even on the busiest days.
- heading: The story behind this recipe
Ingredient breakdown
- Dark chocolate: I love using a good quality, slightly bitter dark chocolate. It melts smoothly and gives that rich, velvety finish. You can swap it for milk chocolate if you prefer a sweeter, creamier texture—just expect a milder cocoa flavor.
- Biscuits: I usually reach for plain digestives or graham crackers. They provide a perfect crunch and absorb the chocolate well. For a different twist, try oat biscuits or even gluten-free options, but keep an eye on the texture—some might get too crumbly.
- Butter: I use unsalted butter for that clean, creamy base that helps everything stick together. If you’re dairy-free, coconut oil works as a substitute—just note it will add a slight coconut aroma and a different firmness.
- Sweetener: I typically add a touch of honey or golden syrup to enhance gloss and flavor. If you prefer a less sweet bar, you can skip it or try maple syrup. Just be aware it might slightly alter the texture and sheen.
- Optional add-ins: Chopped nuts, dried fruits, or a sprinkle of sea salt can elevate the bars. I like a pinch of sea salt on top—it creates a beautiful contrast with the bitter chocolate and crisp biscuit base. Feel free to experiment with what you have on hand.
- Vanilla extract: A splash of vanilla adds depth and warmth to the chocolate. If you want a more intense flavor, a tiny drop of almond or orange extract can give a lovely twist, but use sparingly to avoid overpowering.
- Optional toppings: I sometimes sprinkle extra crushed biscuits or drizzle white chocolate on top for decoration. These add visual appeal and a bit of extra crunch, but keep it simple if you prefer that rustic, homemade look.
Spotlight on key ingredients
Dark chocolate:
- I love using a good quality, slightly bitter dark chocolate. It melts smoothly and gives that rich, velvety finish. You can swap it for milk chocolate if you prefer a sweeter, creamier texture—just expect a milder cocoa flavor.
- Biscuits: I usually reach for plain digestives or graham crackers. They provide a perfect crunch and absorb the chocolate well. For a different twist, try oat biscuits or even gluten-free options, but keep an eye on the texture—some might get too crumbly.
- Butter: I use unsalted butter for that clean, creamy base that helps everything stick together. If you’re dairy-free, coconut oil works as a substitute—just note it will add a slight coconut aroma and a different firmness.
Biscuits:
- Crushed biscuits: They bring that satisfying crunch and absorb the chocolate beautifully. I like a mix of fine crumbs and larger pieces for texture, especially when you bite into a chunk of biscuit amidst the smooth chocolate.
- Sweetener: I often add a touch of honey or golden syrup to give the bars a glossy shine and a little extra depth. If you prefer less sweetness, skip it—just expect a slightly drier texture, but still delicious.
Notes for ingredient swaps
- Dairy-Free: Swap butter for coconut oil for a slightly coconutty aroma and similar firmness.
- Chocolate: Use milk chocolate if you prefer a sweeter, creamier taste—expect a milder cocoa punch.
- Biscuits: Replace digestives with graham crackers or oat biscuits; aim for similar crunch and absorption.
- Sweetener: Substitute honey or maple syrup instead of golden syrup; note potential slight texture changes.
- Add-ins: Nuts or dried fruits can be swapped or omitted; keep in mind they add crunch or chewiness.
- Vanilla Extract: Use almond or orange extract for a flavor twist—use sparingly to avoid overpowering.
- Toppings: White chocolate drizzle or extra crushed biscuits can be added for decoration or extra crunch.
Equipment & Tools
- Square dish (20x20cm/8×8 inch): Holds the mixture and shapes the bars.
- Heatproof bowl: Melts the chocolate evenly without scorching.
- Spatula: Stirs the chocolate and folds in biscuits gently.
- Knife: Slices the set bars cleanly.
- Parchment paper: Prevents sticking and makes removal easy.
Step-by-step to perfect bars
- Gather your equipment: a 20x20cm (8×8 inch) square dish, a heatproof bowl, a spatula, and a knife for slicing.
- Line the dish with parchment paper, leaving some overhang for easy removal. This keeps cleanup simple and the bars intact.
- Chop 200g (7 oz) of dark chocolate into small pieces. Set aside; smaller bits melt faster and more evenly.
- Melt the chocolate: place in a heatproof bowl over a pot of simmering water (about 60°C/140°F). Stir gently until smooth and glossy, about 3-4 minutes.
- While the chocolate melts, crush 250g (9 oz) of biscuits into small crumbs. Aim for a mix of fine powder and some larger chunks for texture.
- Once melted, remove the bowl from heat. Add 50g (1/4 cup) of butter or coconut oil. Stir until fully incorporated and shiny.
- Pour the crushed biscuits into the melted chocolate mixture. Fold gently with a spatula to coat evenly, about 2 minutes.
- Transfer the mixture into the prepared dish. Use the spatula to spread and press down firmly, ensuring an even layer and compacted surface.
- Refrigerate uncovered for at least 3 hours, or until firm. For best results, let it rest overnight for a more cohesive texture.
- Once set, use the parchment overhang to lift the block out of the dish. Slice into bars or squares with a sharp knife.
- Serve immediately or store in an airtight container in the fridge for up to 5 days. The bars firm up nicely after chilling.
Refrigerate uncovered for at least 3 hours until firm. Use parchment overhang to lift out and cut into bars. Serve immediately or store in an airtight container in the fridge for up to 5 days.
How to Know It’s Done
- Chocolate is smooth, shiny, and fully melted without lumps.
- Crushed biscuits are evenly coated and hold together when pressed.
- Bars are firm and set, with a clean cut and no excess sticky residue.
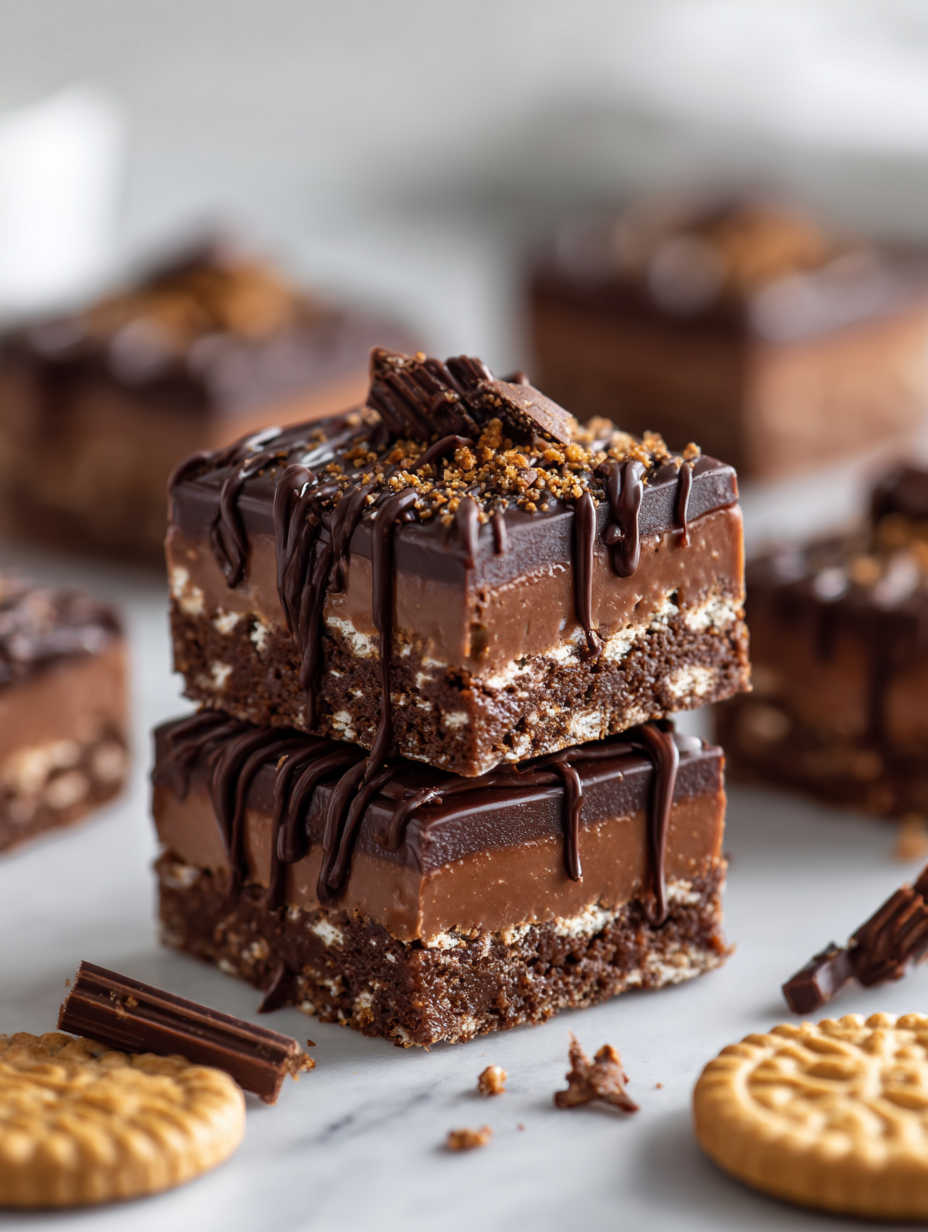
No-Bake Chocolate Biscuit Bars
Ingredients
Equipment
Method
- Line your square dish with parchment paper, leaving some overhang for easy lifting later.
- Chop the dark chocolate into small, even pieces to help it melt faster and more smoothly.
- Place the chopped chocolate into a heatproof bowl and melt it over a pot of simmering water, stirring gently until silky and glossy. This should take about 3-4 minutes.
- While the chocolate melts, crush the biscuits into fine crumbs, aiming for a mix of powder and small chunks for texture.
- Remove the melted chocolate from heat and stir in the butter or coconut oil until fully combined and shiny. Add honey or syrup if using, and mix well.
- Gently fold the crushed biscuits into the melted chocolate mixture until evenly coated and sticky.
- Pour the mixture into the prepared dish and use a spatula to spread it evenly, pressing down firmly to compact everything tightly.
- Refrigerate uncovered for at least 3 hours, or overnight for best results, until the mixture is firm and set.
- Lift the set block out of the dish using the parchment overhang and place on a cutting board.
- Use a sharp knife to slice the block into even bars or squares, wiping the knife clean between cuts for neat edges.
- Serve immediately or store in an airtight container in the fridge for up to 5 days. Enjoy the rich, crumbly, chocolatey goodness!
Tips & Tricks for Best Bars
- Bolded mini-head: Use high-quality chocolate for a glossy, smooth melt that coats evenly.
- Bolded mini-head: Chill the mixture briefly before pouring to prevent melting when spreading.
- Bolded mini-head: Crush biscuits finely for a smooth texture or leave some chunks for crunch.
- Bolded mini-head: Press down firmly when spreading to ensure bars hold together well.
- Bolded mini-head: Refrigerate uncovered for at least 3 hours to avoid condensation and sogginess.
- Bolded mini-head: Use a hot knife to slice cleanly through firm, chilled bars without cracks.
- Bolded mini-head: Add a pinch of sea salt on top for contrast and enhanced chocolate flavor.
Common mistakes and how to fix them
- FORGOT to level the mixture? Press firmly and refrigerate longer to set properly.
- DUMPED chocolate too hot? Wait until it cools slightly before mixing to prevent seizing.
- OVER-TORCHED the chocolate? Melt in short bursts and stir constantly to avoid burning.
- MISSED the chill time? Extend refrigerating to ensure bars are firm and slices cleanly.
Quick fixes and pantry swaps
- When chocolate seizes, splash in a teaspoon of warm coconut oil to loosen it.
- If bars are crumbly, dump in a bit more melted chocolate and press again.
- Over-torched chocolate? Patch with a splash of hot cream to salvage the shine.
- Forgot to chill? Shield the bars with plastic wrap and refrigerate for quicker setting.
- When in doubt, substitute graham crackers for digestives for a different crunch and flavor.
Prep, store, and reheat tips
- Prepare the mixture in advance: Melted chocolate and crushed biscuits can be combined a few hours before pouring, making assembly quicker and easier. The aroma of cocoa and buttery biscuits will already fill your kitchen.
- Store the uncut bars in an airtight container in the fridge for up to 5 days. The cool environment keeps them firm, but be aware the chocolate may develop a slight sheen or bloom over time.
- To extend shelf life, wrap the sliced bars individually in plastic wrap and freeze for up to 3 months. Thaw in the fridge for a few hours before serving, and notice how the chocolate firms up again with a crisp snap.
- Reheat by placing a bar in a microwave-safe dish and warming at 15-20 second intervals until just soft. The chocolate should shimmer and melt slightly, perfect for a quick, gooey treat.
Top questions about no bake bars
1. Can I use different types of chocolate?
Use good quality dark chocolate for a smooth, shiny melt that coats evenly. Milk chocolate is sweeter but less velvety.
2. How finely should I crush the biscuits?
Crush the biscuits into small crumbs for a finer texture or leave some chunks for more crunch in each bite.
3. Can I make these dairy-free?
Yes, coconut oil is a good dairy-free substitute for butter. It melts smoothly but adds a slight coconut aroma.
4. How long can I store the bars?
Refrigerate the bars uncovered for at least 3 hours until firm. Wrap individually for longer storage in the freezer up to 3 months.
5. My mixture is too soft, what do I do?
If the mixture is too runny, add a bit more crushed biscuits or chill it briefly before pouring into the dish.
6. How do I get clean slices?
Use a hot knife to slice through the chilled, firm bars for clean cuts without cracks or crumbling.
7. Should I add salt on top?
Adding a pinch of sea salt on top enhances the chocolate’s richness and balances the sweetness beautifully.
8. How do I melt chocolate without burning it?
When melting chocolate, do it over low heat or in short bursts to prevent burning or seizing.
9. The chocolate seized — what now?
If your chocolate seizes, splash in a teaspoon of warm coconut oil or cream, stirring until smooth again.
10. My bars are crumbly, how can I fix them?
To fix a crumbly bar, melt a little extra chocolate and press it back together before chilling.
These no-bake chocolate biscuit bars are more than just a quick fix; they’re a little reminder that simple things can be so satisfying. Whenever I make them, I’m transported back to lazy afternoons and the comforting smell of melting chocolate. It’s a treat that always feels like a small, honest victory in the kitchen.
In a world that’s constantly rushing, this recipe offers a moment to pause, grab some biscuits, and enjoy a homemade sweet without the fuss. Whether it’s for an unexpected guest or just because I need a moment of chocolatey calm, these bars never disappoint.