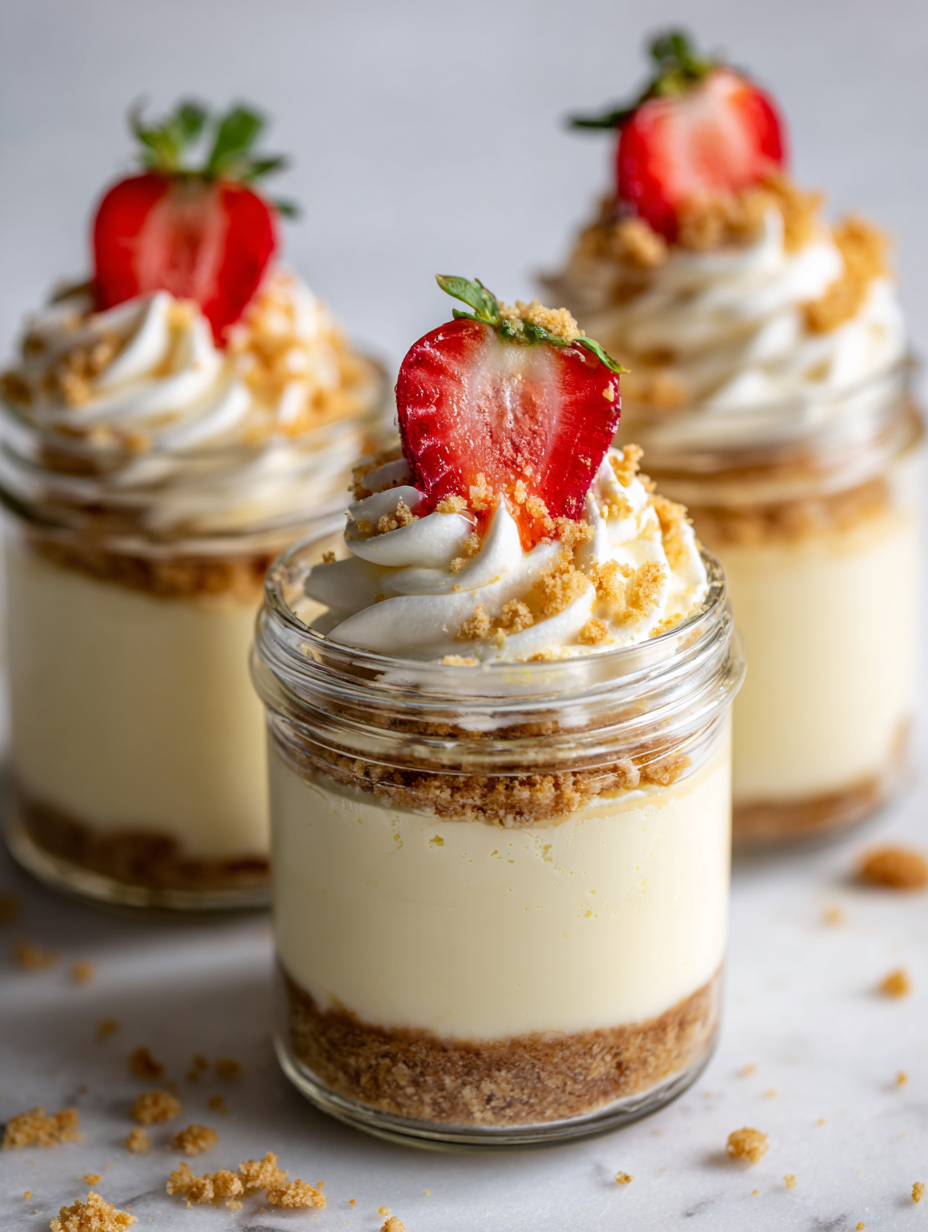
Making these no bake cheesecake cups is like turning a chaotic dessert into a tiny personal celebration. No more fussing with a springform pan or waiting for a big cheesecake to set—just grab some jars and layer away. It’s the kind of recipe that fits into a busy life but still feels indulgent, especially when you’re craving something creamy and tangy.
What I love about this approach is how flexible it is. You can customize each cup with different toppings or flavors, making it a little project for yourself or for a crowd. Plus, the process is honest—no fancy equipment needed, just a spoon, some patience, and a few good ingredients. It’s a small, manageable way to satisfy that cheesecake craving without the usual mess.
Focusing on how making individual cheesecake cups turns the chaos of dessert prep into a manageable, personal moment in a busy life.
Turning Chaos into Personal Joy
- I love how these cups turn dessert into a personal, almost meditative act—each one feels like a tiny victory.
- There was a day I whipped these up during a hectic week—suddenly, a moment of calm and sweetness broke through the chaos.
- Nothing beats the pure joy of spooning that creamy filling into the jars, feeling like I’m creating a little masterpiece each time.
- These cups remind me that sometimes, the simplest recipes are the most satisfying—no fuss, just flavor and texture that hits just right.
- It’s a small act of kindness to myself—these little cheesecakes make ordinary days feel special.
The inspiration behind these cups
- This recipe was born out of a desperate need to enjoy cheesecake without the heavy lifting. One summer evening, I was craving something cool and creamy but had zero energy to turn on the oven or wait for a cake to chill. So I started experimenting with jars, thinking maybe I could get that luscious texture in a simpler way.
- Turns out, layering that tangy cream cheese mixture with a crunchy graham cracker base in small cups not only kept things easy but made the whole experience more personal. I could see everyone’s eyes light up when I handed out these individual treats—like tiny, portable slices of happiness. Now, they’re my go-to for quick parties, picnics, or just a sweet escape when I need it most.
- heading
- story_type
Historical & Cultural Tidbits
- The concept of individual dessert cups dates back to Victorian tea parties, where serving small portions was both elegant and practical.
- No bake cheesecakes gained popularity in the mid-20th century with the advent of refrigeration and easier access to cream cheese.
- This recipe style reflects a modern shift towards personalized, fuss-free desserts that fit into busy lifestyles and smaller gatherings.
Key Ingredients and Tips
- Cream cheese: I prefer the full-fat stuff—it’s the oozy, tangy core. If you want lighter, try Neufchâtel, but you’ll lose some richness.
- Graham cracker crumbs: I crush these until they’re just about sandy—gives a lovely crunch. Swap for digestive biscuits if you’re in the UK, but expect a slightly sweeter note.
- Sweetener (sugar or honey): I like a touch of honey for a mellow sweetness and a hint of floral aroma. Use powdered sugar if you want a smoother filling, especially if mixing by hand.
- Lemon juice: Brightens everything up and cuts through the richness. Use fresh for that zing, but bottled works in a pinch if you’re out of lemons.
- Heavy cream: Whips up to a silky, cloud-like texture. For a lighter version, try coconut cream—adds a subtle tropical flavor and lovely sheen.
- Vanilla extract: Adds depth and warmth. Skip if you want a more neutral cheesecake taste, but it’s the secret whisper of flavor that rounds it out.
- Toppings (berries, chocolate, etc.): I love fresh berries—they add a juicy burst and color. Or sprinkle some crushed cookies for crunch—whatever makes it feel special.
Spotlight on Key Ingredients
Cream cheese:
- I love the velvety, tangy sensation on the tongue; it melts smoothly when mixing. Use full-fat for richness or Neufchâtel for a lighter touch.
- Graham cracker crumbs: I crush these into fine, sandy textures—crisp and slightly sweet. Swap for digestive biscuits if needed, but expect a nuttier, less sweet flavor.
Graham cracker crumbs:
- Lemon juice: Bright and zesty, it invigorates the filling with a fresh, aromatic punch. Use freshly squeezed for that sharp, citrusy hit, or bottled if in a rush.
- Heavy cream: Whips into a silky, cloud-like peak that adds lightness. For a dairy-free version, coconut cream offers a rich, tropical aroma and a glossy finish.
Notes for ingredient swaps
- Dairy-Free: Swap cream cheese for cashew-based soft cheese or coconut cream—won’t be quite as tangy but still creamy.
- Gluten-Free: Use crushed gluten-free graham crackers or digestive biscuits; expect a slightly different crunch and sweetness.
- Sweetener: Replace sugar with maple syrup or agave nectar for a more nuanced, caramel-like flavor; adjust sweetness accordingly.
- Lemon Juice: Use bottled lemon juice if fresh lemons aren’t available—still bright, but less zingy freshness.
- Heavy Cream: Substitute with coconut cream or cashew cream for a vegan option—adds richness, with a different aroma.
- Toppings: Swap berries for sliced fruits, or crushed cookies, depending on your flavor vibe—add texture and color.
- Graham Crackers: Try digestive biscuits or vanilla wafers for a different base flavor—expect a slightly different crumb texture.
Equipment & Tools
- Small jars or cups: For serving individual cheesecake portions.
- Mixing bowl: To prepare the crumb base and filling.
- Whisk or hand mixer: To beat and aerate the cream cheese and heavy cream.
- Spatula: For folding and smoothing the mixture.
- Spoon or piping bag: To fill the jars with the cheesecake mixture.
Step-by-step guide to cheesecake cups
- Gather all your equipment: small jars or cups (for serving), a mixing bowl, a whisk, a spatula, and a small spoon. Make sure your fridge is ready too.
- In a bowl, combine 1 cup of graham cracker crumbs with 2 tablespoons of melted butter and a pinch of salt. Mix until crumbs are evenly coated and resemble wet sand.
- Divide the crumb mixture evenly among your jars, pressing down gently with the back of a spoon to form a firm base. Chill in the fridge for 10 minutes to set.
- While the base chills, beat 8 oz of softened cream cheese with 1/4 cup of sugar and 1 teaspoon of vanilla extract until smooth. Use a whisk or hand mixer on low speed for about 2 minutes.
- Add 1/4 cup of lemon juice and mix again until fully incorporated—this gives a fresh, zingy contrast. If the mixture looks lumpy, scrape down the sides and beat briefly.
- In a separate bowl, whip 1 cup of heavy cream until soft peaks form. Be careful not to overwhip; it should be silky and hold gentle peaks.
- Gently fold the whipped cream into the cream cheese mixture, using a spatula. Do this in stages, folding just until combined. The mixture should be fluffy and light.
- Spoon or pipe the filling over the chilled crumb bases, filling each jar almost to the top. Smooth the surface with the back of a spoon or a small spatula.
- Cover the jars loosely with plastic wrap or lids. Chill in the fridge for at least 4 hours, or overnight if possible. This allows flavors to meld and the filling to firm up slightly.
- Before serving, garnish with fresh berries, a drizzle of honey, or a sprinkle of crushed cookies. Serve cold, and enjoy that creamy, tangy burst with every spoonful.
Chill the assembled cups for at least 4 hours or overnight. Before serving, add toppings as desired. Serve cold, straight from the fridge for best texture and flavor.
How to Know It’s Done
- The filling should be smooth, not lumpy, and hold gentle peaks when whipped.
- The crust should be firm and slightly golden when pressed, not crumbly or soggy.
- The cheesecake should jiggle slightly when shaken but not be runny or liquidy.

No Bake Cheesecake Cups
Ingredients
Equipment
Method
- Combine the graham cracker crumbs with melted butter in a bowl until the mixture resembles wet sand.
- Divide the crumb mixture evenly among your jars, pressing down gently with the back of a spoon to form a firm crust. Place the jars in the fridge for 10 minutes to set.
- In a mixing bowl, beat the softened cream cheese with sugar and vanilla until smooth and creamy, about 2 minutes. The mixture should look fluffy and slightly pale.
- Add the lemon juice to the cream cheese mixture and beat again until fully combined, brightening the flavor and making the mixture slightly thinner.
- In a separate bowl, whip the heavy cream until soft peaks form, listening for a gentle swoosh and watching it turn silky and smooth.
- Gently fold the whipped cream into the cream cheese mixture using a spatula, folding just until fully combined and fluffy.
- Spoon or pipe the creamy filling over the chilled crusts, filling each jar nearly to the top and smoothing the surface with the back of a spoon.
- Cover the jars loosely and chill in the fridge for at least 4 hours, or overnight if possible, to allow the flavors to meld and the filling to set.
- Just before serving, garnish with fresh berries or your favorite toppings for a burst of color and flavor.
Pro tips for perfect cheesecake cups
- Chill the crust briefly before filling to keep it crisp and prevent sogginess.
- Use room temperature cream cheese for smoother, lump-free filling that mixes easily.
- Whip the heavy cream just until soft peaks form—overwhipping can make it grainy and tough.
- Gently fold whipped cream into the cream cheese mixture—this keeps the filling light and airy.
- Chill assembled cups for at least 4 hours—this helps the flavors meld and the filling set perfectly.
- For a glossy top, lightly torch the surface or add a drizzle of warm honey just before serving.
- Use fresh lemon juice for bright, zingy flavor—bottled works in a pinch but lacks vibrancy.
Common mistakes and how to fix them
- FORGOT to chill crust before adding filling → Chill for 10 minutes to prevent sogginess.
- DUMPED filling into hot crust → Wait until crust is cold to avoid melting the base.
- OVER-TORCHED the topping → Use gentle heat when melting chocolate, avoid burning or browning.
- SKIPPED the final chill → Rest cups for at least 4 hours for proper setting and flavor melding.
Quick fixes and pantry swaps
- When filling looks runny → Chill the filling for 10 minutes to thicken.
- Splash hot water on jar rims → Helps seal lids more securely.
- DUMPED too much topping → Use a spoon to even out and add more filling if needed.
- Over-whipped cream turns grainy → Stop whipping as soon as soft peaks form, then fold immediately.
- When crust crumbles → Add a little melted butter and press firmly into jars.
Make-Ahead and Storage Tips
- Prepare the crust mixture and chill it in the fridge for at least 10 minutes before pressing into jars. It firms up and makes spreading easier.
- Assemble the cheesecake filling up to 24 hours in advance. Keep it covered tightly and store in the fridge to maintain freshness and tang.
- These cheesecake cups can be stored in the fridge for up to 2 days. The flavors meld, and the texture stays creamy, but avoid overlong storage to prevent sogginess.
- Reheat is not necessary; serve cold for best texture. If you want a slightly softer filling, let them sit at room temperature for 10 minutes before serving, watching for the filling to soften without losing structure.
Top questions about cheesecake cups
1. Can I use low-fat cream cheese?
Use full-fat cream cheese for the richest, ooziest texture. Light or Neufchâtel will make it less creamy but still tasty.
2. Can I substitute low-fat cream cheese?
Yes, but it might be a bit less tangy and creamy. You may need to add a touch more whipped cream.
3. Why is my crust soggy?
Crust should be pressed firmly and chilled to set. If it’s soggy, it probably needs more chilling or a firmer base.
4. How do I know when the whipped cream is ready?
Make sure your heavy cream is cold and whip it just to soft peaks. Overwhipping turns it grainy.
5. How long should I chill the cheesecake cups?
Chill the assembled cups for at least 4 hours or overnight. This helps the filling set and flavors meld.
6. What are good toppings for these cups?
You can top with fresh berries, chocolate shavings, or a drizzle of honey. Keep toppings light until serving.
7. Can I make these in advance?
Yes, you can prepare the crust and filling a day ahead. Keep everything covered tightly in the fridge.
8. What if my filling is too runny?
If the filling is too runny, chill it for 10 minutes or fold in more whipped cream to thicken.
9. Can I substitute bottled lemon juice?
Use fresh lemon juice for that bright, zingy flavor. Bottled works, but lacks vibrancy and freshness.
10. How do I fix cracks or dull tops?
If the tops crack or look dull, lightly torch or add a fresh fruit garnish for a quick fix.
These no bake cheesecake cups are a small, honest way to indulge without the fuss. They’re perfect for busy days when you want something creamy and satisfying with minimal effort.
Sharing them feels personal, almost like a quiet celebration of simple ingredients and straightforward joy. Sometimes, the best desserts are the ones you can put together quickly and still feel like a treat.