Sometimes, the best desserts are the ones that come together without any heat, especially in the dead heat of summer or after a long day when the last thing you want is to stand by a hot oven. These no-bake cheesecake bars are my go-to for quick, creamy indulgence that feels fancy but is really just a handful of simple ingredients thrown together. They’re perfect for when I want dessert but don’t have the energy or patience for anything complicated.
What I love most about this recipe is its flexibility—change the toppings, add a splash of lemon, or swap out the crust to match what’s in the pantry. It’s a dessert that feels like a little victory, especially when friends drop by unexpectedly or I need a treat that’s easy to make ahead. Plus, the chill time means I can do other things, knowing it’s slowly setting into that silky, tangy goodness I crave.
This recipe is inspired by my late-night craving for something sweet but effortless, a dessert I can whip up without turning on the oven, especially during those hot summer days when the kitchen feels like a sauna. I love how no-bake cheesecake bars can be made ahead, transported easily, and still deliver that creamy, tangy punch I crave after a long day.
A Dessert for Lazy Days
- I love how these bars come together in minutes, saving me from last-minute dessert stress.
- There’s a nostalgic happiness in the creamy tang that always reminds me of family gatherings.
- Honestly, I feel proud every time I make these—they taste like I put real effort into something simple.
- When I’m tired or overwhelmed, this recipe feels like a small victory—quick, satisfying, and no fuss at all.
- Sharing these with friends always sparks good conversations and happy, sticky fingers.
The story behind this recipe
- This recipe actually came from a lazy afternoon experiment. I had some cream cheese and graham crackers sitting around, and I just wanted something quick without heating up the kitchen. The first batch was a total mess—cracks and uneven layers—but the flavor was so good I kept tweaking it until I got that perfect creamy, tangy bite that feels indulgent but easy.
- Over time, I realized how much I rely on these bars for last-minute gatherings or when I need a sweet fix without a fuss. They’re like a little secret weapon—simple, satisfying, and always a hit. Plus, the no-bake aspect makes them feel like a summer’s cheat code, especially when the heat’s got me avoiding the oven entirely.
- heading: ‘The story behind this recipe’
Historical & Cultural Tidbits
- This no-bake cheesecake bar idea likely traces back to the mid-20th century, when refrigeration became more widespread and cooks looked for desserts that didn’t require oven time.
- Some food historians believe that the surge in refrigerated desserts during the 1950s and 60s popularized recipes like these, making them a staple for picnics and summer gatherings.
- The concept of combining cream cheese with a crumbly base was probably inspired by traditional cheesecake recipes, but adapted for quick, no-heat preparation that suits modern busy lives.
Key Ingredients Breakdown
- Cream cheese: I love how its rich, velvety texture melts in your mouth; make sure it’s softened so it blends smoothly—no lumps! You want that silky bite every time.
- Graham cracker crumbs: These give the crust its crunch and sweetness. Toast them lightly if you want a deeper, toasted flavor—just watch for burning, or they’ll turn bitter.
- Butter: I always use unsalted butter, melted until just fragrant and golden. It binds the crumbs perfectly, but if you’re out, coconut oil works well for a dairy-free crust.
- Sugar: I prefer superfine sugar for a smoother, less gritty crust and filling. If you want it less sweet, reduce by a tablespoon; it won’t compromise the creamy balance.
- Lemon juice: Brightens the whole thing with a sharp, fresh zing. Use freshly squeezed for that oozy, vibrant citrus hit—bottled lemon can feel flat and dull.
- Whipped cream: Adds that light, airy contrast to the dense cheesecake. Fold gently to keep the volume—skip it if you want a denser, more traditional texture.
- Vanilla extract: Just a splash enhances the overall flavor with a warm, aromatic note. If you don’t have vanilla, a pinch of almond extract can add a different sort of depth.
Spotlight on key ingredients
Cream cheese:
- I love how its rich, velvety texture melts in your mouth; make sure it’s softened so it blends smoothly—no lumps! You want that silky bite every time.
- Graham cracker crumbs: These give the crust its crunch and sweetness. Toast them lightly if you want a deeper, toasted flavor—just watch for burning, or they’ll turn bitter.
Lemon juice & whipped cream:
- Lemon juice: Brightens the whole thing with a sharp, fresh zing. Use freshly squeezed for that oozy, vibrant citrus hit—bottled lemon can feel flat and dull.
- Whipped cream: Adds that light, airy contrast to the dense cheesecake. Fold gently to keep the volume—skip it if you want a denser, more traditional texture.
Notes for ingredient swaps
- Dairy-Free: Swap cream cheese for cashew-based cream cheese or coconut cream. Expect a slightly sweeter, coconutty flavor and a softer texture.
- Gluten-Free: Use crushed gluten-free cookies or almond flour for the crust. The texture will be a bit denser and nuttier.
- Sweetener: Replace sugar with honey, maple syrup, or agave nectar. These will add moisture and a different kind of sweetness—less crystalline, more syrupy.
- Lemon Juice: Freshly squeezed lemon brightens the filling with a tangy punch. Bottled lemon juice works, but it’s less vibrant and more muted.
- Whipped Cream: Use coconut whipped cream or stabilized plant-based cream for a dairy-free or vegan version. It may not be as fluffy but still light and creamy.
- Butter: Substitute with coconut oil or vegan butter for dairy-free crusts. Expect a slightly different flavor profile—more tropical or neutral.
- Graham Crackers: Replace with digestive biscuits, cookie crumbs, or crushed pretzels for a different flavor and crunch. Adjust sweetness accordingly.
Equipment & Tools
- 20×20 cm (8×8 inch) pan: Holds the crust and filling, helps shape the bars.
- Mixing bowl: Combines ingredients smoothly and evenly.
- Spatula: Spreads and presses crust and filling evenly.
- Small saucepan: Melts butter gently without burning.
Step-by-step guide to cheesecake bars
- Prepare your equipment: a 20×20 cm (8×8 inch) square pan, a sturdy mixing bowl, a spatula, and a small saucepan for melting butter.
- Crush the graham crackers: place them in a zip-top bag and use a rolling pin to crush into fine crumbs, about 1 cup worth. Set aside.
- Melt the butter: in the saucepan over low heat, about 2 minutes, until just fragrant and golden. Remove from heat.
- Combine crumbs and butter: pour the melted butter over the crumbs and mix thoroughly with the spatula until evenly coated.
- Press crust into pan: transfer the crumb mixture to your prepared pan. Use the bottom of a glass or spatula to press firmly into an even layer. Chill in the fridge for 10 minutes to set.
- Make the filling: in the mixing bowl, beat softened cream cheese with 1/2 cup sugar until smooth and fluffy, about 2 minutes. Add 2 tablespoons lemon juice and 1 teaspoon vanilla extract, mix well.
- Incorporate whipped cream: gently fold in 1 cup of whipped cream until well combined. Avoid overmixing to keep it light.
- Assemble the bars: spread the cream cheese filling evenly over the chilled crust. Smooth the top with a spatula.
- Chill and set: cover with plastic wrap and refrigerate for at least 4 hours, preferably overnight, until firm and creamy.
- Final check: the filling should jiggle slightly when shaken, the surface smooth and matte, and the edges set without cracks.
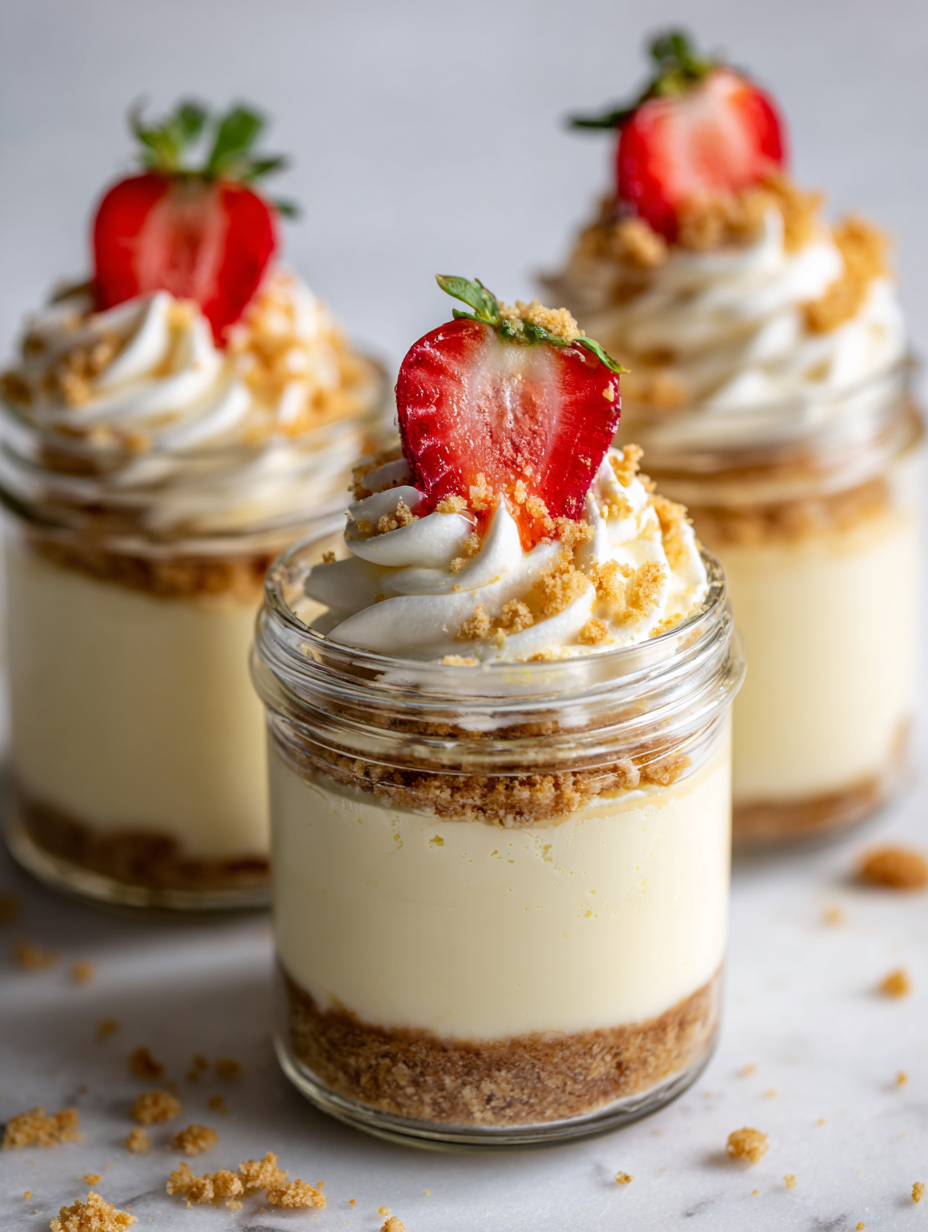
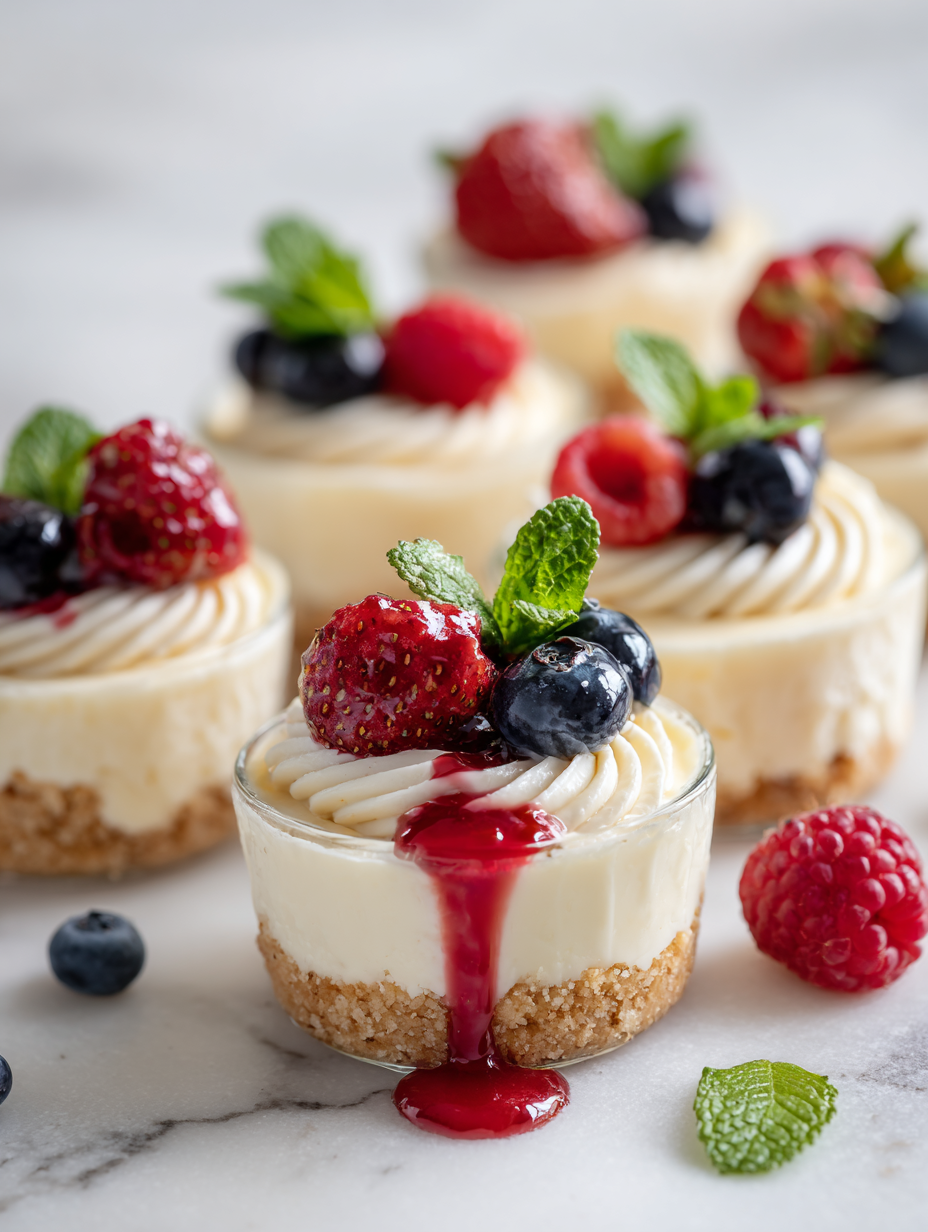
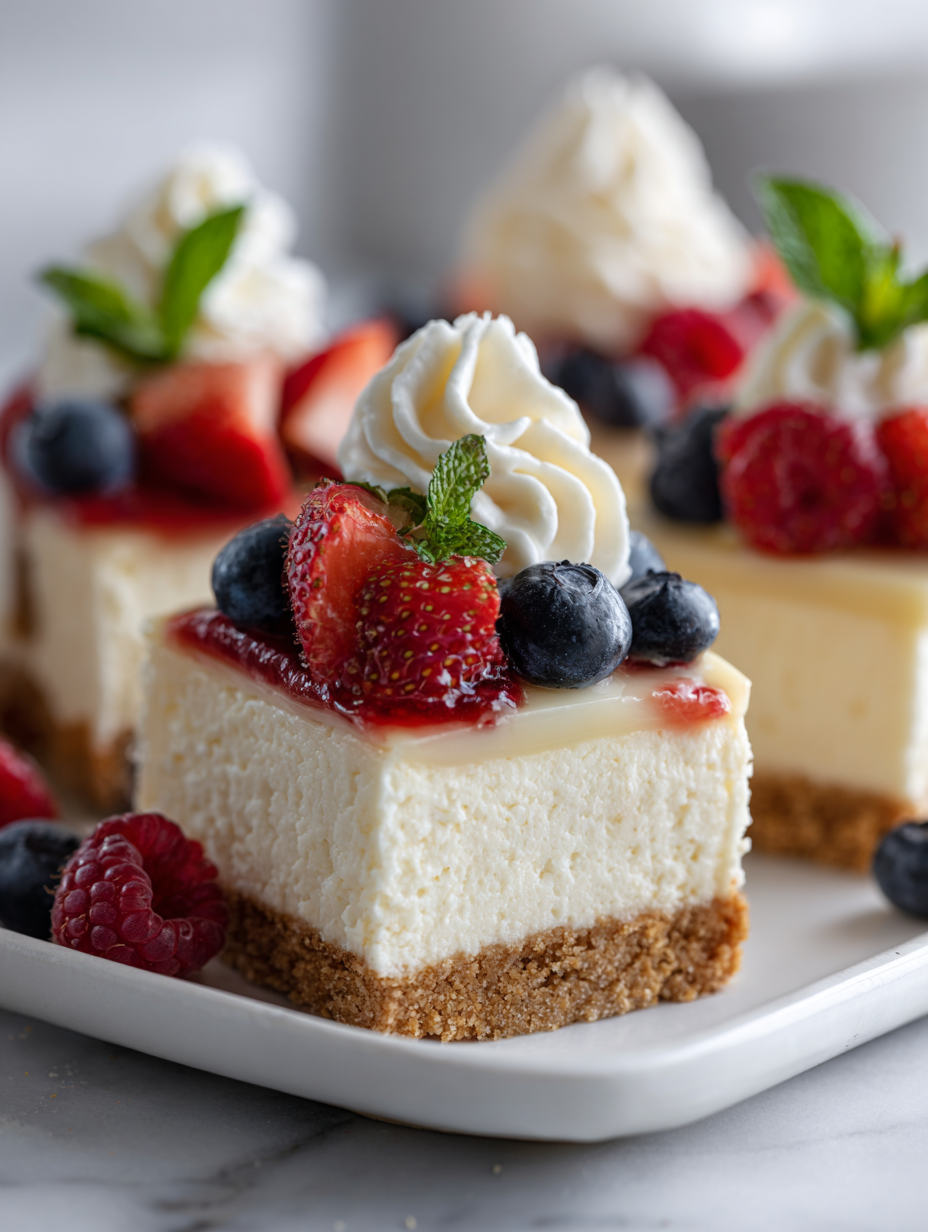
Once set, slice into squares, serve chilled. No need for additional garnishes unless you want a quick drizzle of fruit or chocolate. Keep refrigerated until ready to serve.
How to Know It’s Done
- The crust is golden and firm when pressed; no crumbles fall apart.
- The filling is smooth, slightly jiggles, and holds its shape when sliced.
- The top is matte, not shiny or wet, indicating proper setting.
No-Bake Cheesecake Bars
Ingredients
Equipment
Method
- Crush the graham crackers into fine crumbs using a zip-top bag and rolling pin until you have about 1 cup of crumbs. Transfer to a mixing bowl.
- Melt the butter in a small saucepan over low heat until fragrant and golden, about 2 minutes. Pour the melted butter over the graham crumbs and stir until evenly coated and crumbly.
- Press the crumb mixture firmly into the bottom of your prepared pan, creating an even crust. Chill in the refrigerator for 10 minutes to set.
- In a mixing bowl, beat the softened cream cheese with sugar using a spatula or hand mixer until smooth and fluffy, about 2 minutes.
- Add the lemon juice and vanilla extract to the cream cheese mixture and mix well until combined.
- In a chilled bowl, whip the heavy cream with a mixer until soft peaks form, about 2-3 minutes.
- Gently fold the whipped cream into the cream cheese mixture until fully incorporated and smooth, taking care not to deflate the whipped cream.
- Spread the creamy filling evenly over the chilled crust using a spatula, smoothing the surface for a neat finish.
- Refrigerate the assembled bars for at least 4 hours or overnight until set and firm.
- Once set, slice into squares, serve chilled, and enjoy the silky, tangy goodness of these no-bake cheesecake bars.
Pro tips for perfect cheesecake bars
- Use room temperature cream cheese for a lump-free, silky filling that blends smoothly.
- Press the crust firmly into the pan to prevent it from crumbling when sliced.
- Chill the crust for at least 10 minutes before adding filling to keep it crisp and firm.
- Gently fold whipped cream into the filling for a light, airy texture that won’t deflate.
- Use freshly squeezed lemon juice for a bright, oozy tang that enlivens the creamy flavor.
- Don’t skip the chill time—overnight refrigeration helps the bars set properly and enhances flavor.
- Run a warm knife under hot water before slicing for clean, smooth edges without cracks.
Common mistakes and how to fix them
- FORGOT to chill the crust? Repress and refrigerate for 15 minutes before filling.
- DUMPED too much lemon? Reduce to 1 tablespoon for balanced tang without curdling.
- OVER-TORCHED the crust? Keep a close eye and remove as soon as golden brown appears.
- SPILLED filling? Use a spatula to quickly scoop and smooth it back in place without disturbing the crust.
Quick fixes and pantry swaps
- When the filling is too runny, splash in a little more cream cheese and chill for 15 minutes.
- If the crust crumbles, patch with a bit of melted butter and press down firmly again.
- Splash a few drops of lemon juice if the filling tastes dull or flat.
- Patch cracked bars with a dab of filling and smooth it over for a cleaner look.
- Shield the edges with foil if they start to over-torment while chilling in the fridge.
Prep, store, and reheat tips
- You can prepare the crust and filling a day in advance; keep them covered and refrigerated. The crust may firm up further, making slicing easier.
- Store the assembled cheesecake bars in an airtight container in the fridge for up to three days. The texture stays creamy, but the topping may soften slightly.
- For longer storage, freeze the bars wrapped tightly in plastic wrap and then in foil for up to a month. Thaw in the fridge for a few hours before serving to avoid condensation.
- Refrigerated bars may become a bit firmer; let them sit at room temperature for 10 minutes before slicing for a softer, more luscious bite. The aroma of lemon and vanilla will be more pronounced then.
Top questions about no bake cheesecake bars
1. Should I soften the cream cheese first?
Use softened cream cheese to avoid lumps. It mixes smoothly and gives that velvety texture we love.
2. How long should I chill the cheesecake bars?
Chill the bars for at least 4 hours, preferably overnight. It helps the filling set firm and slice cleanly.
3. Can I substitute the graham cracker crust?
Yes, you can swap graham crackers for digestive biscuits or crushed cookies for different flavors and textures.
4. Is bottled lemon juice okay to use?
Use freshly squeezed lemon juice for that bright, zesty punch. Bottled juice can be dull and flat.
5. Can I skip the whipped cream?
Yes, whipped cream adds a light, airy contrast. Fold it gently into the filling to keep it fluffy.
6. My crust crumbly—what do I do?
If the crust is too crumbly, press it firmly again and chill for 10 minutes to help it set.
7. How long can I keep these in the fridge?
Store leftovers in an airtight container in the fridge for up to three days. Freezing extends shelf life but may soften the texture.
8. The filling is too loose—what now?
If the filling is too runny, mix in a bit more softened cream cheese and chill again for 15 minutes.
9. How do I get perfect slices?
Run a warm knife under hot water before slicing for clean, neat edges without cracks.
10. Can I freeze these cheesecake bars?
Yes, you can freeze the bars wrapped tightly. Thaw in the fridge for a few hours before serving.
These no-bake cheesecake bars are a reminder that sometimes, simplicity reigns supreme. They come together quickly and taste like a little celebration—creamy, tangy, and just sweet enough. Perfect for when time is tight but you still crave something satisfying.
Sharing them with friends or family feels special, even though the process is straightforward. Sometimes, the best moments are found in these easy, honest desserts that don’t fuss but deliver every time.