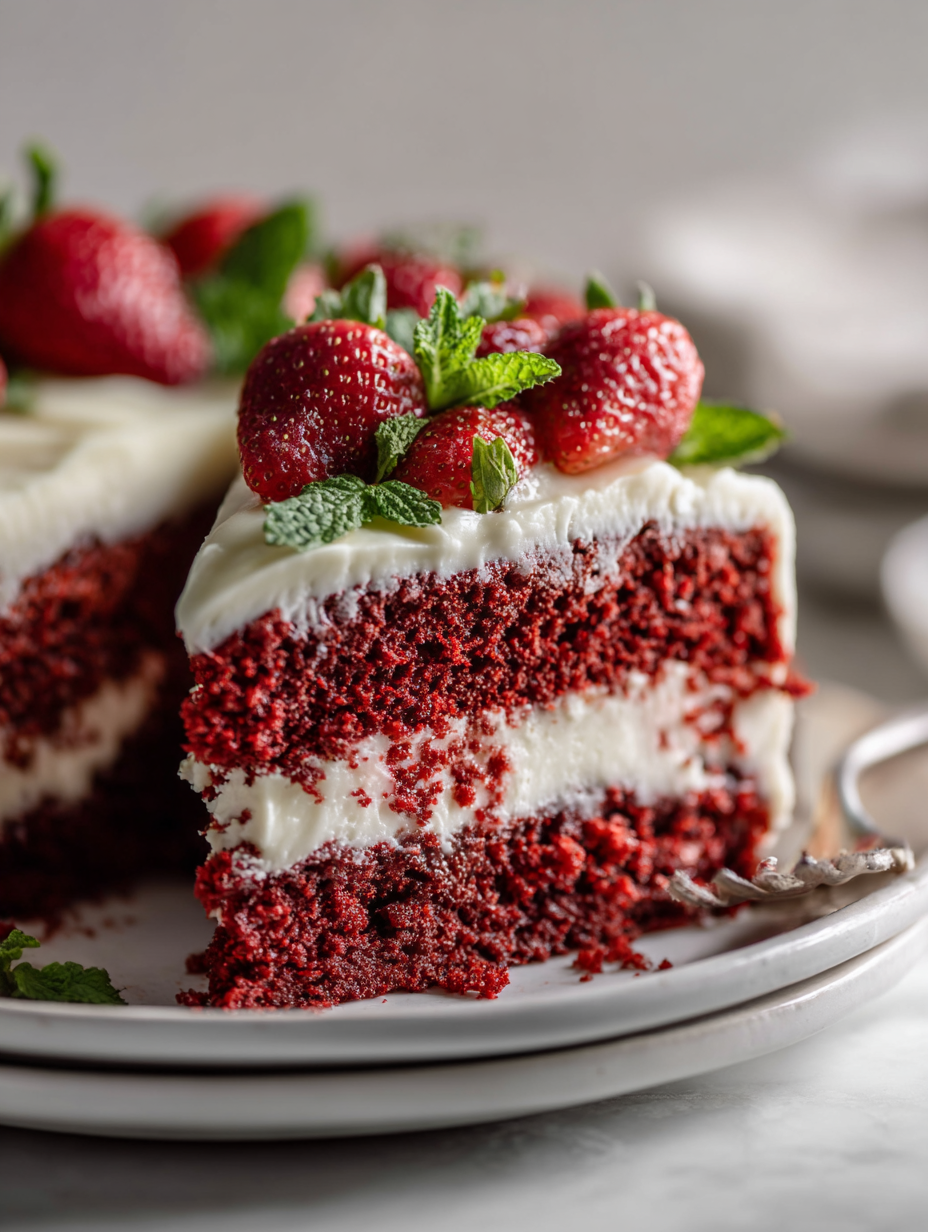
This Red Velvet Strawberry Cake is all about that surprising harmony between the tart, juicy strawberries and the rich, velvety crumb of the cake. I love how the fresh strawberries cut through the deep cocoa tones, making each bite lively and complex. It’s the kind of cake that feels like a celebration of contrast—bright and indulgent at once.
What really drew me to this recipe was how easily it can be adapted to feel both special and approachable. The strawberries add a burst of freshness that lifts the heavy richness of traditional red velvet, making it perfect for spring picnics or a casual weekend treat. It’s a little messy, a little daring, but always worth the effort for that perfect slice.
Baking this cake reminds me of lazy weekend mornings when I’d pick ripe strawberries from the market and dream up new ways to enjoy them. There’s something nostalgic about that sweet, slightly earthy aroma mingling with cocoa, filling the kitchen with a warm, inviting scent. Every time I make it, I feel a little more connected to those simple, joyful moments.
Focusing on the balance of vibrant freshness and deep, comforting richness, this cake explores how the bright, juicy burst of strawberries pairs unexpectedly well with the rich, velvety texture of traditional red velvet, creating a layered experience of contrast and harmony.
The inspiration behind this cake
- This cake came about one spring when I had a mountain of ripe strawberries and a craving to do something playful with red velvet. I wanted the strawberries to shine, not just as a topping, but woven into the very crumb of the cake. It’s almost like a tribute to those fleeting, juicy moments of early-season berries, balanced with the deep cocoa comfort of red velvet.
- Baking it felt like a small rebellion against the usual. Mixing fresh fruit into a traditionally rich cake was risky, but the result was unexpectedly bright and tender—something I kept sneaking bites of while layering and tasting. Every slice carries that little spark of surprise, a reminder that classic flavors can still feel fresh and new.
- heading
- story_type
Ingredient breakdown: key components
- Cream cheese: I love how its slight tanginess balances the sweetness; make sure it’s softened so it mixes smoothly, avoiding lumps.
- Strawberries: Ripe, juicy berries are key—look for deep red, fragrant ones. For a bolder flavor, macerate with a touch of sugar before folding in.
- Red velvet cocoa: The cocoa here is rich and slightly smoky—don’t skimp on quality; it’s what gives the cake its deepen, earthy notes.
- Buttermilk: It adds a tender crumb and a subtle tang; if you don’t have buttermilk, mix milk with a splash of vinegar and let it sit for 5 minutes.
- Food coloring: A little goes a long way to get that vibrant red; use gel dye for intensity without thinning your batter, but don’t overdo it—keep it natural-ish.
- Sugar: I prefer superfine for a smoother batter and finer crumb; if you only have granulated, pulse it briefly in the food processor.
- Eggs: They give structure and moisture; room temperature eggs blend better and help the batter emulsify, ensuring a fluffy, even bake.
Spotlight on key ingredients
Cream cheese:
- I love how its slight tanginess balances the sweetness; make sure it’s softened so it mixes smoothly, avoiding lumps.
- Strawberries: Ripe, juicy berries are key—look for deep red, fragrant ones. For a bolder flavor, macerate with a touch of sugar before folding in.
Strawberries:
- Red velvet cocoa: The cocoa here is rich and slightly smoky—don’t skimp on quality; it’s what gives the cake its deepen, earthy notes.
- Juicy, bright, and fragrant—look for berries with a deep red hue and a sweet, floral aroma. Macerate slightly for enhanced flavor and juiciness.
Notes for ingredient swaps
- Dairy-Free: Coconut cream or vegan cream cheese can replace traditional cream cheese, but expect a slightly sweeter or coconut-forward flavor.
- Gluten-Free: Almond or oat flour can stand in for all-purpose flour, though the texture may be a bit denser and nuttier.
- Sugar Alternatives: Honey or maple syrup can be used instead of granulated sugar, impacting the sweetness and moisture—use less to start.
- Vegan Eggs: Flaxseed meal or applesauce can substitute eggs, though the batter may be slightly denser and less airy.
- Color Boost: Natural beetroot powder can replace artificial food coloring, offering a subtle earthy hue and extra nutrition.
- Strawberry Variations: Frozen strawberries work well if fresh aren’t available; chop and thaw thoroughly to avoid excess water.
- Cocoa Powder: Dutched cocoa or raw cacao nibs can replace standard cocoa, changing the flavor depth and sometimes the color subtly.
Equipment & Tools
- Oven: Bake the cake layers evenly at 175°C (350°F).
- Mixing bowls: Combine ingredients separately for better texture control.
- Electric mixer: Cream butter and sugar, and beat eggs smoothly.
- Measuring cups and spoons: Ensure accurate ingredient proportions.
- Spatula: Spread batter and frosting evenly.
- Cooling racks: Cool layers completely to prevent sogginess.
- Cake pans (8-inch round): Shape the layers uniformly.
Step-by-step guide to making the cake
- Preheat your oven to 175°C (350°F). Grease and flour two 8-inch round cake pans, or line them with parchment. Have your ingredients ready—softened butter, sugar, eggs, buttermilk, cocoa powder, food coloring, and chopped strawberries.
- In a large bowl, cream together 1 cup (225g) butter and 1 1/2 cups (300g) sugar until light and fluffy, about 3-4 minutes. Scrape down the sides frequently. This initial step sets the stage for a tender crumb.
- Add 3 eggs one at a time, beating well after each. Mix in 2 teaspoons vanilla extract. The mixture should loosen and become glossy. If it looks curdled, don’t worry—scrape the bowl and move on.
- In a separate bowl, whisk together 2 1/2 cups (310g) all-purpose flour, 1 teaspoon baking soda, 1 teaspoon salt, and 1/2 cup (45g) unsweetened cocoa powder. Sift to remove lumps. Set aside.
- In thirds, alternate adding dry ingredients and 1 cup (240ml) buttermilk to the butter mixture. Start and end with dry. Mix just until each addition is incorporated, avoiding overmixing. The batter will be thick but smooth.
- Stir in a few drops of bright red gel food coloring—about 1 teaspoon or until you reach a vibrant hue. Gently fold in 1 cup chopped strawberries, making sure they’re evenly distributed without breaking apart the batter.
- Divide batter evenly between prepared pans. Smooth the tops with a spatula. Bake for 25-30 minutes, or until a toothpick inserted in the center comes out with moist crumbs. The edges should pull slightly from the sides.
- Transfer pans to a wire rack. Let the cakes cool in the pans for 15 minutes, then turn out onto racks. Cool completely—this prevents sogginess and makes frosting easier to spread.
- While the cakes cool, prepare your cream cheese frosting. Beat 8 oz softened cream cheese with 1/2 cup (115g) softened butter until creamy. Gradually add 2 cups (250g) powdered sugar and a splash of vanilla. Chill if needed to stiffen.
- Once cooled, level the cake layers if domed. Spread a layer of frosting on the first layer, then top with the second. Use remaining frosting to cover the sides and top smoothly. Decorate with fresh strawberries if desired.
- Rest the assembled cake in the fridge for at least 30 minutes to set the frosting. This helps with cleaner slices and better flavor melding.
Let the cake rest in the fridge for at least 30 minutes before slicing. This helps the frosting set firm. Serve chilled or at room temperature, with extra strawberries for garnish.
How to Know It’s Done
- Cake edges are golden and pulling away slightly from the pan.
- Toothpick comes out clean or with moist crumbs, not wet batter.
- Cake springs back gently when pressed in the center.
Red Velvet Strawberry Cake
Ingredients
Equipment
Method
- Preheat your oven to 175°C (350°F). Grease and flour two 8-inch round cake pans, or line with parchment paper.
- In a large bowl, beat together softened butter and granulated sugar until the mixture is light, fluffy, and fragrant, about 3-4 minutes. This helps create a tender crumb.
- Add eggs one at a time, beating well after each addition. Mix in the vanilla extract until fully incorporated.
- In a separate bowl, whisk together flour, baking soda, salt, and cocoa powder until combined.
- Alternate adding dry ingredients and buttermilk to the wet mixture, starting and ending with the dry, mixing gently after each addition until just combined.
- Stir in the red gel food coloring gradually, until the batter turns a vibrant red hue. Gently fold in the chopped strawberries, distributing them evenly without overmixing.
- Divide the batter evenly between the prepared pans, smoothing the tops with a spatula.
- Bake for 25-30 minutes, or until a toothpick inserted into the center comes out with moist crumbs. The edges should be slightly pulling away from the sides of the pans.
- Allow the cakes to cool in their pans for 15 minutes before transferring to wire racks. Cool completely to prevent sogginess.
- Prepare the frosting by beating softened cream cheese and butter until smooth and creamy. Gradually add powdered sugar and vanilla, mixing until fluffy and well combined. Chill if necessary to stiffen.
- Once the cakes are cooled, level the layers if needed. Spread a generous layer of frosting on top of the first layer, then stack the second layer and frost the entire cake evenly. Decorate with extra strawberries if desired.
- Refrigerate for at least 30 minutes to set the frosting. Slice and serve chilled or at room temperature, enjoying the bright, velvety contrast of flavors.
Pro tips for perfect cake
- Use gel food coloring for vibrant hue without thinning the batter.
- Fold strawberries gently into batter to keep them whole and juicy.
- Chill the cake layers before frosting to prevent sliding and melting.
- Check doneness with a toothpick—moist crumbs mean perfect bake.
- Use room temperature ingredients for smoother mixing and better rise.
- Slightly underbake if you want a fudgier, more moist crumb—edges should be just set.
- Distribute frosting evenly with an offset spatula for a professional finish.
Common mistakes and how to fix them
- FORGOT to check cake doneness → Test with toothpick, should come out moist but clean.
- DUMPED too much food coloring → Use gel dye sparingly for vibrant color without thinning batter.
- OVER-TORCHED the edges → Cover with foil if edges brown too quickly, bake evenly.
- MISTAKENLY skipped cooling time → Cool cakes completely to avoid sogginess and frosting sliding.
Quick fixes and pantry swaps
- When the cake cracks, patch with a dollop of frosting and smooth over.
- If the frosting is too soft, chill it for 10 minutes before spreading.
- Splash a little lemon juice on strawberries to brighten their flavor and shimmer.
- Patch dry edges with extra frosting or a quick brush of simple syrup.
- Shield the cake with foil if edges start to burn or darken too quickly.
Prep, store, and reheat tips
- Cake layers can be baked up to 1 day ahead; wrap tightly in plastic wrap and store at room temperature to keep moist and fresh.
- Frosted cake can be refrigerated for up to 2 days; cover loosely with foil to prevent drying out, allowing flavors to meld.
- Strawberries are best added just before serving to maintain their bright, juicy texture; pre-slice and store in an airtight container in the fridge for up to 24 hours.
- Reheat slices briefly in the microwave (10-15 seconds) to revive softness and aroma; watch for melting frosting or over-softening.
- The flavors deepen after resting overnight in the fridge, but the strawberries may release some juice—serve chilled for best sensory experience.
Top questions about Red Velvet Strawberry Cake
1. Can I use frozen strawberries?
Use fresh, ripe strawberries for the best flavor and juiciness. Frozen can work, but thaw and drain well to prevent excess moisture.
2. Can I substitute fresh strawberries with frozen?
Yes, but reduce the baking time slightly and pat strawberries dry to avoid adding extra water to the batter.
3. Should I add vanilla to the batter?
Adding a splash of vanilla extract deepens the flavor, balancing the tartness of strawberries and richness of the cake.
4. How can I get an intense red color?
Use gel food coloring for vibrant red without thinning the batter. Start with a teaspoon and add more if needed.
5. How do I keep the slices clean?
Chill the cake in the fridge for at least 30 minutes before slicing to help the frosting set and prevent crumbs from mixing.
6. What if my cake cracks while frosting?
If the cake cracks during decorating, patch with frosting and smooth over for a seamless look.
7. How long does the cake stay fresh?
Store the cake in an airtight container in the fridge for up to 2 days. Bring to room temperature before serving for best flavor and texture.
8. Can I use cold ingredients?
Use room temperature ingredients for a smoother batter and better rise. Cold ingredients can cause curdling or uneven mixing.
9. How do I tell when the cake is done?
For a fudgier texture, slightly underbake the cakes; for a lighter crumb, bake until a toothpick comes out with moist crumbs.
10. How can I enhance strawberry flavor?
To brighten strawberries, sprinkle with a little sugar and lemon juice before folding into the batter or topping.
Baking this cake felt like reconnecting with a childhood memory, where the aroma of strawberries and cocoa blended into a comforting scent. Every slice is a reminder that simple ingredients, treated with care, create something unexpectedly joyful. It’s a little project of love that’s worth every messy, joyful moment in the kitchen.
In the end, it’s about those fleeting, bright bursts of flavor that make each bite memorable. Sharing it with someone special, or just indulging alone, feels like a small celebration of the season and the simple pleasure of good baking. Sometimes, that’s enough to make the day feel a little sweeter.

Hello, I’m Oliver James, the person behind Melting Into Flavors. Cooking is my greatest passion, and it’s been the driving force in my life for as long as I can remember.
It’s not just about food for me; it’s about creating experiences, connecting with others, and sharing the love I have for what’s on the plate. Through this blog and my café, I’m able to share my journey with all of you and hopefully inspire some of your own culinary adventures along the way.


