During a particularly hectic week, I found myself reaching for these no-bake chocolate honey bars more often than I’d like to admit. There’s something about the rich, gooey mix that offers a quick escape from chaos, even if just for a few bites. They became my little act of rebellion against the mess of deadlines and to-do lists, a sweet reminder that sometimes simplicity is best.
What I love most is how forgiving this recipe is—no oven needed, just a bit of melting and mixing. It’s a rare kind of comfort that doesn’t demand much time or fuss, perfect for those moments when you need a treat but don’t have the energy for anything fancy. Plus, the smell of honey and cocoa filling the kitchen is a small luxury that can turn any day around.
These bars are more than just a snack; they’re a small act of self-care, a way to carve out a moment of calm amidst the chaos. Whether you’re looking for a quick fix or a little bit of nostalgia, they deliver with every bite. It’s surprising how something so simple can make a hectic day feel a little more manageable.
How these bars became my unexpected remedy during a chaotic week, blending comfort and quick escape in every bite.
The story behind this recipe
This recipe came together one rainy afternoon when I was craving something sweet but didn’t want to turn on the oven. I remembered how my grandmother used to melt honey and chocolate for her no-bake treats, and I thought, why not combine that with some crunchy bits for texture? It’s funny how a simple, spontaneous idea can turn into a little stash of comfort that I keep reaching for. These bars are like a warm hug in every bite, especially when the weather’s gloomy or I need a quick pick-me-up after a long day.
Key Ingredients and Tips
- Chocolate: I prefer a good quality semi-sweet chocolate, it melts smoothly and provides that rich, velvety flavor. Feel free to swap for dark chocolate if you like it more intense—just watch the sweetness level.
- Honey: It’s the glue that gives these bars their sticky, sweet charm. Using local, floral honey adds a hint of aroma that can brighten the whole batch—skip if you want a more neutral sweetness.
- Butter: I use unsalted butter for a clean, creamy base, but salted butter can add a subtle savory note if that’s your thing. Melted butter should be warm but not overly hot—keep an eye on it to avoid scorching.
- Oats: Rolled oats give the bars a satisfying chew. For a nuttier flavor, try toasted oats beforehand—they add a smoky depth. Skip or substitute with gluten-free oats if needed.
- Nuts or Seeds: I toss in a handful of chopped almonds or sunflower seeds for crunch. Toast them lightly for extra flavor—raw nuts stay softer but still add texture. You can leave them out if allergies are a concern.
- Vanilla Extract: Just a splash lifts the chocolate and honey, making everything feel more rounded. Use real vanilla for a fragrant boost—imitation works, but it’s not quite the same.
- Salt: A pinch of sea salt enhances the sweetness and depth. Don’t skip it; it’s what makes the chocolate pop and balances the sticky sweetness.
Spotlight on key ingredients
Chocolate:
- I prefer a good quality semi-sweet chocolate, it melts smoothly and provides that rich, velvety flavor. Feel free to swap for dark chocolate if you like it more intense—just watch the sweetness level.
- Honey: It’s the glue that gives these bars their sticky, sweet charm. Using local, floral honey adds a hint of aroma that can brighten the whole batch—skip if you want a more neutral sweetness.
- Butter: I use unsalted butter for a clean, creamy base, but salted butter can add a subtle savory note if that’s your thing. Melted butter should be warm but not overly hot—keep an eye on it to avoid scorching.
Honey:
- It’s sticky and fragrant, with a floral aroma that intensifies as it warms. It’s the glue in these bars, so quality and freshness matter.
- Oats: Rolled oats have a hearty, chewy texture that balances the richness. When toasted, they develop a smoky, nutty scent—crucial for that crunch and depth.
- Nuts or Seeds: Chopped almonds or sunflower seeds add crunch and richness. Toast them lightly for extra flavor—raw ones stay softer but still add texture.
Notes for ingredient swaps
- Dairy-Free: Swap butter for coconut oil or margarine. Expect slightly different richness and a more tropical aroma.
- Vegan Chocolate: Use dairy-free dark chocolate or cacao nibs blended with coconut oil. It melts well and keeps the bars rich.
- Sweetener: Replace honey with maple syrup or agave nectar. These will give a different, slightly less sticky texture.
- Oats: Gluten-free rolled oats work perfectly if you need a gluten-free version—just ensure they’re processed in a gluten-free facility.
- Nuts/Seeds: Almonds, pecans, or sesame seeds can be substitutes. Toast them lightly for extra flavor, or leave raw for softer bites.
- Flavor Boost: Add a pinch of cinnamon or chili powder to the chocolate mixture for a smoky or spicy twist. Adjust to taste.
- Sweet Add-ins: Mix in dried fruit or coconut flakes for extra texture and flavor variation. Keep in mind they may alter firmness slightly.
Equipment & Tools
- 20×20 cm (8×8 inch) pan: Holds the mixture and shapes the bars.
- Heatproof bowl: Melts chocolate and honey over simmering water.
- Spatula: Stirs the melting mixture and spreads it evenly.
- Parchment paper: Prevents sticking and makes removal easy.
- Sharp knife: Cuts the set bars into squares.
Step-by-step guide to no bake bars
- Gather your equipment: a 20×20 cm (8×8 inch) square pan, a heatproof bowl, a spatula, and parchment paper to line the pan.
- Line the pan with parchment, leaving an overhang for easy removal later. Set aside.
- In a heatproof bowl, combine roughly chopped chocolate (about 200g) and honey (1/3 cup).
- Place the bowl over a saucepan with simmering water (about 80°C/175°F), creating a double boiler. Stir gently until melted and smooth, about 3-5 minutes.
- Remove from heat. Add 1/4 cup melted unsalted butter, 1 teaspoon vanilla extract, and a pinch of salt. Mix well.
- Stir in 1 1/2 cups rolled oats and 1/2 cup chopped nuts or seeds. Mix until evenly coated and crunchy bits are dispersed.
- Pour the mixture into the prepared pan. Use a spatula to spread and press down firmly, ensuring an even surface.
- Tap the pan lightly on the counter to settle the mixture and eliminate air pockets.
- Place in the fridge to set. Chill for at least 2 hours or until firm and crackly on top.
- Once set, lift the bars out using the parchment overhang. Cut into squares or rectangles with a sharp knife.
- Serve immediately or store in an airtight container. These bars keep well for up to a week in the fridge.
Chill the bars until fully firm, at least 2 hours. Remove from fridge, lift out using parchment, and cut into desired shapes. Serve immediately or store in an airtight container in the fridge.
How to Know It’s Done
- Chocolate is fully melted and smooth, no lumps or graininess.
- Mixture is firm but still slightly tacky when pressed.
- Bars hold their shape and crack when cut, not sticky or soggy.
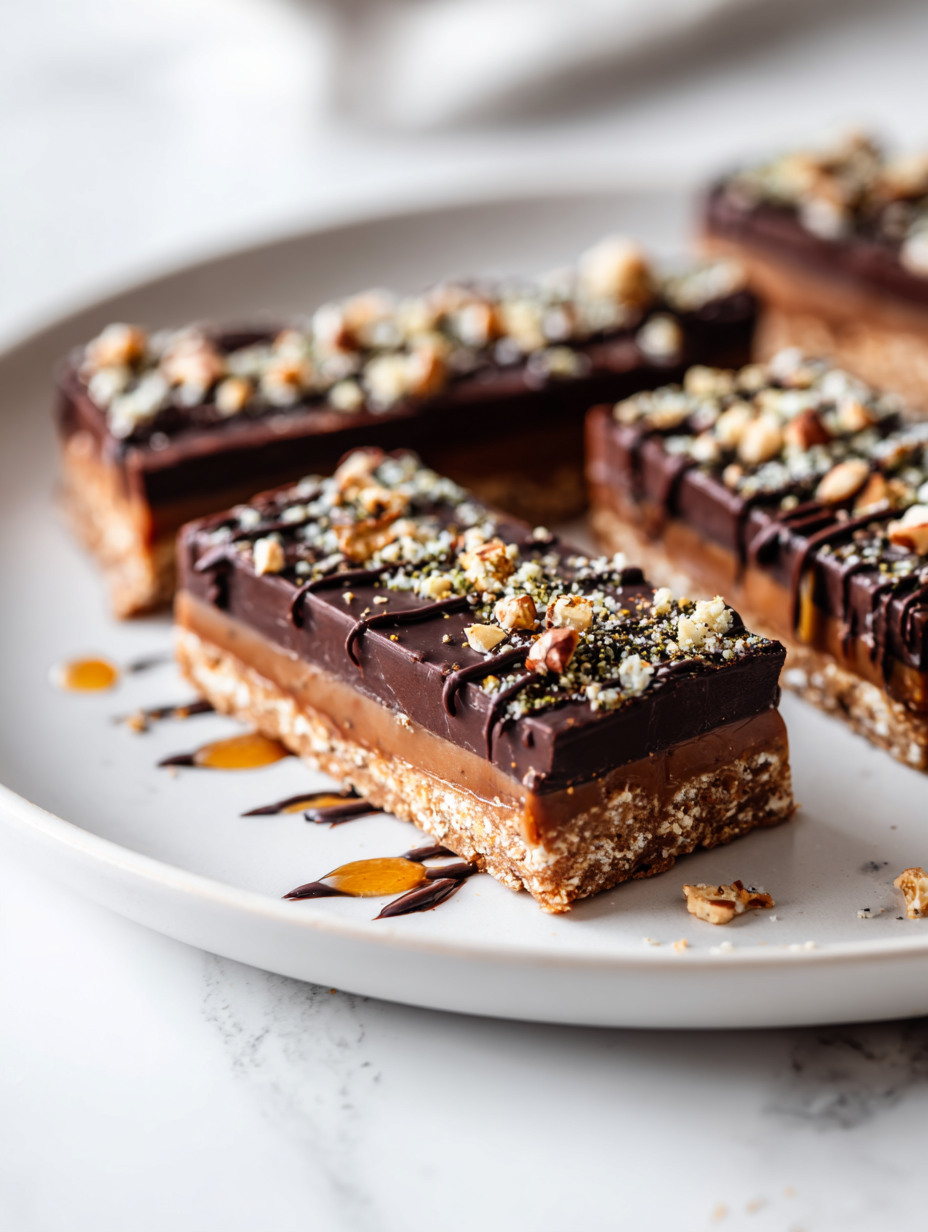
No-Bake Chocolate Honey Bars
Ingredients
Equipment
Method
- Line your pan with parchment paper, leaving overhang for easy removal.
- Combine the chopped chocolate and honey in a heatproof bowl.
- Set the bowl over a saucepan with simmering water and stir gently until the mixture is smooth and shiny, about 3-5 minutes.
- Remove from heat and stir in the warm melted butter, vanilla extract, and a pinch of sea salt until well combined.
- Stir in the oats and chopped nuts, mixing thoroughly so every bit is coated with the chocolate mixture.
- Pour the mixture into your prepared pan and use a spatula to spread it out evenly, pressing down firmly to compact the mixture.
- Tap the pan lightly on the counter to settle the mixture further and remove air pockets.
- Place the pan in the refrigerator and chill for at least 2 hours, or until the mixture is firm and crackly on top.
- Once set, lift the bars out of the pan using the parchment overhang and transfer to a cutting board.
- Slice into squares with a sharp knife dipped in hot water for clean, smooth cuts.
- Serve immediately or store in an airtight container in the fridge for up to a week. Enjoy these chewy, chocolatey bites whenever you need a quick treat!
Pro tips for perfect bars
- Use good quality chocolate for a rich, velvety melt. Cheaper brands can seize or dull.
- Warm honey slightly before mixing in; it becomes more fluid and coats ingredients evenly.
- Melt chocolate over low heat or double boiler; avoid direct heat to prevent scorching and bitterness.
- Press mixture firmly into the pan; this ensures bars hold together and have a uniform texture.
- Chill the bars until completely firm—at least 2 hours—so they cut cleanly without crumbling.
- Use a sharp knife dipped in hot water for cleaner cuts—resist sawing to prevent breakage.
- Store in an airtight container in the fridge; moisture can soften bars, but they stay fresh longer.
Common mistakes and how to fix them
- FORGOT to check chocolate melting; fix by stirring until smooth and glossy.
- DUMPED too much honey; fix by adding more oats to absorb excess sweetness.
- OVER-TORCHED the mixture; fix by cooling slightly before stirring to prevent burning.
- MISSED the parchment lining; fix by using parchment for easy bar removal.
Quick fixes and pantry swaps
- When chocolate seizes → Splash warm milk to smooth it out quickly.
- If bars stick to parchment → Patch with a gentle warm cloth to loosen.
- Dumped too much honey → Stir in extra oats or nuts for balance.
- Over-torched mixture → Shield with a splash of cream or milk to cool and recover flavor.
- When bars crumble → Rescue by pressing back into the pan and chilling briefly.
Prep, store, and reheat tips
- Prepare the mixture and line the pan a day in advance; it firms up better overnight, making cutting easier and cleaner.
- Store the bars in an airtight container in the fridge for up to a week; the cool temp keeps them firm and preserves flavor.
- For longer storage, freeze the bars wrapped tightly in plastic wrap and stored in a freezer bag; they’ll keep for up to a month.
- Refrigerate to maintain firm texture; allow to sit at room temperature for 5 minutes before serving to soften slightly and enhance aroma.
- Reheat in short bursts in the microwave at 15-second intervals if you want a slightly gooey, melty bite—watch for overheating, which can cause graininess.
Top questions about no bake bars
1. Can I use regular chocolate chips instead of baking chocolate?
Use high-quality melting chocolate for a smooth, rich finish. Cheaper chocolate can seize or develop a grainy texture.
2. Can I substitute chocolate chips for chopped chocolate?
Absolutely. Just chop them into small pieces so they melt evenly and smoothly when heated.
3. Will using less honey affect the texture?
Yes, but the texture might be slightly softer. Keep an eye on the fridge time to ensure they set properly.
4. What if the bars are too soft after setting?
If the mixture feels too sticky, add a few more oats or nuts to balance the moisture and firmness.
5. How should I store these bars?
Store in an airtight container in the fridge for up to a week. For longer, freeze wrapped bars for up to a month.
6. Can I make these vegan?
Yes! Swap the honey for maple syrup or agave nectar. The bars will still be sweet but with a slightly different flavor profile.
7. Are these bars dairy-free?
Use coconut oil instead of butter for a dairy-free version, but expect a slightly different texture and aroma.
8. How do I cut the bars without cracking them?
Chill the mixture until firm, about 2 hours, then use a sharp, hot knife to cut clean squares. Keep the knife dipped in hot water for best results.
9. How do I melt the chocolate properly?
When melting, keep the heat low and stir often to prevent burning or seizing. A double boiler helps control temperature.
10. What if my chocolate seizes during melting?
If the chocolate mixture seizes, add a splash of warm milk and stir until smooth again. This quick fix restores creaminess.
These no-bake chocolate honey bars are a reminder that sometimes, the simplest treats are the most satisfying. They come together quickly, yet their rich, gooey texture provides a small moment of indulgence that’s hard to beat.
Whenever I make them, I’m struck by how a few basic ingredients can turn into something so comforting and versatile. They’re perfect for busy days or when a craving hits unexpectedly, offering a quick fix that feels like a warm hug from the kitchen.

Hello, I’m Oliver James, the person behind Melting Into Flavors. Cooking is my greatest passion, and it’s been the driving force in my life for as long as I can remember.
It’s not just about food for me; it’s about creating experiences, connecting with others, and sharing the love I have for what’s on the plate. Through this blog and my café, I’m able to share my journey with all of you and hopefully inspire some of your own culinary adventures along the way.


