Sometimes, the simplest treats are the hardest to resist. These no-bake chocolate rice bars bring back memories of hurried afternoons and spontaneous snack cravings, all made easier with just a handful of ingredients and no stove needed. It’s the kind of recipe that feels like a little secret—quick, satisfying, and just a bit nostalgic.
What makes this recipe stand out isn’t just the ease, but the way it captures a moment of childhood joy—breaking apart crunchy rice cereal coated in rich, melty chocolate. No fuss, no heat, just sticky, crispy, chocolatey goodness that comes together in a matter of minutes. It’s perfect for when you need a sweet fix without the chaos of baking.
And honestly, I keep a batch stashed in the freezer for those frantic moments when life feels a little too hectic. It’s my go-to for quick comfort, and I love how it transforms a simple pantry raid into something unexpectedly delightful. These bars are more than a treat—they’re a tiny rebellion against the busy, noisy world outside.
This recipe is inspired by childhood nostalgia, capturing the simple joy of making something sweet and satisfying without turning on the stove, perfect for busy days or when the kitchen is too hot to handle.
The story behind this recipe
- This recipe came together during a chaotic weekend when I needed something quick and comforting, but didn’t want to turn on the stove. I remembered a batch of rice krispies treats from childhood, but with a richer chocolate twist that felt more indulgent and adult. It’s funny how simple ingredients—just rice cereal, chocolate, and butter—can craft something so satisfying, almost like a tiny edible hug.
- I love that it’s a hands-off, no-bake process, perfect for days when I just want to snack without the fuss. The smell of melting chocolate filling the kitchen takes me right back to lazy, carefree afternoons. Now, these bars are my go-to when I crave something sweet but want to keep it quick and easy, especially during busy weekends or when friends drop by unexpectedly.
- heading
- story_type
Key ingredients and how to tweak
- Dark chocolate: I love a rich, slightly bitter chocolate that melts smoothly, giving the bars a deep flavor. Swap with milk chocolate if you prefer sweeter, but expect a milder cocoa punch.
- Butter: Unsalted butter helps everything come together with a glossy finish and rich aroma. You can use coconut oil for a dairy-free version that still coats the rice crisps nicely.
- Rice cereal: The crunch is what makes these bars satisfying. Skip the rice puffs and try cornflakes for a different texture that’s just as crispy and addictive.
- Honey or syrup: I add a touch for sweetness and to help bind everything. Maple syrup works well too, adding a subtle caramel note that enhances the chocolate.
- Vanilla extract: Just a splash brightens the chocolate flavor and cuts through the richness. Skip if you want a more straightforward cocoa punch, but it’s worth including for depth.
- Sea salt: A pinch on top or mixed in heightens the sweetness and makes the chocolate pop. Try smoked salt if you want an unexpected smoky twist.
- Optional add-ins: Nuts, dried fruit, or coconut flakes can be stirred in for extra texture and flavor. Just keep the mix balanced so it doesn’t overwhelm the chocolate.
Spotlight on key ingredients
Dark chocolate:
- I love a rich, slightly bitter chocolate that melts smoothly, giving the bars a deep flavor. Swap with milk chocolate if you prefer sweeter, but expect a milder cocoa punch.
- Butter: Unsalted butter helps everything come together with a glossy finish and rich aroma. You can use coconut oil for a dairy-free version that still coats the rice crisps nicely.
- Rice cereal: The crunch is what makes these bars satisfying. Skip the rice puffs and try cornflakes for a different texture that’s just as crispy and addictive.
Sweeteners and flavorings:
- Honey or syrup: I add a touch for sweetness and to help bind everything. Maple syrup works well too, adding a subtle caramel note that enhances the chocolate.
- Vanilla extract: Just a splash brightens the chocolate flavor and cuts through the richness. Skip if you want a more straightforward cocoa punch, but it’s worth including for depth.
- Sea salt: A pinch on top or mixed in heightens the sweetness and makes the chocolate pop. Try smoked salt if you want an unexpected smoky twist.
Notes for ingredient swaps
- Dairy-Free: Swap butter for coconut oil or dairy-free margarine. Expect a slightly different richness and a hint of coconut aroma.
- Chocolate: Use dark chocolate for a deeper cocoa flavor or milk chocolate for a sweeter, creamier taste. Carob chips can be an allergy-friendly alternative.
- Sweetener: Honey adds a floral note, while maple syrup offers a caramel undertone. Agave syrup is a neutral, smooth option.
- Rice Cereal: Cornflakes or puffed quinoa can replace rice cereal. They’ll give a different crunch but still keep the bars crispy.
- Add-ins: Nuts or dried fruit can be substituted with seeds or coconut flakes. Adjust quantities to avoid overpowering the chocolate.
- Salt: Fine sea salt enhances flavor; smoked salt adds a subtle smoky depth. Use sparingly to avoid overpowering sweetness.
- Binders: Marshmallow fluff or nut butters can help with sticking if you want a softer, chewier texture, but will alter the classic crunch.
Equipment & Tools
- 20×20 cm (8×8 inch) pan: To shape and set the bars.
- Rubber spatula: For mixing and pressing down the mixture.
- Double boiler or heatproof bowl and saucepan: To melt chocolate gently without burning.
- Parchment paper: To prevent sticking and facilitate easy removal.
Step-by-step guide to no-bake bars
- Gather your equipment: a 20×20 cm (8×8 inch) square pan, a rubber spatula, a double boiler or heatproof bowl and saucepan, and parchment paper. Line the pan with parchment for easy removal.
- Melt the chocolate and butter together: set up a double boiler over medium heat (about 60°C/140°F). Stir occasionally until smooth and shiny, about 5-7 minutes. Keep an eye to prevent scorching; if the mixture smells burnt or thickens too much, lower heat or add a splash of milk.
- Remove from heat and stir in vanilla extract and a pinch of sea salt. Mix thoroughly—this is where the aroma deepens and the chocolate becomes lush.
- Add the rice cereal: fold in gently with the spatula until evenly coated. The mixture should be glossy and sticky. If it’s too dry or crumbly, stir in a teaspoon of melted butter or honey.
- Transfer the mixture to your prepared pan: press it down firmly with the back of a spatula or your fingers (lined with a bit of parchment to avoid sticking). Make sure it’s evenly spread and compacted for clean slicing later.
- Chill in the fridge: cover lightly with plastic wrap and refrigerate for at least 2 hours, or until firm. The chocolate should be set and the bars hold together when pressed.
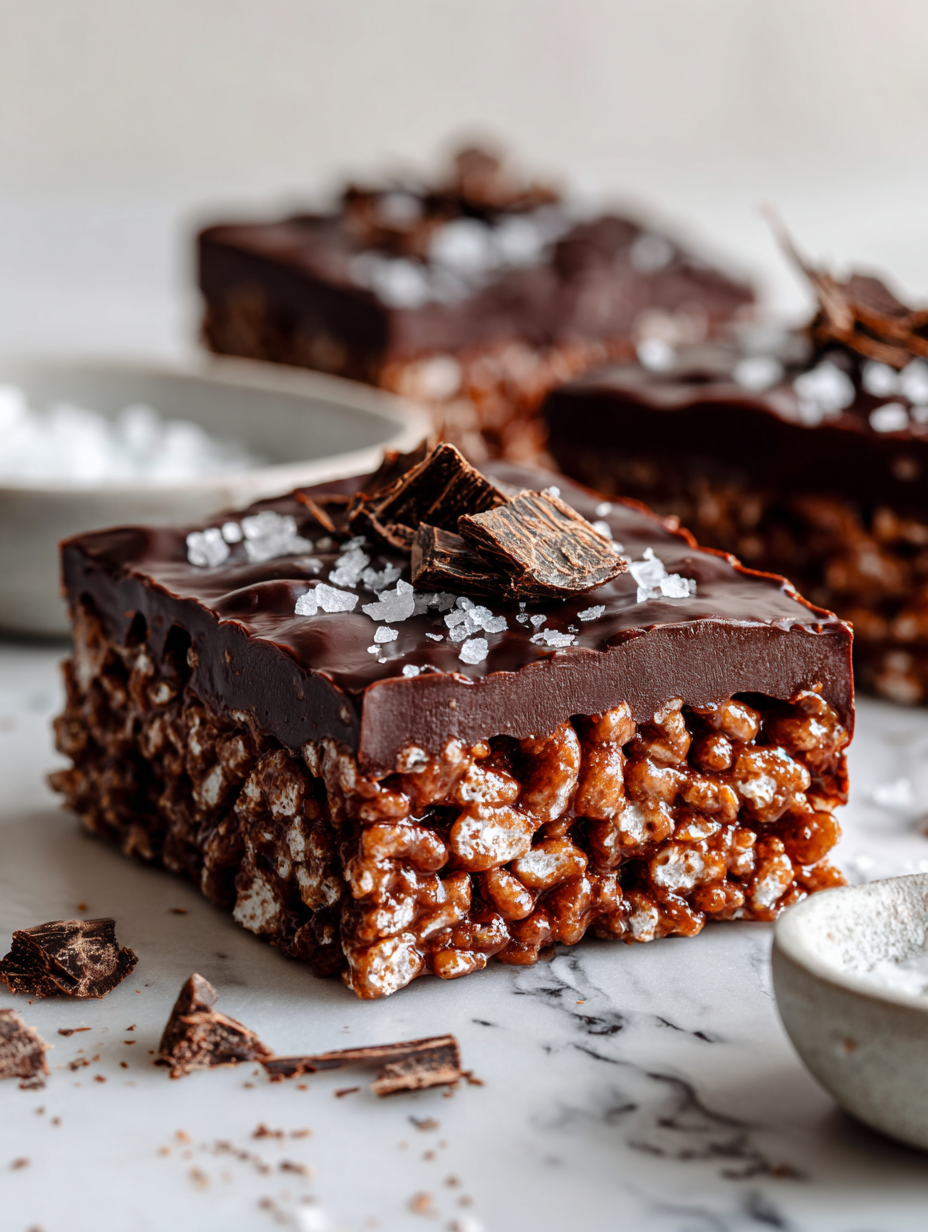
- Cut into squares or bars: use a sharp knife to slice through the chilled mixture. Wipe the knife clean between cuts for neat edges. The bars should be crisp on the outside and chewy inside.
- Finish and serve: gently lift them out of the pan with the parchment, place on a platter, and optionally drizzle with extra melted chocolate or sprinkle with sea salt for a finishing touch.
- Store leftovers: keep in an airtight container in the fridge for up to a week. For longer storage, freeze them wrapped in parchment and foil for up to a month. Let thaw slightly before serving for best texture.
Refrigerate the bars until firm, at least 2 hours. Slice into squares, serve directly or drizzle with extra chocolate. Store in an airtight container in the fridge for up to a week or freeze for longer storage. Let thaw slightly before serving.
How to Know It’s Done
- Chocolate is glossy and fully melted with no lumps.
- Rice cereal is evenly coated and sticks together when pressed.
- Bars are firm but chewy, with a slight crackle when bitten.
No-Bake Chocolate Rice Bars
Ingredients
Equipment
Method
- Line your pan with parchment paper to prevent sticking and set aside.
- Set up a double boiler or place a heatproof bowl over a saucepan with simmering water. Add chopped dark chocolate and butter to the bowl.
- Gently stir the mixture as it melts, watching for a glossy, smooth texture with no lumps. This should take about 5-7 minutes, and you'll smell a rich chocolate aroma filling the air.
- Once melted, remove the bowl from heat and stir in vanilla extract and a pinch of sea salt for added flavor depth.
- Pour the melted chocolate mixture into a large bowl and fold in the rice cereal using a spatula. Gently mix until the cereal is evenly coated and the mixture is sticky and glossy.
- Transfer the mixture into your prepared pan. Use the back of a spatula or your fingers (lined with parchment) to press the mixture firmly into an even layer. This helps the bars hold together nicely.
- Cover the pan lightly with plastic wrap and refrigerate for at least 2 hours, or until the chocolate is set and the bars are firm.
- Once chilled and firm, lift the bars out of the pan using the parchment paper and place on a cutting board. Use a sharp knife to cut into squares or rectangles.
- Optional: sprinkle a tiny pinch of sea salt on top of each bar for extra flavor and visual appeal.
- Serve immediately or store leftovers in an airtight container in the fridge for up to a week. For longer storage, wrap individually and freeze for up to a month. Let thaw slightly before enjoying.
Notes
Pro tips for perfect bars
- Bolded mini-head: Use a gentle double boiler to melt chocolate—this prevents scorching and keeps the sheen.
- Bolded mini-head: Press the mixture firmly into the pan to avoid crumbly bars and ensure clean slicing later.
- Bolded mini-head: Add a pinch of sea salt on top before chilling—this enhances the chocolate’s richness and adds a subtle crunch.
- Bolded mini-head: Wipe the knife clean between cuts for sharp, neat edges—this keeps your bars looking professional.
- Bolded mini-head: For a shinier finish, give the melted chocolate a quick stir to redistribute heat before pouring.
- Bolded mini-head: If the mixture feels too sticky, sprinkle in a bit more rice cereal to balance the crunch and hold.
- Bolded mini-head: Chill the bars at least 2 hours to fully set—rushing this step can make slicing messy and uneven.
Common mistakes and how to fix them
- FORGOT to temper chocolate → Use gentle heat and stir constantly.
- DUMPED in all ingredients at once → Mix gradually for even coating.
- OVER-TORCHED chocolate → Remove from heat immediately to prevent bitterness.
- MISSED the chilling step → Ensure bars are fully set before cutting for clean edges.
Quick fixes and pantry swaps
- When mixture is too sticky → Splash in a bit more rice cereal for easier handling.
- If chocolate seizes → Ditch the bowl and start melting again gently over low heat.
- Splash with warm water if chocolate isn’t melting smoothly—stir until glossy.
- Patch cracks by pressing the mixture back together with a spatula—don’t worry about small imperfections.
- Shield from moisture in the fridge—humidity can cause the chocolate to bloom, dulling shine.
Prep, store, and reheat tips
- You can prepare the mixture and press it into the pan a day ahead; just cover tightly and chill overnight. The chocolate will firm up further, making slicing easier and cleaner.
- Store the bars in an airtight container in the fridge for up to a week. The cool environment keeps the chocolate glossy and prevents melting, but expect a slightly firmer bite.
- For longer storage, wrap individual bars in parchment and freeze for up to a month. Thaw at room temperature for a few minutes before serving to regain some chewiness.
- Reheat by letting a bar sit at room temperature for 10 minutes or gently warming it in a low oven (about 90°C/200°F) for a few seconds to soften the chocolate without melting it completely. The aroma of melting chocolate is the giveaway—rich and inviting.
Top questions about no bake rice bars
1. What exactly are no bake chocolate rice bars?
A chewy, crispy treat with rich chocolate flavor and a satisfying crunch from rice cereal. The texture is sticky yet firm, perfect for quick snacking or sharing.
2. Can I substitute the chocolate or butter?
Use dark chocolate for a deeper cocoa taste, or milk chocolate for sweeter notes. Coconut oil can replace butter for a dairy-free version, adding a slight coconut aroma.
3. How do I know when the bars are set?
Chill the mixture in the fridge for at least two hours until firm. The bars are ready when they are solid, shiny, and hold their shape when pressed.
4. How should I store these bars?
Wrap leftovers tightly in plastic wrap or store in an airtight container in the fridge. They stay fresh for up to a week and can be frozen for longer storage.
5. Can I add other ingredients?
Yes, adding chopped nuts, dried fruit, or coconut flakes can boost flavor and texture. Just keep the additions balanced so they don’t overwhelm the chocolate.
6. How do I melt the chocolate properly?
Use a double boiler or a heatproof bowl over simmering water. Stir gently and frequently to prevent scorching and ensure a smooth, glossy melt.
7. How do I get the bars to hold together?
Ensure the mixture is pressed firmly into the pan to avoid crumbly bars. Use a spatula or your fingers (lined with parchment) to compact the surface evenly.
8. What if the mixture is too sticky or the chocolate seizes?
If mixture is too sticky, sprinkle in more rice cereal. If chocolate seizes, stop and start melting anew over low heat, stirring constantly.
9. Should I add salt or toppings?
Add a pinch of sea salt before chilling to enhance sweetness and flavor contrast. You can also sprinkle extra salt on top after setting.
10. How do I cut the bars neatly?
Use a sharp knife wiped between cuts for clean edges. Wipe with a warm cloth to keep the blade sharp and prevent sticking.
Making these no bake chocolate rice bars is like capturing a moment of childhood simplicity. They’re a reminder that sometimes, the best treats come together without fuss, just good ingredients and a little patience in the fridge. It’s a small, sweet victory in the middle of a busy day or a lazy weekend afternoon.
And honestly, once you’ve got that first bite—crunchy rice cereal balanced with rich, melty chocolate—you’ll understand why I keep these around. They’re not just a quick fix, but a little bit of joy you can rely on, anytime you need a simple, satisfying sweet.

Hello, I’m Oliver James, the person behind Melting Into Flavors. Cooking is my greatest passion, and it’s been the driving force in my life for as long as I can remember.
It’s not just about food for me; it’s about creating experiences, connecting with others, and sharing the love I have for what’s on the plate. Through this blog and my café, I’m able to share my journey with all of you and hopefully inspire some of your own culinary adventures along the way.


