Sometimes, the simplest ingredients can surprise you. These no-bake date bars are a prime example—no oven needed, just a little patience to let everything set. It’s my go-to when I want something sweet but don’t want to fuss with heat or complicated steps.
What I love most is how honest and straightforward they are. Just sticky dates, crunchy nuts, a touch of cocoa, and a sprinkle of sea salt. They come together in minutes, but the flavor feels like it’s been slowly crafted over time, with that perfect balance of richness and chew.
This recipe is my little reminder that good things don’t always require a lot of effort. It’s honest, unpolished, a bit messy—just like a real kitchen—and that’s exactly why it works. When I need a quick treat that feels special, these bars save the day.
This recipe is a testament to how simplicity, when done right, can bring unexpected comfort. I often turn to no-bake treats when life gets hectic or I need a quick fix that still feels indulgent. The sticky, chewy texture combined with the rich, caramel-like flavor of dates makes these bars feel like a small victory in my busy kitchen.
The story behind this recipe
I first stumbled upon this recipe during a chaotic week when I needed something quick and satisfying. I was craving that rich, caramel-y sweetness of dates but didn’t want to turn on the oven or make a mess. It’s become a little ritual of mine—pressing the sticky mixture into a pan, then waiting just enough for it to set, feeling that first firm bite with a sense of quiet accomplishment. These bars remind me that sometimes, the simplest ingredients, handled honestly, can turn into a small, sweet victory.
Ingredient breakdown: key components
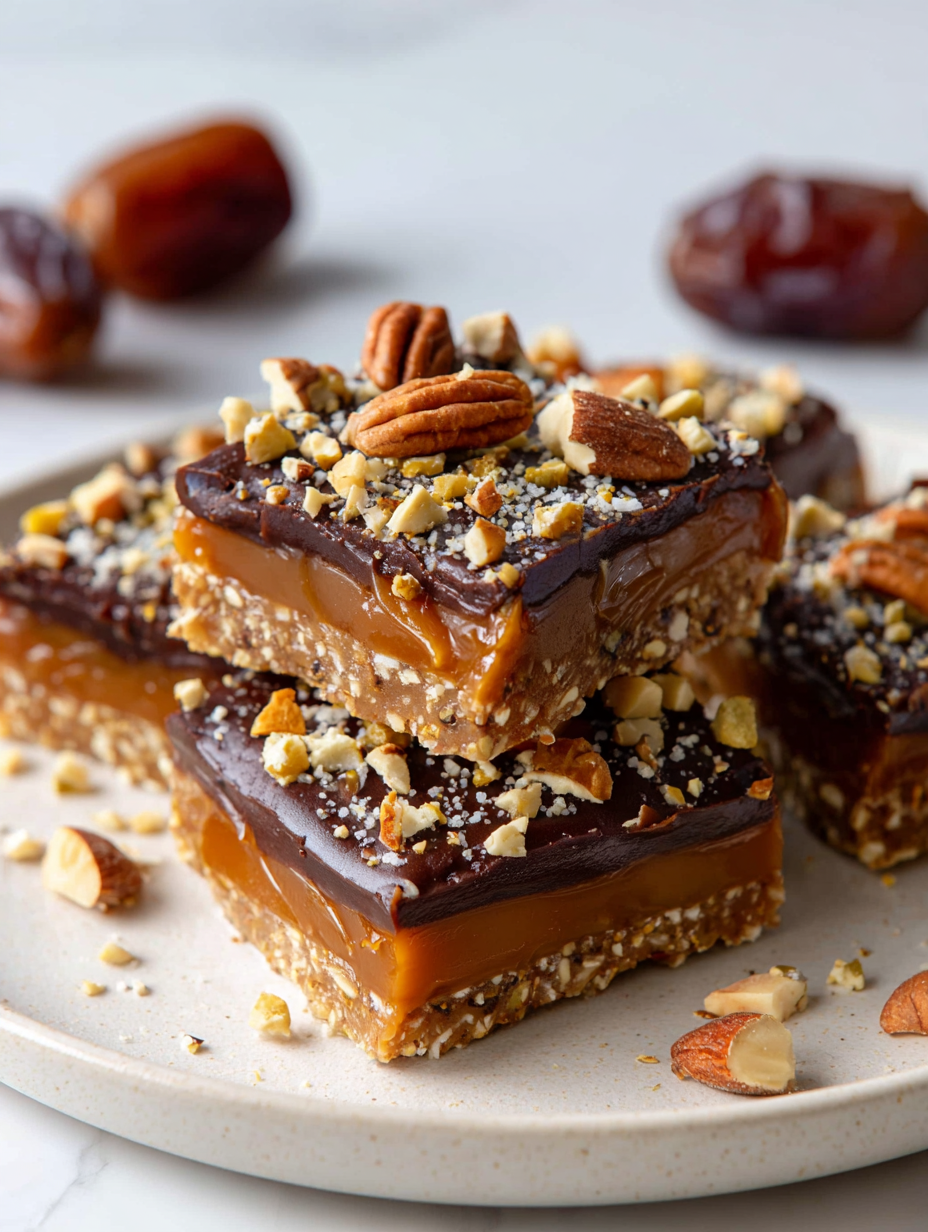
- Dates: I love how they turn gooey and caramel-like when blended—just make sure to pick soft, moist dates for that rich, sticky texture. You can swap in dried apricots if you want a slightly tangy twist, but the flavor won’t be as sweet and mellow.
- Nuts: I prefer crunchy almonds or cashews for a satisfying bite. Toast them lightly beforehand to boost flavor and aroma. If allergies are an issue, shredded coconut can add a different kind of chew and coconutty aroma that’s just as inviting.
- Cocoa Powder: I use unsweetened cacao to keep the bars rich and dark. Sifting it first helps avoid clumps. If you want a sweeter version, toss in a bit of honey or maple syrup, but the cocoa’s bitterness balances the sweetness perfectly.
- Sea Salt: I sprinkle just a pinch on top—it cuts through the sweetness and enhances the nutty, caramel notes. If you’re into salty-sweet, try flaky sea salt for that crispy burst of saltiness with each bite.
- Binding Oil or Butter: I prefer a splash of coconut oil for its mild flavor and smooth texture. It helps everything hold together. If you skip it, the bars might be a little crumbly—consider pressing them extra firmly into the pan.
- Optional Add-ins: I sometimes toss in a handful of chia seeds or chopped dried fruit for extra texture. Feel free to experiment with sesame or flax seeds if you want more crunch and nutrition in each bite.
Spotlight on key ingredients
Dates:
- I love how they turn gooey and caramel-like when blended—just make sure to pick soft, moist dates for that rich, sticky texture. You can swap in dried apricots if you want a slightly tangy twist, but the flavor won’t be as sweet and mellow.
- Nuts: I prefer crunchy almonds or cashews for a satisfying bite. Toast them lightly beforehand to boost flavor and aroma. If allergies are an issue, shredded coconut can add a different kind of chew and coconutty aroma that’s just as inviting.
Nuts and Cocoa Powder:
- Nuts: I prefer crunchy almonds or cashews for a satisfying bite. Toast them lightly beforehand to boost flavor and aroma. If allergies are an issue, shredded coconut can add a different kind of chew and coconutty aroma that’s just as inviting.
- Cocoa Powder: I use unsweetened cacao to keep the bars rich and dark. Sifting it first helps avoid clumps. If you want a sweeter version, toss in a bit of honey or maple syrup, but the cocoa’s bitterness balances the sweetness perfectly.
Notes for ingredient swaps
- Dates: I prefer soft medjool dates for their natural sweetness and sticky texture. Swap with dried figs or dried apricots if you want a different flavor profile, but expect a less caramel-like chew.
- Nuts: Toasted almonds or cashews give a satisfying crunch. You can substitute with walnuts or pecans, but keep in mind they may alter the flavor and texture slightly.
- Cocoa Powder: Unsweetened cacao keeps it rich and dark. If you prefer a sweeter bar, add a teaspoon of honey or maple syrup, but the deep cocoa aroma might diminish.
- Sea Salt: Just a pinch enhances the caramel notes. Flaky sea salt on top adds a crispy burst—skip it if you want a milder, less salty finish.
- Oil or Butter: Coconut oil is my go-to for smoothness and mild flavor. Swap with butter or a neutral oil like safflower if you prefer a different richness, but the texture might change.
- Add-ins: Chopped dried fruit or seeds can boost texture. Feel free to experiment with sesame seeds or chia for extra crunch and nutrition.
Equipment & Tools
- Baking pan: To hold and shape the mixture
- Spatula: For pressing and smoothing the mixture
- Sharp knife: To slice the set bars cleanly
- Parchment paper: To prevent sticking and for easy removal
- Blender or food processor: To blend the dates into a paste
- Skillet: To toast nuts for added flavor
Step-by-step guide to no bake date bars
- Gather your equipment: a 20×20 cm (8×8 inch) baking pan, a spatula, a sharp knife, and parchment paper for lining. Have a blender or food processor ready for the dates.
- Line the pan with parchment paper, leaving some overhang for easy removal later. This helps with clean slicing and handling.
- In your blender, add about 250 grams (9 oz) of pitted soft dates. Blend until they form a sticky, oozy paste, about 30 seconds. If they’re dry, soak them in warm water for 10 minutes first, then drain.
- Chop 100 grams (3.5 oz) of your favorite nuts—almonds or cashews work well—and toast them lightly in a dry skillet over medium heat for 3-4 minutes until fragrant and slightly golden. Let cool.
- Add the toasted nuts to the blended dates. Mix well with a spatula or spoon until evenly combined. If the mixture feels too sticky, sprinkle in a teaspoon of cocoa powder or a splash of coconut oil to help bind.
- Press the mixture evenly into the prepared pan. Use a spatula or the back of a measuring cup to press firmly and smooth the surface. The more compact, the better the bars will hold together.
- Sprinkle a pinch of sea salt over the top. Optionally, add a few flakes for extra texture and flavor contrast.
- Place the pan in the fridge for at least 2 hours, or until the mixture is firm and set. This helps everything bind and makes slicing easier.
- Once set, lift the mixture out using the parchment overhang. Place on a cutting board and slice into bars or squares with a sharp knife.
- Serve immediately or store in an airtight container in the fridge for up to a week. For longer storage, freeze the bars and thaw at room temperature for a soft bite.
Refrigerate the pressed mixture for at least 2 hours until firm. Slice into bars, then serve or store in an airtight container. For best texture, keep chilled until ready to eat.
How to Know It’s Done
- The mixture should be sticky but not overly wet, with a uniform texture.
- Bars hold their shape firmly when pressed; they shouldn’t crumble easily.
- The edges are clean and even when sliced, with no sticking or crumbling.
No-Bake Date Bars
Ingredients
Equipment
Method
- Line your baking pan with parchment paper, leaving overhang for easy removal.
- Place your pitted dates into a blender or food processor and blend until they form a sticky, gooey paste, about 30 seconds. If they're dry, soak them briefly in warm water, then drain before blending.
- While the dates are blending, toast your nuts in a dry skillet over medium heat for 3-4 minutes until fragrant and lightly golden. Let them cool slightly, then chop into smaller pieces.
- Add the chopped toasted nuts to the blender with the date paste. Pulse a few times to combine, or stir with a spatula until evenly mixed. The mixture should be sticky and slightly chunky.
- If the mixture is too sticky to handle, stir in a tablespoon of melted coconut oil to help it come together. This makes pressing easier and improves the texture.
- Press the mixture firmly into the prepared pan using the back of a spatula or your fingers, smoothing out the top so it's even. The mixture should be compact and hold together when pressed.
- Sprinkle a pinch of sea salt over the top for a salty contrast, then gently press it into the surface with your fingers.
- Place the pan in the refrigerator and chill for at least 2 hours, or until the mixture is firm and set.
- Once set, lift the entire block out of the pan using the parchment overhang. Place on a cutting board and cut into bars or squares with a sharp knife.
- Serve immediately or store in an airtight container in the fridge for up to a week. For longer storage, freeze the bars and thaw at room temperature before eating.
Notes
Pro tips for perfect no bake date bars
- Bolded mini-head: Use a food processor to blend dates until smooth—avoid over-processing to prevent heat build-up that can alter texture.
- Bolded mini-head: Toast nuts lightly in a dry skillet for 3-4 minutes—this enhances aroma and adds a satisfying crunch.
- Bolded mini-head: When pressing the mixture into the pan, use the back of a measuring cup for an even, firm pack—crucial for clean slices.
- Bolded mini-head: Sift cocoa powder before mixing—prevents clumping and keeps the chocolate flavor evenly distributed.
- Bolded mini-head: Chill the assembled bars for at least 2 hours—this firming step ensures they hold together without crumbling.
- Bolded mini-head: For a shiny top, sprinkle flaky sea salt just before chilling—delights the senses with a salty crunch and enhances sweetness.
- Bolded mini-head: If mixture feels too sticky, add a teaspoon of cocoa powder or a splash of coconut oil—adjusts texture without compromising flavor.
Common mistakes and how to fix them
- FORGOT to chill the mixture → Chill for at least 2 hours for proper set.
- DUMPED too much oil → Use sparingly; too much makes bars greasy and soft.
- OVER-TORCHED nuts → Toast lightly, keep a close eye to avoid bitterness.
- MISSED pressing firmly → Press mixture tightly to prevent crumbling when sliced.
Quick fixes and pantry swaps
- When mixture is too sticky, splash in a little more coconut oil to help it hold.
- If bars crumble, chill longer or press firmly into the pan before setting.
- Splash cold water on a sticky knife for cleaner cuts through firm bars.
- Patch over cracks with a bit of melted chocolate for a polished look.
- Shield from humidity by wrapping bars tightly; humidity makes them softer and stickier.
Prep, store, and reheat tips
- Prepare the mixture ahead of time: Blend dates and chop nuts the day before to save time and enhance flavor blending.
- Store the assembled bars in an airtight container in the fridge for up to a week, keeping them firm and fresh with a chewy texture.
- For longer storage, freeze the bars for up to a month; wrap individually to prevent freezer burn and preserve flavor.
- Refrigerate or thaw the bars at room temperature for about 10 minutes before serving, noting the aroma of caramel and nuts intensifies as they soften.
Top questions about no bake date bars
1. Can I use dried apricots instead of dates?
Use soft, moist dates for best gooey texture. Drier dates may need soaking first.
2. Can I substitute dates with other dried fruits?
Yes, but dried figs or dried cherries will change the flavor and may alter the chewy texture.
3. How long do the bars last in the fridge?
Store in an airtight container in the fridge for up to a week or freeze for longer storage.
4. Do I need to refrigerate the bars after making them?
Chill the mixture for at least 2 hours to help it set properly and hold together when sliced.
5. Can I skip the sea salt topping?
Add a pinch of flaky sea salt on top before chilling for a satisfying salty crunch.
6. How do I cut the bars without breaking them?
Use a sharp knife, dipped in warm water if needed, to get clean, even slices without crumbling.
7. Should I toast the nuts before adding?
Toasting nuts enhances their flavor and crunch, making the bars more satisfying.
8. What if the mixture feels too sticky or crumbly?
Adding a splash of coconut oil helps bind the mixture and improves texture if it’s too dry.
9. Can I freeze these bars?
You can freeze the bars for up to a month; thaw at room temp for softer, chewier bites.
10. Can I add spices or flavorings to the recipe?
For extra flavor, sprinkle a little vanilla or cinnamon into the mixture before pressing into the pan.
These no-bake date bars are a quiet reminder that sometimes the best desserts come together with just a few honest ingredients. There’s a certain satisfaction in pressing that sticky mixture into a pan and watching it set, knowing it’s crafted with simple, unpolished care. They’re perfect for when life feels busy but you still want something sweet and familiar.
Whenever I reach for these bars, it’s like a small act of kindness—no fuss, no oven, just honest flavors and a moment to pause. They’re not about perfection, just about that rich, chewy bite that sticks with you long after the last crumb. Sometimes, that’s exactly what I need.

Hello, I’m Oliver James, the person behind Melting Into Flavors. Cooking is my greatest passion, and it’s been the driving force in my life for as long as I can remember.
It’s not just about food for me; it’s about creating experiences, connecting with others, and sharing the love I have for what’s on the plate. Through this blog and my café, I’m able to share my journey with all of you and hopefully inspire some of your own culinary adventures along the way.


