Making no bake granola bars isn’t just about throwing ingredients together; it’s a quiet act of mindfulness. As I press the mixture into the pan, I focus on the textures—the sticky honey, the crunch of oats—and feel a moment of calm settle in. It’s a small ritual that turns a quick snack into a deliberate pause in a busy day.
There’s something soothing about the tactile process: mixing, pressing, waiting. It’s a chance to slow down, to be present with simple, honest ingredients. When I finally cut into those firm, fragrant bars, I’m reminded that even the simplest recipes can offer a moment of quiet joy amidst chaos.
Focusing on the meditative, almost ritualistic process of making no bake granola bars as a mindful, calming activity amidst a busy life, emphasizing the tactile sensations and simple pleasures of mixing, pressing, and waiting for the bars to set. This approach turns a quick snack into a moment of self-care and presence.
The story behind this recipe
Making no bake granola bars isn’t just about throwing ingredients together; it’s a quiet act of mindfulness. As I press the mixture into the pan, I focus on the textures—the sticky honey, the crunch of oats—and feel a moment of calm settle in. It’s a small ritual that turns a quick snack into a deliberate pause in a busy day.
Key Ingredient Insights
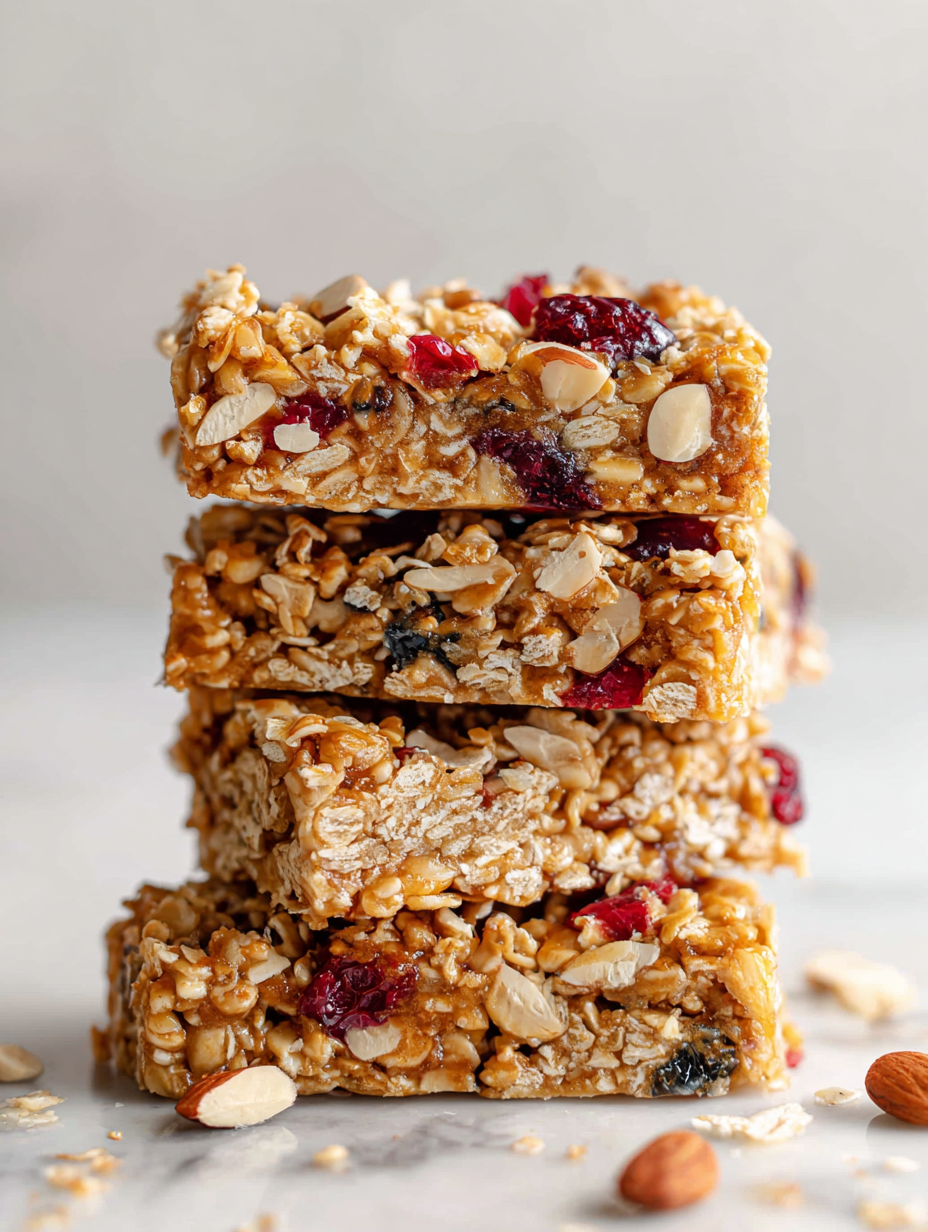
- Oats: I prefer old-fashioned rolled oats for their hearty bite and nutty aroma. If you only have quick oats, expect a slightly softer texture.
- Honey: The glue that holds everything together. I love its golden sheen and stickiness, but maple syrup makes a lovely, slightly different sweetness—less sticky, more floral.
- Nuts: I use chopped almonds for crunch, but walnuts or pecans work well, adding a smoky, toasted flavor that really pops when pressed into the mixture.
- Dried Fruit: I like chewy cranberries or apricots—brightens the bars with a tangy, sweet burst. Dried cherries are a good swap if you want deeper richness.
- Binding Fats: Coconut oil adds a subtle tropical note and helps set, but butter or ghee can give a richer, more decadent finish—just melt and mix in.
- Vanilla Extract: A splash enhances sweetness and depth. If you don’t have vanilla, a pinch of cinnamon or a dash of almond extract can add warmth.
- Salt: Just a pinch. It heightens all the flavors and balances the sweetness. If you’re feeling bold, a tiny sprinkle of sea salt on top before chilling can be magic.
Spotlight on key ingredients
Oats:
- I prefer old-fashioned rolled oats for their hearty bite and nutty aroma. If you only have quick oats, expect a slightly softer texture.
- Honey: The glue that holds everything together. I love its golden sheen and stickiness, but maple syrup makes a lovely, slightly different sweetness—less sticky, more floral.
- Nuts: I use chopped almonds for crunch, but walnuts or pecans work well, adding a smoky, toasted flavor that really pops when pressed into the mixture.
Honey:
- The glue that holds everything together. I love its golden sheen and stickiness, but maple syrup makes a lovely, slightly different sweetness—less sticky, more floral.
- Nuts: I use chopped almonds for crunch, but walnuts or pecans work well, adding a smoky, toasted flavor that really pops when pressed into the mixture.
Notes for ingredient swaps
- Sweetener: Maple syrup can replace honey for a less sticky, more floral note, but expect a slightly softer set. Agave nectar works too, with a mild flavor.
- Nuts: Chopped walnuts or pecans add a smoky, toasted flavor similar to almonds. If you’re allergic, try sunflower or pumpkin seeds for crunch.
- Dried Fruit: Dried cranberries or apricots brighten the bars with tartness. Chopped dried cherries offer a richer, deeper sweetness.
- Binder: Coconut oil melts in easily and adds a subtle tropical aroma, but butter or ghee give a richer, more decadent texture—just melt and stir in.
- Oats: Old-fashioned rolled oats give a hearty chew. Quick oats will soften more and create a slightly less chewy texture.
- Flavoring: Vanilla extract boosts sweetness and depth. If out, a pinch of cinnamon or a splash of almond extract can add warmth and complexity.
- Salt: A pinch enhances all flavors. For a salty-sweet contrast, sprinkle a tiny bit of flaky sea salt on top before chilling.
Equipment & Tools
- Medium mixing bowl: To combine dry ingredients and mix everything evenly.
- Sturdy spatula: For folding and pressing the mixture into the pan.
- 20×20 cm (8×8 inch) square pan: To hold and shape the bars during setting.
- Parchment paper: To prevent sticking and make removal easy.
- Small saucepan: To melt the coconut oil and honey mixture gently.
- Sharp knife: To cut the set mixture into bars without crumbling.
Step-by-step guide to no bake granola bars
- Gather all your ingredients and tools. Use a medium-sized mixing bowl, a sturdy spatula, a 20×20 cm (8×8 inch) square pan, and parchment paper to line it.
- Line the pan with parchment, leaving some overhang for easy removal. Set aside.
- In a small saucepan, melt 1/4 cup (60 ml) coconut oil over low heat (about 35°C/95°F). Keep an eye on it so it doesn’t bubble or burn.
- Add 1/2 cup (120 ml) honey to the melted oil. Stir gently until combined, warm, and fragrant—about 2 minutes. It should smell sweet and slightly caramelized.
- Remove from heat. Stir in 1 teaspoon vanilla extract and a pinch of sea salt. Set aside for a moment.
- In a large bowl, combine 3 cups (240 g) rolled oats, 1 cup (150 g) chopped nuts, and 1/2 cup (80 g) dried fruit. Mix well.
- Pour the warm honey-oil mixture over the dry ingredients. Use the spatula to fold everything together thoroughly, making sure all oats and nuts are coated and sticky.
- Transfer the mixture to your prepared pan. Press it down firmly with the back of the spatula or your fingers to create an even layer. The mixture should be compact but not overly squished.
- Once pressed, cover the pan with plastic wrap or a clean towel. Let it rest at room temperature for at least 1 hour, or refrigerate for 30 minutes to speed up setting. The bars should firm up and become less sticky.
- Check for doneness by gently pressing the top; it should feel solid and hold its shape. If it’s still crumbly, give it a bit more time to set in the fridge.
- Lift out the set mixture using the parchment overhang. Place on a cutting board and slice into bars or squares with a sharp knife.
- Store in an airtight container at room temperature for up to 3 days, or in the fridge for up to a week. For longer storage, freeze and thaw as needed.
Let the bars rest at room temp or in the fridge until firm. Slice with a sharp knife, then store in an airtight container. Enjoy within a week for best freshness.
How to Know It’s Done
- The mixture is well-coated, sticky, and holds together when pressed.
- The bars are firm and not crumbly after chilling.
- A gentle press on the top yields a solid, non-doughy texture.
No Bake Granola Bars
Ingredients
Equipment
Method
- Line your square pan with parchment paper, leaving overhang on the sides for easy removal.
- In a small saucepan, gently melt the coconut oil over low heat until it just starts to shimmer and smell lightly tropical.
- Add honey to the melted coconut oil and stir gently until the mixture is warm, fragrant, and well combined—about 2 minutes.
- Remove the saucepan from heat and stir in vanilla extract and a pinch of sea salt if desired.
- In a large mixing bowl, combine rolled oats, chopped nuts, and dried fruit. Mix thoroughly so everything is evenly distributed.
- Pour the warm honey-oil mixture over the dry ingredients. Use a spatula to fold everything together until the oats and nuts are coated and sticky.
- Transfer the mixture into your prepared pan. Use the back of a spatula or your fingers to press it down firmly and evenly, creating a compact layer.
- Cover the pan with plastic wrap or a clean towel and let it rest at room temperature for at least 1 hour, or refrigerate for about 30 minutes until the mixture is firm.
- Once set, lift the mixture out using the parchment overhang. Place it on a cutting board and slice into bars or squares with a sharp knife.
- Enjoy immediately or store in an airtight container at room temperature for up to 3 days, or in the fridge for up to a week.
Notes
Pro tips for perfect bars
- Use parchment paper: Line your pan to prevent sticking and make removal a breeze, especially when pressing the mixture.
- Press firmly: Apply consistent pressure when shaping the bars to ensure they hold together and aren’t crumbly.
- Chill thoroughly: Let the bars set in the fridge for at least an hour; the colder, the firmer and easier to cut cleanly.
- Monitor heat: When melting fats, keep heat low and stir constantly to avoid scorching and smoky smells.
- Add mix-ins last: Fold in dried fruit or nuts after the mixture is evenly coated to prevent them from sinking or over-softening.
- Check texture: The mixture should be sticky but manageable; if it’s too loose, refrigerate briefly before pressing.
- Slice with a sharp knife: Use a serrated or very sharp knife to cut cleanly, avoiding crumbling or squashing the bars.
Common mistakes and how to fix them
- FORGOT to pack bars tightly → Press firmly for compact, even bars.
- DUMPED too much honey → Use measured, moderate amounts for texture balance.
- OVER-TORCHED the mixture → Stir constantly on low heat to prevent burning.
- MISSED the chill time → Let the bars set properly to avoid crumbling.
Quick Fixes for Smooth Bars
- If mixture is too dry, splash a tiny bit of honey or coconut oil to loosen it up.
- When bars crumble while slicing, chill longer or press more firmly during setting.
- Splash warm water on knife if it sticks or drags through the set bars.
- Patch sticky edges with a small amount of melted chocolate to seal cracks.
- Shield delicate ingredients like dried fruit with a quick freeze before mixing to prevent over-softening.
Prep, store, and reheat tips
- Prepare the mixture and press into the pan ahead of time; keep covered in the fridge for up to 24 hours, which allows flavors to meld and makes slicing easier.
- Store the bars in an airtight container at room temperature for up to 3 days, or refrigerate for up to a week; they stay chewy and fragrant, with the oats mellowing slightly over time.
- For longer storage, freeze bars individually wrapped for up to 3 months; thaw at room temperature until soft and fragrant before enjoying.
- Reheat bars briefly in the microwave (about 10-15 seconds) if you prefer a softer bite; they’ll warm up with a faint honey aroma and a slightly gooey texture.
Top questions about no bake granola bars
1. How do I cut the bars without crumbling?
Use a sharp knife and chill the bars well; they’ll cut more cleanly and hold their shape.
2. My mixture is too sticky, what now?
If the mixture feels too sticky, refrigerate it for 15-20 minutes before pressing into the pan.
3. How long do these bars last?
Store bars in an airtight container at room temp for up to 3 days, in the fridge for a week.
4. Can I freeze these bars?
Refrigerate or freeze to extend shelf life. Thaw frozen bars at room temp for 10-15 minutes.
5. Are these bars vegan?
To make them vegan, substitute honey with maple syrup or agave nectar, which keeps the bars sticky and sweet.
6. How do I press the mixture evenly?
Use a sturdy spatula for pressing, and apply even pressure to avoid uneven bars or cracks.
7. My bars are crumbly, how fix that?
If bars are too crumbly, add a bit more honey or coconut oil to bind better before pressing.
8. Can I customize the ingredients?
Choose your favorite nuts, dried fruits, or seeds to customize flavor and crunch—think smoky walnuts or tart cranberries.
9. Can I adjust the sweetness?
Adjust sweetness by adding more or less honey or syrup, depending on your preference for sweetness.
10. What’s the best way to prevent sticking?
Use parchment paper to prevent sticking and make removal and slicing easier, especially if pressing firmly.
Making these no bake granola bars reminds me that sometimes, simplicity holds the most comfort. The tactile experience—pressing the mixture and waiting—turns a quick snack into a mindful pause amidst a hectic day.
They’re a little ritual I return to when I need a moment of calm, and a treat that’s honest and adaptable. In the end, it’s about appreciating the small, quiet acts that nourish both body and mind.

Hello, I’m Oliver James, the person behind Melting Into Flavors. Cooking is my greatest passion, and it’s been the driving force in my life for as long as I can remember.
It’s not just about food for me; it’s about creating experiences, connecting with others, and sharing the love I have for what’s on the plate. Through this blog and my café, I’m able to share my journey with all of you and hopefully inspire some of your own culinary adventures along the way.


