During those hectic weekends when time feels like it’s slipping through my fingers, I turn to these no-bake caramel bites. They’re my little sweet escape, blending simple ingredients that remind me of childhood treats. There’s something about the gooey caramel and crumbly edges that instantly transports me back to lazy afternoons at Grandma’s house.
This recipe isn’t just about ease — it’s about capturing that nostalgic flavor without the fuss. I love how quick they come together, making them perfect for last-minute cravings or unexpected guests. Plus, the fact that they don’t require turning on the oven means more time enjoying the messy, joyful process.
Focusing on how this no-bake caramel bites recipe became my go-to for quick, nostalgic comfort during hectic weekends, blending simple ingredients with a touch of my childhood sweetness.
Nostalgic Sweet Simplicity
- I remember sneaking bites of these caramel bites as a kid, the sticky sweetness still hits differently today.
- Making these is a chaotic little ritual — I love the messy caramel, the way it drips and shimmers in the pan.
- There’s a pride in whipping these up in under 20 minutes, especially when friends drop by unexpectedly.
- This recipe feels like a small rebellion against complicated desserts — simple, honest, and deeply satisfying.
- The first time I got the caramel just right, I felt like I’d cracked some secret kitchen code.
The story behind this recipe
This recipe was born out of a lazy afternoon craving and a messy kitchen counter. I was looking for something quick, sweet, and satisfying without turning on the oven. The caramel bites just happened as a happy accident — a mix of leftover dulce de leche, crushed cookies, and a sprinkle of sea salt. The first batch was a bit rough, but that gooey caramel center and crunchy shell kept calling me back to tweak the recipe until it felt just right. Now, it’s my go-to when I need a little sweet fix that’s effortless and nostalgic.
Historical & Cultural Tidbits
- These caramel bites have roots in a 1950s American snack trend, where quick, no-oven confections gained popularity in home kitchens.
- They often appeared at church socials and school fundraisers, cherished for their simplicity and rich flavor with just a handful of ingredients.
- Originally, similar treats used condensed milk or dulce de leche, which made for easy caramel spreading before modern caramel candies took over.
- In some regions, these bites are called ‘caramel squares,’ but the no-bake version with crushed cookies turned them into a portable, mess-free delight.
- Today, they’ve experienced a resurgence with no-bake desserts, loved for their nostalgic feel and minimal fuss—perfect for busy, modern lives.
Key Ingredients and Tips
- Sweetened condensed milk: I love its silky richness, but if you want a less sweet bite, try coconut cream mixed with a touch of honey—just watch the consistency. It’ll still ooze beautifully.
- Butter: I use salted butter for depth, but unsalted works fine if you prefer control over salt levels. Melt it slowly until it’s just shimmering—no browning, or it’ll smell burnt.
- Caramel bits or caramel candies: These give that gooey, smoky-sweet flavor. If you can’t find them, try melting down soft toffees, but expect a slightly firmer texture.
- Crushed cookies: I prefer graham crackers for their mild sweetness and crumbly crunch, but digestives or even vanilla wafers work. Toast them lightly first for extra flavor.
- Sea salt: I sprinkle it generously on top—crystals shimmer and create a perfect sweet-salty contrast. Sea salt flakes are my favorite for that crunch and burst of mineral flavor.
- Vanilla extract: Just a splash enhances the caramel’s depth. Skip it if you want a more straightforward flavor, but don’t skip the vanilla—it brightens everything.
- Optional add-ins: A handful of chopped nuts or a drizzle of chocolate can elevate these bites. I like the crunch of almonds—adds a nice contrast to the gooey center.
Spotlight on key ingredients
Caramel candies:
- They melt into a smoky, sweet ooze that forms the core of these bites. During melting, they turn glossy and pull apart with a satisfying crackle.
- They’re forgiving — if a little burnt, the flavor shifts to a deeper, more roasted caramel. Watch for a shiny, smooth consistency as a sign they’re ready.
Cookies:
- Crushed cookies: They add crunch and mild sweetness, absorbing some caramel flavor as they mix in. When toasted lightly, they release a warm, toasty aroma.
- During mixing, they break down slightly but keep enough structure for a satisfying bite. Keep some larger chunks for texture contrast.
Notes for ingredient swaps
- Dairy-Free: Swap butter and condensed milk with coconut oil and coconut cream. Expect a slightly different richness and a hint of coconut aroma.
- Vegan: Use plant-based caramel candies and coconut-based condensed milk alternatives. The texture remains sticky, but flavor shifts subtly.
- Lower Sugar: Choose sugar-free caramel bits and a sugar substitute like monk fruit sweetener. The bites will be less gooey but still satisfying.
- Gluten-Free: Use gluten-free cookies or crushed nuts instead of traditional cookies. Adds a nutty flavor and extra crunch.
- Nut-Free: Skip nuts or nut-based ingredients. Stick with simple cookies and caramel for a clean, sweet bite.
- Extra Crunch: Incorporate chopped pretzels or crispy rice cereal into the mixture. Adds a salty crunch that contrasts the gooey caramel.
- Flavor Twist: Add a dash of cinnamon or espresso powder to the caramel mixture. Enhances depth and creates a new flavor dimension.
Equipment & Tools
- Small saucepan: Melts caramel and combines ingredients gently over low heat.
- Mixing bowl: Holds crushed cookies and for mixing in ingredients.
- Spatula: Stirs and folds ingredients smoothly.
- Parchment-lined baking sheet: Sets the caramel bites without sticking.
Quick Guide to No Bake Caramel Bites
- Gather your tools: a small saucepan, a mixing bowl, a spatula, and a baking sheet lined with parchment paper. The saucepan is for melting, the bowl for mixing, and the sheet for setting.
- Heat the caramel bits or candies: place in the saucepan over low heat (about 90°C / 194°F). Stir constantly until fully melted and smooth—this takes about 3-5 minutes. Watch for a glossy, oozy consistency.
- Add the condensed milk and butter: once caramel is melted, stir in 1/2 cup (115g) of softened butter and 1/4 cup (60ml) condensed milk. Keep stirring until well combined and heated through, about 2 minutes. The mixture will thicken slightly and smell rich.
- Remove from heat: when the mixture is smooth, shiny, and starting to bubble gently around the edges, take it off the stove. If it smells burnt or starts to crackle loudly, reduce heat or remove earlier.
- Fold in crushed cookies and vanilla: quickly stir in 1 cup (around 120g) of crushed cookies and a teaspoon of vanilla extract. The mixture should be sticky, with bits of cookie visible. If it’s too runny, add more crushed cookies; if too thick, a splash of milk.
- Portion and shape: using a teaspoon or small cookie scoop, drop dollops onto your prepared baking sheet. Gently press down to flatten slightly if desired. Work quickly before the mixture cools and hardens too much.
- Let set: leave the bites at room temperature for 30 minutes or refrigerate for 15-20 minutes until firm. The caramel should be chewy but not hard.
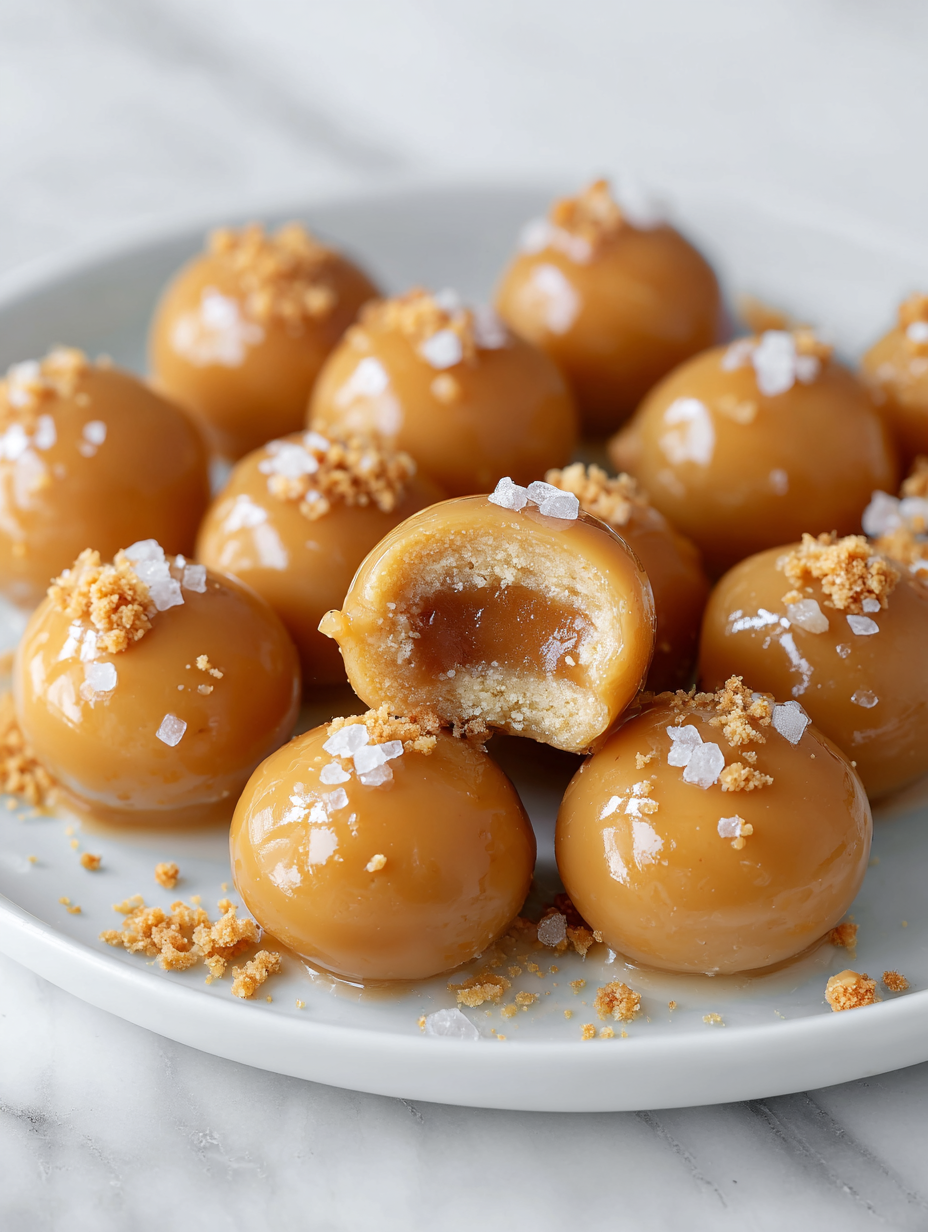
- Finish and serve: sprinkle with sea salt flakes or additional crushed cookies if you like. For best flavor, serve slightly chilled or at room temperature, enjoying the gooey, smoky-sweet bite.
Let the caramel bites rest at room temperature for 30 minutes or refrigerate for 15-20 minutes until firm. Once set, sprinkle with sea salt flakes or extra crushed cookies for finishing. Serve slightly chilled or at room temperature for best gooey texture.
How to Know It’s Done
- Caramel is glossy, smooth, and just bubbling around the edges.
- Mixture is sticky and holds shape when portioned.
- Caramel bites are firm but chewy after resting, with a slight crackle when bitten.
No-Bake Caramel Bites
Ingredients
Equipment
Method
- Place the caramel candies or bits in a small saucepan and melt over low heat, stirring constantly. The candies should turn glossy and smooth after about 3-5 minutes, filling your kitchen with a sweet, caramel aroma.
- Add the melted butter and sweetened condensed milk to the melted caramel, stirring continuously until the mixture is well combined and heated through. It will thicken slightly and smell rich and inviting.
- Remove the saucepan from heat once the mixture is smooth, shiny, and just bubbling around the edges. Stir in the vanilla extract for an extra layer of flavor.
- Fold in the crushed cookies quickly, mixing until evenly coated. The mixture should be sticky and slightly thickened, with bits of cookie visible.
- Using a teaspoon or small scoop, portion the mixture onto a parchment-lined baking sheet, shaping each into a small, rounded bite. Gently press down to flatten slightly if desired.
- Sprinkle sea salt flakes over each bite for a perfect sweet-salty contrast. Let the bites sit at room temperature for about 30 minutes, or refrigerate for 15-20 minutes until set and chewy.
- Once set, enjoy these glossy, golden caramel bites straight from the fridge or at room temperature. They should be chewy, gooey, and bursting with nostalgic flavor.
Notes
Pro Tips for Perfect Bites
- Use a low, steady heat to melt caramel smoothly—avoid scorching and bubbling over.
- Stir continuously once caramel is melted—this prevents sticking and ensures even texture.
- Add crushed cookies quickly—stir in immediately to keep the mixture sticky and manageable.
- Chill the bites briefly in the fridge—this helps them set without becoming too hard or crumbly.
- Sprinkle sea salt flakes just before serving—shimmering crystals add a satisfying crunch and contrast.
- Use a spatula to evenly press and shape—this creates a uniform, professional look in less time.
- Keep an eye on caramel’s color—its glossy, amber hue signals it’s ready for the next step.
Common mistakes and how to fix them
- FORGOT to lightly oil the parchment; the bites may stick — use a light spray of non-stick spray.
- DUMPED in too much salt; it overpowers the caramel—add salt gradually and taste as you go.
- OVER-TORCHED caramel; it turns bitter and hard — stir constantly and remove from heat as soon as glossy.
- SEIZED caramel mixture; it becomes grainy and separates — keep heat low and stir continuously.
Quick Fixes for Common Issues
- When caramel looks grainy, splash in a teaspoon of hot water; stir quickly to smooth.
- If mixture is too sticky, patch with a sprinkle of crushed cookies or rice cereal for texture.
- Splash a little milk or cream if bites are too hard or crumbly—softens with gentle warming.
- DUMPED in too much salt? Shield the bites with a quick rinse, then re-salt lightly before serving.
- When caramel shimmers and crackles, it’s perfectly melted—rescue with a gentle stir and lower heat.
Prep, Store, and Reheat Tips
- Prepare the caramel mixture ahead by melting the candies and combining with butter and condensed milk; refrigerate if needed to firm up slightly, which makes portioning easier later and enhances flavor development.
- Store the baked and assembled caramel bites in an airtight container in the fridge for up to 5 days. The cold keeps them chewy and preserves the caramel’s rich, smoky aroma.
- Reheat gently in the microwave for 10-15 seconds, checking for a soft, oozy texture. The caramel should shimmer and emit a sweet, smoky scent. Avoid overheating to prevent melting into a mess.
- For longer storage, freeze the bites in an airtight container up to 1 month. Let them thaw slightly at room temperature before serving for best texture and flavor.
- Letting the caramel bites sit at room temperature for 10 minutes before serving restores their ideal chewy, melt-in-your-mouth consistency, especially if chilled or frozen.
- Over time, flavors mellow slightly, so enjoy within the first few days for maximum gooey sweetness and fresh caramel aroma.
Top questions about caramel bites
1. Can I use homemade caramel instead of candies?
Use soft caramel candies or caramel bits. If they’re too hard, warm them slightly to melt smoothly and avoid tearing the mixture, which can cause uneven bites.
2. Can I make these vegan?
Absolutely. Warm homemade caramel until it’s pourable, then proceed as with store-bought candies. It might add a richer, fresher flavor.
3. How long do they keep?
Yes. Swap butter with coconut oil and condensed milk with coconut cream or almond milk sweetened with a touch of sugar. Expect a slightly different texture and coconut aroma.
4. Can I freeze them?
Store in an airtight container in the fridge for up to 5 days. They stay chewy and flavorful, but the caramel can harden if too cold.
5. What toppings work best?
Yes, freeze in a sealed container for up to 1 month. Let thaw at room temp for 10 minutes before serving to regain chewy texture.
6. Can I add nuts or chocolate?
Sea salt flakes are classic. You can also sprinkle crushed nuts or drizzle melted chocolate after they set for extra flavor and texture.
7. How do I prevent them from sticking?
Yes. Mix chopped nuts into the caramel before portioning for crunch, or drizzle melted chocolate on top once set for a decadent finish.
8. My caramel isn’t melting smoothly, what now?
Line your baking sheet with parchment and lightly oil it. Also, refrigerate before handling to firm up the bites, reducing stickiness.
9. Why are my bites too hard?
Keep heat very low and stir constantly. If it still seizes, add a teaspoon of hot water and stir until smooth again.
10. Can I adjust sweetness?
Overcooling or too much chilling can make them hard. Let them sit at room temperature for a few minutes before serving to soften slightly.
These no-bake caramel bites are a tiny reminder that sometimes, simple ingredients can create something truly satisfying. When you bite into one, you get that rich, smoky caramel melting slowly, with a subtle crunch from the crushed cookies. It’s the kind of treat that feels like a small, sweet rebellion against the fuss of more elaborate desserts.
They’re perfect for when time’s tight but you still crave something homemade and nostalgic. Keep a batch in the fridge for those unexpected moments — they’re a little bit of comfort that’s easy to pull out and share.

Hello, I’m Oliver James, the person behind Melting Into Flavors. Cooking is my greatest passion, and it’s been the driving force in my life for as long as I can remember.
It’s not just about food for me; it’s about creating experiences, connecting with others, and sharing the love I have for what’s on the plate. Through this blog and my café, I’m able to share my journey with all of you and hopefully inspire some of your own culinary adventures along the way.


