This no-bake ricotta cheesecake is my go-to for when I want something sweet but don’t want to turn on the oven. It’s light, creamy, and surprisingly fresh, with a tang that’s just enough to keep you coming back for more. Plus, it’s a real lifesaver when I’m short on time or feeling a little lazy in the kitchen.
What I love most is how forgiving it is—no crust fuss, no baking panic, just a simple mix and chill. It’s perfect for those moments when you want dessert that feels fancy but is actually straightforward. And honestly, it’s become my secret weapon for last-minute dinners or unexpected guests who show up hungry.
This recipe is my secret weapon for spontaneous dinner parties. It’s so simple, I can whip it up in moments when unexpected guests arrive, and it never fails to impress—creamy, bright, and surprisingly elegant without turning on the oven.
The Unexpected Ease of Elegant Desserts
- I love how this dessert can come together in minutes, perfect for those last-minute sweet cravings.
- There’s a quiet thrill in watching the cheesecake set in the fridge—like a secret I’m keeping from everyone.
- The tang of ricotta feels so comforting, like a gentle hug after a long day.
- Making this recipe always reminds me of family dinners—simple, honest, and a little bit indulgent.
- I get a little proud every time I serve it, knowing how easy and impressive it is without any oven fuss.
Inspiration Behind the No Bake Ricotta Cheesecake
This recipe came about on a busy weekend when I realized I’d forgotten to buy a traditional cake crust. Instead of panicking, I raided the fridge and found some ricotta and a few simple ingredients. That accidental combo turned into a creamy, tangy dessert that’s now a regular in my kitchen. It’s the kind of improvisation that reminds me how sometimes, the best dishes are born from a little forgetfulness and a lot of curiosity.
Origin and Trivia of No Bake Ricotta Cheesecake
- This recipe emerged during a warm summer when turning on the oven felt unbearable, leading me to discover how creamy ricotta can stand in for traditional cheesecake filling.
- The idea of a no-bake dessert with ricotta is rooted in Italian cucina povera, where simple, fresh ingredients create surprisingly rich treats.
- I stumbled upon this method when a friend’s dairy shortage inspired me to think outside the box, and ricotta’s naturally creamy texture became the star.
Ingredient breakdown: key components
- Ricotta cheese: I love how its creamy, slightly grainy texture melts smoothly, giving this cheesecake a gentle richness. You can swap with mascarpone if you want a silkier finish, but the ricotta’s tang keeps it lively.
- Graham cracker crumbs: I prefer a bit of crunch from these, but for a gluten-free version, crushed digestive biscuits work well. The buttery, toasty scent when mixed with melted butter makes the crust feel like a little indulgence.
- Honey or maple syrup: I use a splash for subtle sweetness and floral notes, but maple syrup adds a richer, deeper aroma—adjust to taste if you like it sweeter or more nuanced.
- Lemon zest: I love the zing and brightness it brings; it’s like a fresh burst of sunshine. Skip if you prefer a more neutral flavor, but I promise it elevates the whole thing.
- Vanilla extract: I add a splash to round out the flavor with warmth. If you’re out, a pinch of almond extract can add a surprising twist, just don’t overdo it.
- Gelatin (optional): I sometimes include it for extra firmness, especially if I want slices to hold their shape longer. Bloom it in cold water first—don’t skip this step or it’ll clump.
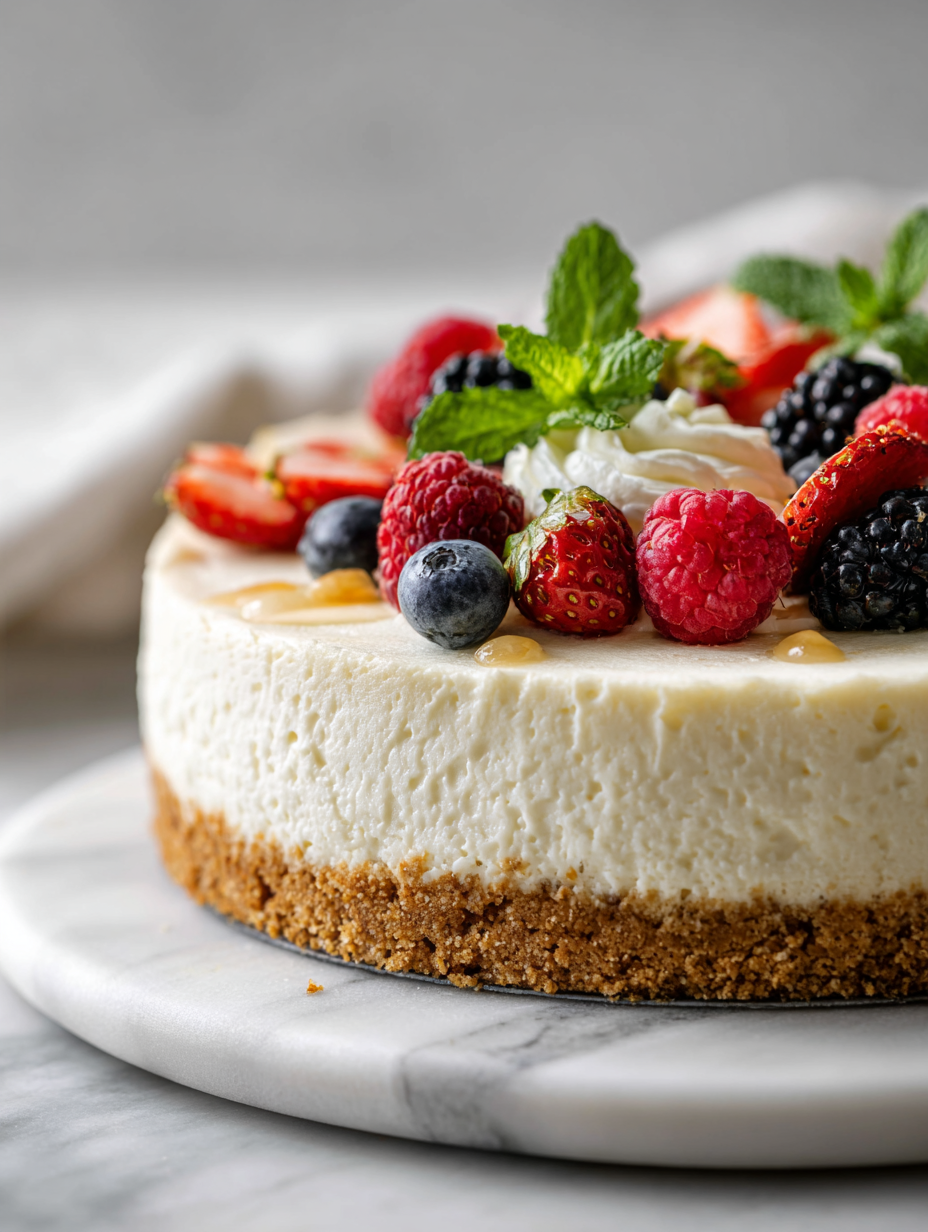
- Fresh berries: I often top it with a handful of berries—strawberries, blueberries, or raspberries—adding a juicy pop and a splash of color. Frozen berries work if you thaw and drain well, but fresh are best for vibrancy.
Spotlight on key ingredients
Ricotta cheese:
- Its creamy, slightly grainy texture melts smoothly, giving this cheesecake a gentle richness. The tang keeps it lively and fresh, unlike mascarpone’s silky neutrality.
- Graham cracker crumbs: They provide a buttery, toasty crunch that contrasts beautifully with the soft filling. When mixed with butter, they smell like a bakery in your kitchen—warm and inviting.
Sweetener (honey or maple syrup):
- Lemon zest: Bright and fragrant, it adds a zing that cuts through the richness. The scent of citrus in the air makes the whole process feel like a fresh burst—almost like summer in your bowl.
- Honey or maple syrup: They sweeten and add depth, with maple offering a smoky, rich aroma. The way honey glistens when mixed in is almost hypnotic, and it balances the tang perfectly.
Notes for ingredient swaps
- Dairy-Free: Swap ricotta for firm silken tofu blended until smooth. It’s more neutral and less tangy, but still creamy.
- Gluten-Free: Use crushed gluten-free cookies or toasted nuts instead of graham crackers. Keep an eye on texture and binding.
- Sweetener: Maple syrup adds a richer, smoky note, while honey keeps it more floral and traditional. Adjust quantity to taste.
- Citrus: Lime zest can replace lemon for a slightly different bright, tart flavor—think more tropical vibe.
- Binding Agent: If you skip gelatin, the cheesecake will be softer—add a bit more whipped cream or chill longer.
- Berries: Frozen berries work well if thawed and drained. Fresh berries give a vibrant, juicy topping, especially in season.
- Flavor Boost: A splash of orange liqueur or rosewater can add a floral or citrusy twist, but use sparingly to avoid overpowering.
Equipment & Tools
- Springform pan: To shape and contain the cheesecake during setting.
- Food processor or crumb grinder: To turn crackers into fine crumbs for the crust.
- Mixing bowl: To combine and beat the filling ingredients.
- Spatula: To smooth the filling and press the crust evenly.
Step-by-step guide to no bake cheesecake
- Gather your equipment: a 20cm (8-inch) springform pan, a mixing bowl, a spatula, and a food processor or crumb grinder. Have it all within arm’s reach to keep the process smooth.
- Make the crust: In the food processor, pulse 200g (7 oz) graham cracker crumbs with 100g (7 tbsp) melted butter and a pinch of salt until combined. The mixture should clump when pressed together.
- Press the crust: Firmly press the crumb mixture into the bottom of the springform pan, spreading evenly. Use the back of a spoon or a flat-bottomed glass to compact it well. Chill in the fridge for 15 minutes while you prepare the filling.
- Prepare the filling: In a large bowl, combine 500g (1 lb) ricotta cheese, 100ml (1/3 cup) honey or maple syrup, 1 tbsp lemon zest, 1 tsp vanilla extract, and a pinch of salt. Mix until smooth and creamy, no lumps remaining. Taste and adjust sweetness if needed.
- Optional gelatin step: Bloom 1 tsp gelatin in 2 tbsp cold water for 5 minutes. Warm gently (not boiling) until dissolved, then whisk into the ricotta mixture for extra firmness.
- Assemble the cheesecake: Pour the ricotta filling over the chilled crust. Use a spatula to smooth the top evenly. Tap the pan gently on the counter to settle the filling and eliminate air bubbles.
- Set in the fridge: Cover loosely with plastic wrap and refrigerate for at least 4 hours, preferably overnight. The cheesecake should be firm, with a slight jiggle in the center when ready.
- Final touch: Before serving, top with fresh berries or a drizzle of honey. Carefully run a knife around the edge of the springform pan before removing the sides for a clean presentation.
Chill the cheesecake uncovered for best texture. Once set, slide a knife around the edge before removing the sides of the pan. Serve directly or transfer to a plate with a wide spatula for a clean cut.
How to Know It’s Done
- Crust is firm and holds shape when pressed.
- Filling is set with a slight jiggle in the center after chilling.
- Top is smooth, with no cracks or tears, and looks glossy.
No Bake Ricotta Cheesecake
Ingredients
Equipment
Method
- Pulse the graham cracker crumbs with melted butter in a food processor until the mixture resembles wet sand that clumps when pressed together.
- Press this crumb mixture firmly into the bottom of a springform pan, using the back of a spoon or a glass to smooth it out. Chill in the fridge for about 15 minutes to set.
- In a large mixing bowl, combine the room temperature ricotta, honey or maple syrup, lemon zest, vanilla extract, and a pinch of salt. Mix until smooth and creamy, with no lumps remaining.
- If using gelatin, bloom it in cold water for 5 minutes, then gently heat until dissolved. Whisk this into the ricotta mixture for extra firmness.
- Pour the ricotta filling over the chilled crust, smoothing the top with a spatula. Tap the pan gently on the counter to release any trapped air bubbles and create an even surface.
- Cover the cheesecake loosely with plastic wrap and refrigerate for at least 4 hours or overnight until set and firm.
- Before serving, top with fresh berries and a drizzle of honey or syrup for a vibrant finish. Use a knife to gently loosen the sides of the springform pan, then carefully remove the sides to reveal the beautiful cheesecake.
Tips for Perfect No Bake Cheesecake
- Bolded Mini-Head: Chill crust thoroughly before adding filling to prevent slippage and ensure clean slices.
- Bolded Mini-Head: Use room temperature ricotta for a smoother, lump-free filling that mixes easily.
- Bolded Mini-Head: Tap the filled pan gently on the counter to release trapped air bubbles for a flatter, even surface.
- Bolded Mini-Head: When melting gelatin, do it gently over low heat or in short bursts to avoid boiling and clumping.
- Bolded Mini-Head: Cover the cheesecake with plastic wrap directly on the surface to prevent condensation from forming and creating a soggy top.
- Bolded Mini-Head: Add lemon zest last, and fold it in gently to preserve its bright, fragrant oils without deflating the mixture.
- Bolded Mini-Head: For an extra glossy finish, briefly warm a berry compote or honey before drizzling over the chilled cheesecake.
Common mistakes and how to fix them
- TOO MUCH AIR: Tap the pan gently to release bubbles, avoid overmixing the filling.
- MISSED CHILL TIME: Don’t skip chilling; it ensures proper set and clean slices.
- CRACKED SURFACE: Cover with berries or a glaze to hide cracks and add flavor.
- INCONSISTENT TEXTURE: Use room temperature ricotta for smooth, lump-free filling.
Quick fixes and pantry swaps
- When the filling is runny, splash in a bit more gelatin and chill for 30 minutes.
- If the crust crumbles, patch with a quick melt of butter and press firmly again.
- Splash some lemon juice if the filling tastes dull or flat.
- Patch cracks with a dollop of whipped cream or a berry topping.
- Shield the cheesecake with plastic wrap if it develops condensation in the fridge.
Prep, store, and reheat tips
- Prepare the crust and press it into the pan a day ahead; keep covered in the fridge for a firm base.
- The filling can be made a few hours in advance, then covered and chilled for up to 24 hours, allowing flavors to meld and develop brightness.
- Store leftovers tightly wrapped in plastic in the fridge for up to 3 days; the texture may soften slightly but remains creamy and fresh.
- Reheat slices slightly at room temperature for 10 minutes before serving to soften the texture; avoid microwave reheating to prevent curdling.
- For best flavor, add fresh berries or toppings just before serving; these can be prepared a few hours ahead but should be topped just before presentation to stay vibrant.
Top questions about ricotta cheesecake
1. Can I make this cheesecake sweeter?
Yes, using pre-sweetened ricotta or adding extra sweetener can make it sweeter, but taste as you go to avoid over-sweetening.
2. Can I substitute honey with other sweeteners?
Absolutely, you can swap honey for maple syrup or agave. Each adds a different aroma and sweetness level.
3. Can I use mascarpone instead of ricotta?
Yes, using mascarpone will give it a silkier texture and richer flavor, but ricotta keeps it light and tangy.
4. Can I freeze leftovers?
You can freeze slices for up to 2 months, but the texture may soften slightly upon thawing.
5. How long should I chill the cheesecake?
Chill the cheesecake for at least 4 hours, preferably overnight, to allow it to set properly and develop flavor.
6. Can I add herbs or spices?
Yes, you can add fresh herbs like basil or mint into the filling for an herby twist that pairs well with berries.
7. My crust is soft, what do I do?
If your crust is too soft, bake it for 5 minutes at 175°C (350°F) to crisp it up before filling.
8. How can I decorate or serve it?
You can top the cheesecake with whipped cream, fruit compote, or a drizzle of honey for extra flavor and presentation.
9. Should the ricotta be cold or room temperature?
Use room temperature ricotta for a smoother, lump-free filling that mixes easily and sets evenly.
10. Can I omit gelatin?
Yes, you can skip gelatin if you prefer a softer, more mousse-like texture, but it will be less firm.
This no-bake ricotta cheesecake feels like a quiet victory in my kitchen—simple, honest, and surprisingly elegant. It’s one of those desserts I turn to when I want something creamy and bright without the fuss of baking or crust worries.
Right now, with fresh berries in season and a craving for light, creamy desserts, it feels like the perfect way to finish any meal. No matter the occasion, it’s a reminder that good things often come from just a few straightforward ingredients, mixed with a little patience.

Hello, I’m Oliver James, the person behind Melting Into Flavors. Cooking is my greatest passion, and it’s been the driving force in my life for as long as I can remember.
It’s not just about food for me; it’s about creating experiences, connecting with others, and sharing the love I have for what’s on the plate. Through this blog and my café, I’m able to share my journey with all of you and hopefully inspire some of your own culinary adventures along the way.


