This no-bake chocolate cheesecake isn’t just a quick fix; it’s my secret weapon for those moments when unexpected guests show up or I forget to plan dessert. It comes together faster than you can say ‘sweet tooth,’ and somehow, it always hits the spot without turning on the oven.
There’s something about the simplicity of smashing cookies, mixing creamy filling, and letting it set in the fridge that feels like a little act of rebellion against the chaos of busy days. It’s honest, unpolished, and perfect for when you want something rich and satisfying without the fuss.
Plus, the chocolate flavor is deep and intense, yet it’s light enough that you don’t feel weighed down afterward. It’s the kind of dessert that makes you feel like you’ve pulled off a little magic, even if you barely spent time in the kitchen.
Focusing on how this no-bake cheesecake can be a lifesaver for last-minute gatherings or unexpected guests, emphasizing its simplicity and quick assembly as a practical kitchen hack.
Unexpected Guests, Sweet Rescue
- This recipe saved me during a last-minute dinner party; it’s surprisingly elegant without much fuss.
- Baking isn’t always my thing, so the fact that this doesn’t require an oven feels like a small victory.
- I love how the rich chocolate flavor somehow feels indulgent but still light enough for a quick treat.
- There’s a certain satisfaction in crushing cookies and mixing everything by hand—it’s honest, imperfect, and fun.
- Whenever I make this, I get nostalgic for simpler days and the joy of easy, no-fail desserts.
Unexpected Inspiration
- This recipe came about during a particularly hectic week when I needed something quick, satisfying, and foolproof. I had a fridge full of chocolate and some stale cookies that I didn’t want to waste, so I started experimenting. The result was a luscious, creamy cheesecake that requires no oven, no fuss, and no waiting for it to bake. It’s become my go-to for last-minute celebrations and lazy weekends alike.
- I remember the first time I made it for friends—seeing their surprised faces when I said ‘no oven required’ and then watching them dive into that rich, velvety slice. That moment made me realize how much I love recipes that are simple yet indulgent, especially when they come together in under 20 minutes. It’s a recipe born out of chaos, comfort, and a little bit of kitchen improvisation.
- heading
- Story Behind This Recipe
Historical & Cultural Trivia
- This no-bake cheesecake has roots in resourceful kitchen hacks from the mid-20th century, where refrigeration and easy ingredients made quick desserts a necessity.
- Originally popularized in post-war America, it was a clever way to enjoy rich desserts without oven time, making it perfect for small kitchens and limited appliances.
- The combination of crushed cookies and creamy fillings echoes European tart traditions, adapted into a modern, fuss-free dessert for busy lives.
Ingredients at a Glance
- Cream cheese: I love how soft and tangy it becomes when softened at room temperature—makes mixing a breeze. If it’s straight from the fridge and stiff, give it a few minutes out to loosen up.
- Dark chocolate: I prefer a good quality bar that melts smoothly, releasing a deep, smoky aroma. For a less intense flavor, swap with semi-sweet chocolate, but skip the bittersweet if you want that rich, velvety taste.
- Cookies for crust: I use chocolate graham crackers because they add a hint of sweetness and a slight cocoa crunch. You can swap with digestive biscuits, but expect a milder flavor and slightly softer crust.
- Heavy cream: I whip it until just soft peaks—watch for that glossy sheen and gentle fold-in. If you want a lighter cheesecake, try coconut cream, but note it will add a subtle coconut flavor.
- Sugar: I use superfine for smooth blending, but regular granulated works fine. If you want less sweetness, cut back slightly—your call based on how intense your chocolate is.
- Butter: I melt it until just bubbling, giving the crust a rich, buttery aroma. For a vegan option, coconut oil works but will add a mild coconut scent and slightly softer crust.
- Vanilla extract: I use a splash of pure vanilla to enhance the chocolate notes. For a twist, add a pinch of sea salt—sometimes that’s all you need to elevate the flavor.
Spotlight on key ingredients
Cream cheese:
- I love how soft and tangy it becomes when softened at room temperature—makes mixing a breeze. If it’s straight from the fridge and stiff, give it a few minutes out to loosen up.
- Dark chocolate: I prefer a good quality bar that melts smoothly, releasing a deep, smoky aroma. For a less intense flavor, swap with semi-sweet chocolate, but skip the bittersweet if you want that rich, velvety taste.
Cookies and cream:
- Cookies for crust: I use chocolate graham crackers because they add a hint of sweetness and a slight cocoa crunch. You can swap with digestive biscuits, but expect a milder flavor and slightly softer crust.
- Heavy cream: I whip it until just soft peaks—watch for that glossy sheen and gentle fold-in. If you want a lighter cheesecake, try coconut cream, but note it will add a subtle coconut flavor.
Notes for ingredient swaps
- Dairy-Free: Swap cream cheese with a blended cashew or coconut cream mixture. Expect a slightly nuttier or coconutty flavor, but still creamy.
- Vegan Chocolate: Use dairy-free dark chocolate and coconut or almond-based cream for a plant-based version that retains richness.
- Gluten-Free: Replace traditional cookies with gluten-free graham crackers or crushed gluten-free biscuits for a crumbly crust without wheat.
- Lower Sugar: Reduce the sugar by half or substitute with maple syrup or agave nectar. The filling will be slightly less sweet but still satisfying.
- Dark Chocolate: Opt for 70% or higher cacao for a more intense, less sweet chocolate flavor. It gives a deeper, more bitter edge.
- Butter: Use melted coconut oil or vegan margarine if you want to keep it dairy-free or vegan, but expect a mild coconut aroma or different texture.
- Sweeteners: Replace sugar with honey or agave syrup for a different sweetness profile, but be mindful of the added flavors and moisture.
Equipment & Tools
- Springform pan: Holds the crust and filling, easy to remove for presentation.
- Food processor or zip-top bag with rolling pin: Crush cookies into even crumbs quickly.
- Mixing bowls: Combine and mix ingredients smoothly.
- Spatula: Spread and fold ingredients gently.
- Microwave or saucepan: Melt butter and chocolate gently.
- Whisk or electric mixer: Whip cream and beat filling to fluffy perfection.
Step-by-step guide to no bake cheesecake
- Gather your equipment: a 20cm (8-inch) springform pan, a food processor or sturdy zip-top bag and rolling pin, a mixing bowl, and a spatula. The pan is for setting, the processor for crushing, the bowl for mixing. Prepping your tools saves time.
- Crush the cookies: If using a food processor, pulse about 200g of chocolate cookies until fine crumbs, about 15 seconds. If using a bag, place cookies inside, seal, and bash with a rolling pin until fine. Aim for even crumbs with no big chunks.
- Melt the butter: In a small saucepan or microwave, about 30 seconds in the microwave or on low heat on the stove, until just bubbling. Let it cool slightly while you prepare the crust.
- Mix the crust: In the bowl, combine cookie crumbs with 80g melted butter. Stir with a spatula until evenly coated and crumbly. The mixture should hold together when pressed. If too dry, add a touch more butter; if too wet, sprinkle in a little more crumbs.
- Press into pan: Transfer the crumb mixture to your springform pan. Use the bottom of a glass or your fingers to press firmly into an even layer on the bottom and slightly up the sides. Chill in the fridge while you make the filling, about 10 minutes.
- Prepare the filling: In a mixing bowl, beat 400g softened cream cheese with a hand whisk or electric mixer until smooth and creamy, about 2 minutes. Add 100g superfine sugar and 2 teaspoons vanilla extract; beat until combined and fluffy.
- Melt the chocolate: Break 150g dark chocolate into small pieces. Melt gently in a heatproof bowl over simmering water or in short bursts in the microwave, stirring until smooth. Let cool slightly before adding to the filling.
- Combine the filling: Fold the melted chocolate into the cream cheese mixture gently, ensuring a streak-free swirl and a glossy, rich appearance. Be careful not to overmix, which can deflate the mixture.
- Whip the cream: In a separate bowl, whip 200ml heavy cream until soft peaks form—when the mixture holds a gentle shape but is still silky. Use a whisk or electric mixer, about 3 minutes on medium-high speed.
- Fold the whipped cream: Gently fold the whipped cream into the chocolate mixture in three additions, maintaining airiness. Use a spatula, swooping from bottom to top, until fully combined and smooth.
- Pour and smooth: Transfer the filling into the chilled crust. Use the spatula to spread evenly and smooth the surface. Tap gently on the counter to settle air bubbles. Cover loosely with plastic wrap.
- Set in the fridge: Chill for at least 4 hours, preferably overnight. During this time, the cheesecake will firm up, flavors meld, and the texture will become velvety and dense.
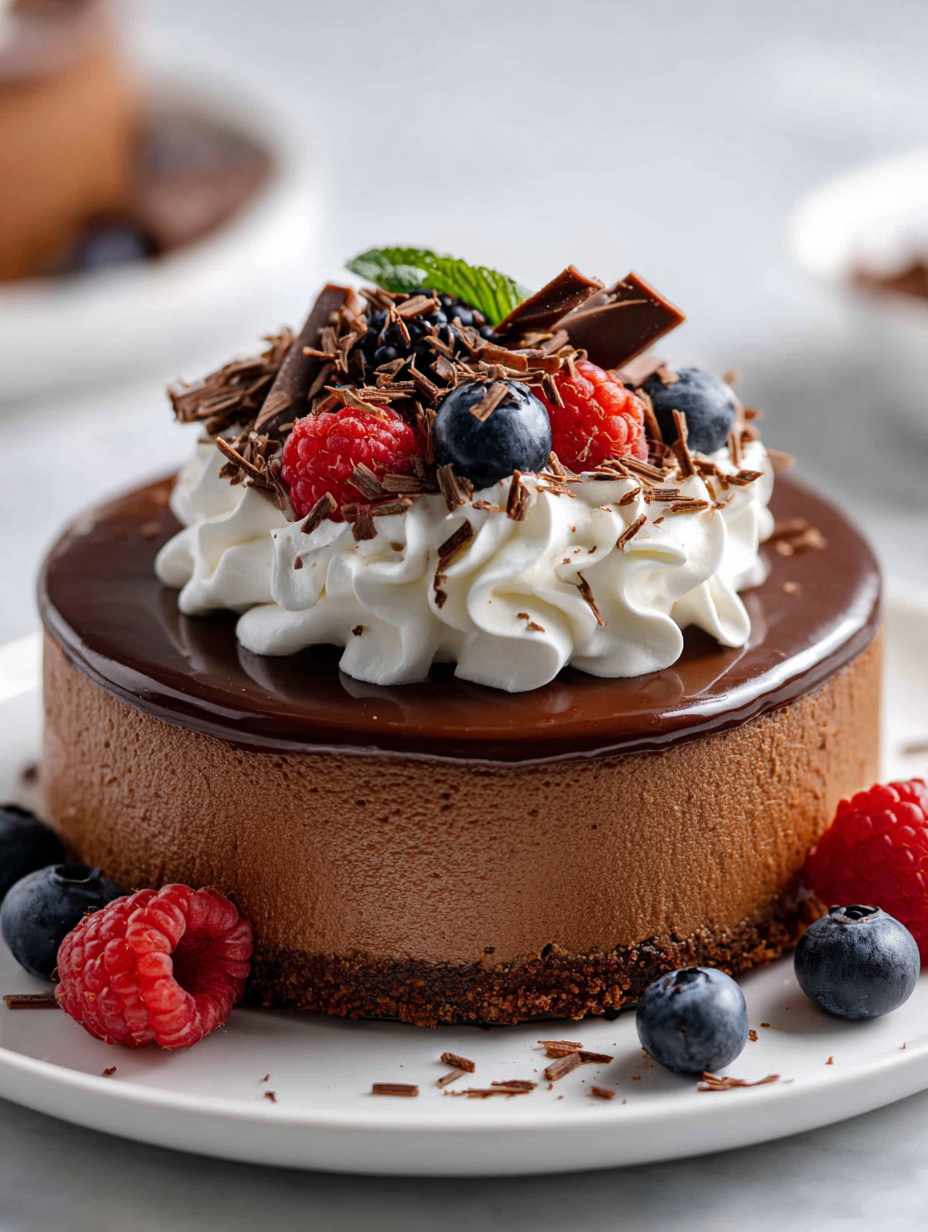
- Final touch: Before serving, run a thin knife around the edge of the pan to loosen, then carefully remove the springform. Optionally, garnish with chocolate shavings or fresh berries. Slice with a warm knife for clean cuts.
Once set, run a thin knife around the edge of the pan before unclipping. Slice with a warm, sharp knife for clean pieces. Serve directly from the pan or transfer to a platter. Keep refrigerated until ready to serve, ideally within 2 days for best texture.
How to Know It’s Done
- Crust is firm and holds shape when pressed, no crumbs falling apart.
- Filling is set with a slight wobble in the center, not liquid.
- Surface is glossy, not dull or cracked, with no liquid pooling.
No-Bake Chocolate Cheesecake
Ingredients
Equipment
Method
- Place your cookies in a food processor or zip-top bag and crush them into fine crumbs, about 15 seconds in the processor or bash with a rolling pin until even and no large chunks remain.
- Melt the butter in a small saucepan or microwave in short bursts until just bubbling. Let it cool slightly.
- In a mixing bowl, combine the cookie crumbs with the melted butter. Stir with a spatula until evenly coated and crumbly enough to hold together when pressed.
- Press the crumb mixture firmly into the bottom of a springform pan, creating an even crust. Use the bottom of a glass or your fingers to press down. Chill in the fridge for about 10 minutes to set.
- In a large bowl, beat the softened cream cheese with a whisk or electric mixer until smooth and fluffy, about 2 minutes.
- Add superfine sugar and vanilla extract to the cream cheese. Beat again until well combined and slightly airy.
- Break the dark chocolate into small pieces and melt gently over simmering water or in short bursts in the microwave, stirring until smooth. Allow to cool slightly.
- Fold the melted chocolate into the cream cheese mixture gently, ensuring a glossy, even color. Avoid overmixing to keep it airy.
- Whip the heavy cream in a separate bowl until soft peaks form, about 3 minutes. Look for a glossy, billowy texture.
- Gently fold the whipped cream into the chocolate mixture in three additions, maintaining a light, airy texture.
- Pour the filling into the chilled crust and smooth the top with a spatula. Tap the pan lightly on the counter to remove air bubbles.
- Cover the pan loosely with plastic wrap and refrigerate for at least 4 hours or overnight until set and firm, with a glossy surface.
- Before serving, run a warm knife around the edge of the pan, then carefully remove the springform. Slice with a warm knife, garnish as desired, and enjoy this luscious, velvety cheesecake.
Notes
Pro tips for perfect cheesecake
- Use room temperature cream cheese to ensure a smooth, lump-free filling that blends easily.
- Melt chocolate slowly over low heat or in short microwave bursts to avoid grainy texture.
- When crushing cookies, aim for fine crumbs without big chunks for an even crust.
- Gently fold whipped cream into the chocolate mixture to keep the filling airy and light.
- Chill the crust before filling to prevent it from crumbling when you add the cheesecake mixture.
- Run a warm knife around the edge of the pan before releasing the springform for clean slices.
- Let the cheesecake sit at room temperature for 10 minutes before slicing to enhance flavor and texture.
Common Mistakes and How to Fix Them
- FORGOT to pre-chill the crust, resulting in a crumbly base. Fix: Chill crust before adding filling.
- DUMPED too much chocolate, making the filling bitter. Fix: Melt chocolate gently and measure carefully.
- OVER-TORCHED the chocolate, causing a grainy texture. Fix: Melt chocolate slowly over low heat or in short bursts.
- MISSED the room temperature of cream cheese, leading to lumps. Fix: Soften cream cheese at room temp before mixing.
Quick Fixes for Cheesecake
- If the crust crumbles, splash in a little extra melted butter and press again.
- When chocolate seizes or becomes grainy, patch it by whisking in a teaspoon of warm cream.
- Dumped too much chocolate? Fix with a splash of warm milk or cream to loosen the mixture.
- Overbaked or burnt chocolate melts into a bitter mess—shield with lower heat and melt slowly.
- heading:
Prep, store, and reheat tips
- Prepare the crust: Crush cookies and mix with melted butter up to 2 days in advance. Keep covered in the fridge; the crust firms up better after chilling.
- Make the filling: Assemble and mix the cream cheese and chocolate filling, then store in an airtight container for up to 1 day. Give it a quick stir before pouring.
- Chill the assembled cheesecake: Once the cake is set in the fridge, it can stay covered for up to 2 days. Flavors meld and texture firms up overnight.
- Reheating is unnecessary; serve chilled. If you prefer slightly softer slices, let the cheesecake sit at room temperature for about 10 minutes—watch for a gentle wobble and a rich aroma.
Top questions about no bake cheesecake
1. Why is my cream cheese lumpy?
Use softened cream cheese for smooth mixing and a velvety texture. Cold cream cheese can cause lumps.
2. Why does my crust fall apart?
Chill the crust for at least 10 minutes before adding filling to prevent crumbling. It helps it set better.
3. Why did my chocolate seize or become grainy?
Melt chocolate slowly over gentle heat or in short bursts in the microwave to avoid seizing or graininess.
4. How do I know when whipped cream is ready?
Whip the cream until soft peaks form; don’t overwhip or it’ll turn buttery and lose volume.
5. Can I use cold ingredients?
Use room temperature ingredients for a smooth, even batter; cold ingredients can cause lumps or uneven mixing.
6. How long does it take to set?
Set the cheesecake in the fridge for at least 4 hours, preferably overnight, so it firms up properly.
7. My cheesecake is too soft or too firm, what now?
If the filling is too soft, extend the chilling time. If it’s too firm, let it sit at room temp for a few minutes before slicing.
8. How do I get clean slices?
Run a warm knife around the edge before removing the springform for clean, neat slices.
9. Can I make this gluten-free?
You can replace cookies with gluten-free biscuits or graham crackers, but the flavor and texture will shift slightly.
10. How should I store leftovers?
Storing: Keep cheesecake covered in the fridge for up to 2 days. For longer storage, freeze for up to a month, thaw in the fridge overnight.
This no-bake chocolate cheesecake isn’t just a quick fix; it’s my secret weapon for those moments when unexpected guests show up or I forget to plan dessert. It comes together faster than you can say ‘sweet tooth,’ and somehow, it always hits the spot without turning on the oven.
There’s something about the simplicity of smashing cookies, mixing creamy filling, and letting it set in the fridge that feels like a little act of rebellion against the chaos of busy days. It’s honest, unpolished, and perfect for when you want something rich and satisfying without the fuss.

Hello, I’m Oliver James, the person behind Melting Into Flavors. Cooking is my greatest passion, and it’s been the driving force in my life for as long as I can remember.
It’s not just about food for me; it’s about creating experiences, connecting with others, and sharing the love I have for what’s on the plate. Through this blog and my café, I’m able to share my journey with all of you and hopefully inspire some of your own culinary adventures along the way.


