Getting that perfect golden crust on chicken supreme is a small dance of patience and technique. It’s about balancing heat, timing, and a bit of prep to get crispy skin without sacrificing juicy meat inside. I’ve messed it up more times than I can count—burnt skin, dry chicken, the whole chaos. But when it comes together, that crackle and the warm, tender interior make it worth every effort.
This recipe isn’t just about the look—though that crispy skin is irresistible—it’s about the satisfaction of mastering a classic dish with a little twist. It’s perfect for when I want a straightforward dinner that feels a bit special, and I can’t help but smile every time I hear that satisfying crackle as I cut in. It’s one of those dishes that reminds me how simple techniques can elevate everyday cooking into something memorable.
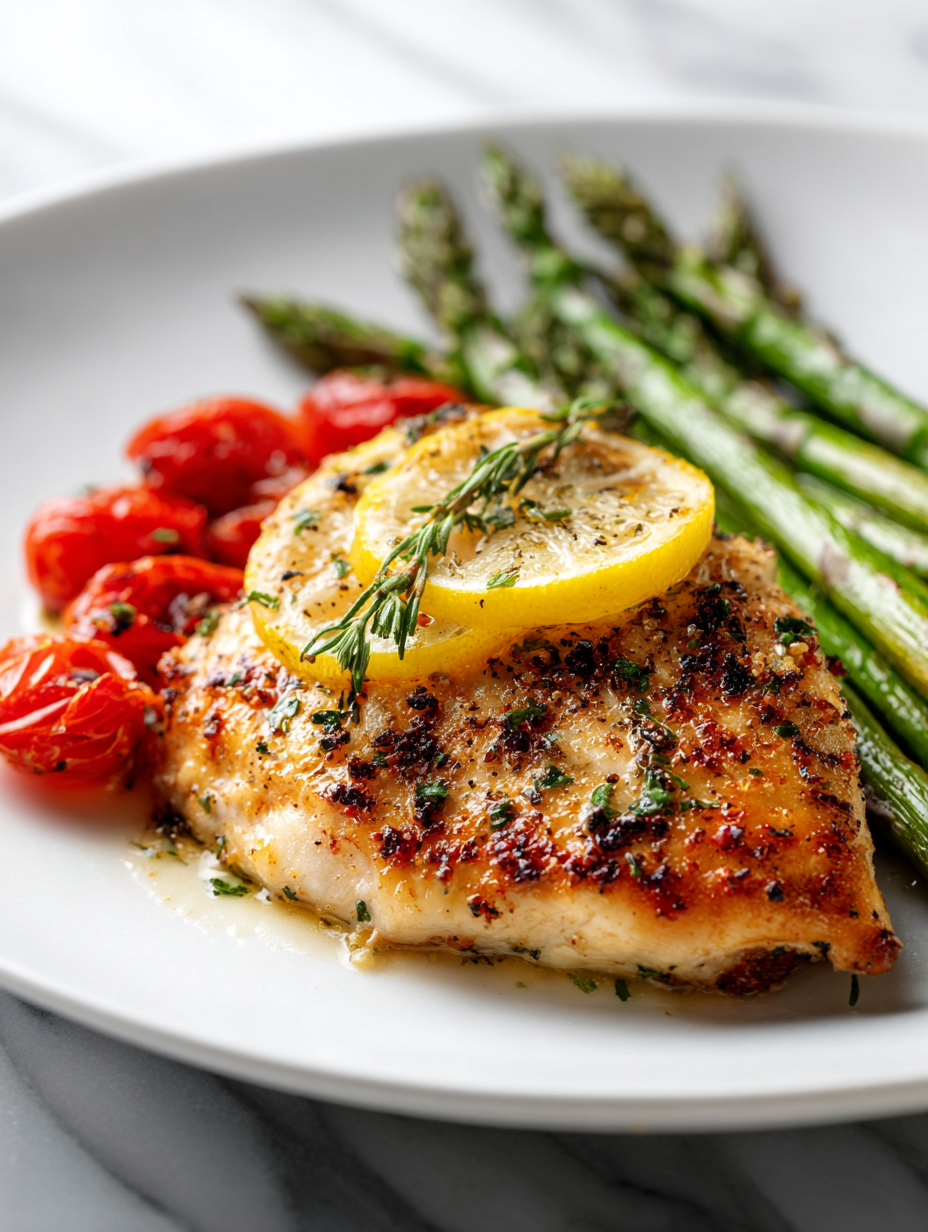
Focusing on how to achieve the perfect golden crust on chicken supreme without drying out the tender meat inside, emphasizing the balance between crispy skin and juicy interior.
Cracking the Chicken Code
- I used to dread making chicken because I’d always end up with either dry meat or soggy skin, but this recipe changed that for me.
- There’s a strange pride I feel when I hear that perfect crackle as I slice into the crispy skin—the kind of satisfaction only a well-cooked chicken gives.
- This dish takes me back to family Sunday dinners, where Mom’s kitchen smelled of roasting herbs and roasted chicken, simple and honest.
- Getting that golden, crispy crust just right feels like a small victory every single time, especially after a few failed attempts.
- I love how this recipe makes me slow down—focusing on each step, smelling the rich aroma, and really appreciating the process.
The story behind this recipe
- This recipe came from a moment of kitchen chaos—trying to save a dinner party with underwhelming chicken that refused to crisp up. I started experimenting with different heat levels and timing, aiming for that crispy skin without sacrificing juicy meat inside. After countless burnt edges and soggy patches, I finally hit a groove that works every time now—crisp on the outside, tender inside. It’s become my go-to for when I want something impressive but straightforward, a real test of patience and finesse in the pan.
- There’s something satisfying about paying close attention to each step—how the smell shifts from raw to nutty, how the skin crackles just right, and how the juices stay locked in. It’s a dish that rewards focus and a little bit of trial and error, turning a simple cut of chicken into a small celebration of technique. Plus, I love how it feels like a little victory every time I manage to get that perfect golden crust.
- heading: ‘The story behind this recipe’
Historical & Cultural Tidbits
- Chicken Supreme became popular in French bistro menus in the early 20th century, known for its rich sauce and tender meat.
- The dish’s name suggests a regal or elevated status, often associated with luxurious ingredients like foie gras or truffles, though recipes vary widely.
- In some regions, Chicken Supreme was traditionally served with a creamy mushroom sauce, highlighting the French influence on classic chicken dishes.
Ingredient breakdown
- Chicken breast: I prefer skin-on for that crispy exterior, but if you want leaner, go skinless—just be mindful to keep it moist. The skin gives a smoky crunch I crave.
- Salt and pepper: I season generously—don’t be shy. That initial sprinkle sets the stage for flavor to develop through the cooking process.
- Butter: I love using a mix of butter and oil—adds richness and a golden hue, plus helps prevent burning. Smells like toasted nuts when fried just right.
- Herbs (thyme or rosemary): Fresh herbs add a fragrant punch that lifts the dish. I toss them in during the final minutes for maximum aroma.
- Lemon juice: Brightens everything at the end—think of it as a fresh splash of sunshine that cuts through the richness and adds a zing.
- Garlic: I smash and add early, letting its aroma seep into the oil—just enough to infuse but not burn, so it stays fragrant and sweet.
- Cooking fat: I keep the pan well-oiled but not swimming—enough to crisp the skin and sear evenly, creating that irresistible crackle.
Spotlight on key ingredients
Chicken breast:
- I prefer skin-on for that crispy exterior, but if you want leaner, go skinless—just be mindful to keep it moist. The skin gives a smoky crunch I crave.
- Salt and pepper: I season generously—don’t be shy. That initial sprinkle sets the stage for flavor to develop through the cooking process.
- Butter: I love using a mix of butter and oil—adds richness and a golden hue, plus helps prevent burning. Smells like toasted nuts when fried just right.
Herbs and lemon:
- Herbs (thyme or rosemary): Fresh herbs add a fragrant punch that lifts the dish. I toss them in during the final minutes for maximum aroma.
- Lemon juice: Brightens everything at the end—think of it as a fresh splash of sunshine that cuts through the richness and adds a zing.
Notes for ingredient swaps
- Dairy-Free: Substitute butter with olive oil or a dairy-free margarine. You’ll lose some richness and that golden hue, but the crispy skin stays intact.
- Low-Sodium: Use unsalted butter and skip added salt until tasting. The dish will still be flavorful from the herbs and pan drippings.
- Herb Variations: Swap thyme or rosemary for sage or oregano for a different aromatic punch—each adds a unique character to the dish.
- Lemon Alternative: Lime juice or a splash of white wine vinegar can brighten the dish similarly, with a slightly different tang.
- Garlic Sub: Use garlic powder or garlic-infused oil if fresh garlic isn’t available. The flavor will be milder but aromatic.
- Skinless Chicken: If you prefer leaner, use skinless chicken breasts—just be extra careful with searing time to prevent drying out.
- Oil Choices: Swap vegetable oil for clarified butter or duck fat for richer flavor and better high-heat performance.
Equipment & Tools
- Heavy skillet (cast iron preferred): Provides even heat for crispy skin and thorough searing.
- Tongs: Handles the chicken without piercing, preserving juices.
- Thermometer: Checks internal temperature for perfect doneness.
- Paper towels: Pat dry chicken to ensure crisp skin.
- Sharp knife: Slices the chicken cleanly for serving.
Step-by-step guide to pan searing
- Equipment ready: heavy skillet (preferably cast iron), tongs, spoon, thermometer, paper towels, and a sharp knife. Preheat your skillet over medium-high heat, around 200°C (390°F), until hot but not smoking.
- Pat the chicken supreme dry with paper towels—moisture is the enemy of crispiness. Season generously with salt and pepper on all sides.
- Add a splash of oil (about 1 tbsp) to the pan—enough to coat the bottom—and swirl to spread evenly. Wait until it shimmers—this is your cue for the chicken.
- Place the chicken skin-side down in the hot pan. Press gently to ensure contact. Sear for about 5-7 minutes, until the skin is golden-brown and crispy. Use tongs to lift and peek—if it sticks, give it another minute.
- Flip the chicken and cook for another 4-5 minutes. Reduce heat slightly if the skin is browning too fast. Add fresh herbs (like thyme or rosemary) during the last 2 minutes for aroma.
- Check the internal temperature with a probe—aim for 65°C (149°F) for juicy, fully cooked chicken. If not there, cover and cook a bit longer, or finish in the oven at 180°C (350°F) for 8-10 minutes.
- Remove from pan, transfer to a plate, and tent loosely with foil. Let it rest for 5 minutes—the juices reabsorb and the skin stays crispy.
- Pour off excess fat from the skillet, leaving the flavorful browned bits. Deglaze with a splash of lemon juice or stock, scraping up the fond to make a quick sauce. Serve the chicken sliced or whole, with the pan sauce drizzled over.
Let the chicken rest loosely covered with foil for 5 minutes. Finish with a squeeze of lemon and a drizzle of pan sauce. Plate with herbs for color and aroma.
How to Know It’s Done
- Skin is crisp and golden-brown, not burnt or soggy.
- Internal temperature reaches 65°C (149°F) with a probe.
- Juices run clear when pierced, and meat is tender yet firm.
Crispy Pan-Seared Chicken Supreme
Ingredients
Equipment
Method
- Pat each chicken breast dry with paper towels until no moisture remains; this step ensures the skin crisps up nicely. Season generously with salt and pepper on all sides.
- Heat a heavy skillet over medium-high heat until shimmering hot. Add olive oil and swirl to coat the bottom evenly. When the oil shimmers and just starts to smoke lightly, it's ready for searing.
- Carefully place the chicken breasts skin-side down into the hot skillet. Press gently with tongs to ensure full contact, and listen for a sizzling sound. Sear for 5-7 minutes without moving, until the skin is deep golden and crispy.
- Use tongs to flip each chicken and cook for another 4-5 minutes on the other side. During the last minute, add crushed garlic, herbs, and butter to the pan. Spoon the melting butter and herbs over the chicken to infuse flavor and aroma.
- Check the internal temperature with a thermometer; it should read about 65°C (149°F). Once done, transfer the chicken to a plate and loosely tent with foil. Let it rest for 5 minutes to allow juices to redistribute.
- Meanwhile, squeeze fresh lemon juice over the rested chicken for brightness. Optionally, add a bit of lemon zest for extra citrus aroma. Serve slices of chicken with the crispy skin facing up, garnished with fresh herbs if desired.
Notes
Pro tips for crispy, juicy chicken
- Crispy Skin: Ensure the chicken skin is completely dry before searing to maximize crispiness and prevent steaming.
- Hot Pan: Preheat your skillet until it shimmers—this helps achieve an even, golden crust quickly.
- Proper Sear: Press chicken gently into the pan for full contact; this promotes crisp skin and even cooking.
- Monitor Heat: Adjust the heat as needed—if the skin browns too fast, dial it down to avoid burning while keeping the inside juicy.
- Rest Time: Rest the chicken loosely tented with foil for at least 5 minutes after cooking to lock in juices and keep the skin crispy.
- Deglaze for Sauce: Use the browned bits in the pan to make a quick, flavorful sauce—adds richness and ties the dish together.
- Thermometer Use: Check internal temp—aim for 65°C (149°F)—to ensure perfect juiciness without overcooking.
Common mistakes and how to fix them
- FORGOT to preheat the pan → Always preheat until shimmer for crisp skin.
- DUMPED too much oil → Use just enough to coat the bottom for even searing.
- OVER-TORCHED the skin → Reduce heat if it browns too fast to prevent burning.
- SKIPPED resting time → Rest for 5 minutes to keep juices inside and skin crispy.
Quick fixes and pantry swaps
- If skin isn’t crispy, pat chicken dry and increase heat to shimmer.
- When chicken is undercooked, pop it in the oven at 180°C (350°F) for 5 minutes.
- Splash a bit of lemon juice if the pan sauce tastes flat or dull.
- Patch burnt skin by scraping off char and searing again briefly on lower heat.
- Shield soggy skin with a quick blast under the broiler for 30 seconds, watching closely.
Prep, store, and reheat tips
- Prep the chicken: Pat dry and season the night before; the salt and spices penetrate better, making for juicier meat.
- Store in an airtight container in the fridge for up to 24 hours; the skin stays crispy longer if uncovered briefly before searing.
- Refrigerated cooked chicken lasts 3-4 days; reheat in a hot skillet or oven until warmed through and skin regains some crispness.
- Reheat gently to avoid drying out the meat—use a covered skillet over low heat or warm in the oven at 180°C (350°F) for about 10 minutes.
- For best flavor, serve reheated chicken soon after warming; the skin may lose some crunch but remains tender and flavorful.
Top questions about Chicken Supreme
1. How can I tell when the chicken skin is crispy enough?
Look for skin that looks golden and crispy, with a firm texture when pressed gently. The meat should be juicy and tender when pierced.
2. What’s the best way to know if the chicken is cooked through?
Use a meat thermometer to check for an internal temperature of about 65°C (149°F). The juices should run clear, and the meat should be firm but not dry.
3. How long should I sear the chicken on each side?
Ensure the pan is hot before adding the chicken—shimmering oil helps achieve that perfect crust. Don’t flip too early; let the skin crisp up first.
4. Why is resting the chicken important?
Rest the chicken loosely covered with foil for about 5 minutes after cooking. This helps reabsorb the juices and keeps the skin crispy.
5. Can I make this with skinless chicken breasts?
Use skin-on chicken for best crispiness and flavor. If you prefer leaner meat, skinless works but may not get as crispy.
6. What heat setting should I use for searing?
Keep the heat medium-high to high for searing. Adjust if the skin burns or doesn’t crisp—lower the heat slightly if needed.
7. Why is drying the chicken skin important?
Pat the chicken dry thoroughly before seasoning and searing. Moisture prevents crispiness and causes steaming instead of searing.
8. How do I make a simple pan sauce?
Deglaze the pan with lemon juice or stock after removing the chicken. Scrape up the browned bits for a quick, flavorful sauce.
9. What if my chicken skin isn’t crispy enough?
If the skin isn’t crisp after cooking, increase the heat slightly or finish under a hot broiler for 30 seconds.
10. How should I store and reheat leftovers?
Store leftovers in an airtight container in the fridge for up to 3-4 days. Reheat in a hot skillet to help regain some crispness.
Cooking Chicken Supreme to that perfect crispy skin while keeping the meat tender is a small but satisfying challenge. It’s an honest skill—one that rewards patience and attention to detail, especially in the way the aroma of seared chicken fills the kitchen. When I get it right, I feel that simple pride, and it’s a reminder that good technique makes all the difference.
This dish feels like a quiet celebration of technique and patience—something I turn to when I want to reconnect with the basics but crave a dish that feels special. It’s a meal that stands out without fuss, perfect for slow weekends or a quick dinner that still feels like an event. Every crackle, every juicy bite, is a small victory worth savoring.

Hello, I’m Oliver James, the person behind Melting Into Flavors. Cooking is my greatest passion, and it’s been the driving force in my life for as long as I can remember.
It’s not just about food for me; it’s about creating experiences, connecting with others, and sharing the love I have for what’s on the plate. Through this blog and my café, I’m able to share my journey with all of you and hopefully inspire some of your own culinary adventures along the way.


